• Steel Soldiers now has a few new forums, read more about it at: New Munitions Forums!

  • Microsoft MSN, Live, Hotmail, Outlook email users may not be receiving emails. We are working to resolve this issue. Please add support@steelsoldiers.com to your trusted contacts.


M1088 camper conversion

ckouba

Well-known member
Steel Soldiers Supporter
562
1,527
93
Location
Oregon
Hi all.

To start with, thank you for the existence of this forum. I haven't been around here too long or spent much time in the other subforums but there seems to be a very high signal to noise ratio within the FMTV community, and a number of very knowledgeable people willing to share and help. I hope to be able to eventually contribute in that manner as well. In the meantime, a rambling introduction and project statement follows. Feel free to ask questions or point out things where I may need some re-direction.

After spending ~2 years of casually vacationing throughout the north- and south-west US in a minimally converted EB E350 cargo van (we're not "vanlifers" or what have you), my wife and I were ready to move on. We've had bumper pull and slide-in/truck campers before and while we enjoyed them, they had compromises we weren't fond of and didn't have the durability or overall storage capacity we desire. With our time with all of these various vehicles, we developed our list of "wants" for what our ultimate RV would be: stand up height (I'm 6' 2"), dedicated bed space, reasonable kitchen/galley, full bath, lots of storage, and all wheel drive. We came up with a variety of vehicular options but based on budget goals (sorry Earthroamer), we decided that a full size 4x4 pickup with our own box outfitted in the manner we sought was our strongest play. We started looking.

And I couldn't find a rig.

Well, I could find them but... We had picked a ~$20k budget point for the base vehicle, and nothing in that ballpark was terribly attractive. I wanted diesel but not a 6.0 Powerstroke, and any of the Cummins that were in that range were 300K or higher mileage and looked it on the inside. I couldn't bring myself to jump on any of those. I also couldn't bring myself to jump to the ~$35k level to acquire a base vehicle in the condition we desired. I would occasionally (twice, three times maybe, over 16 months?) find a decent offering, but they were gone before I could get there- including the one where I said I want it and will be there in the morning (was out of town) and it got sold that evening.

But I always knew what my dream rig would be though: a 6x6 with high speed gears and a big box on the back. I also knew this would never happen for a couple of reasons-
  • Don't meet your heros- I had never touched one, never mind sat in or driven one. Would I even like it?
  • I was too chicken to roll the dice and pick one up from an auction.
  • I was too cheap to pay the $'s at a flipper (despite understanding the service they provide)
  • The wife had never seen, touched, or sat in one either, and despite saying she was OK with the idea, I didn't want to commit her to it.
  • Having done a little homework, I understood that high speed gears are already a fairly tough find, even more so if you need 3 sets for a 6x6.

So, I kept cruising Craigslist, etc... looking for my reasonable mileage, one ton, 4x4 pick up... ...until this happened.

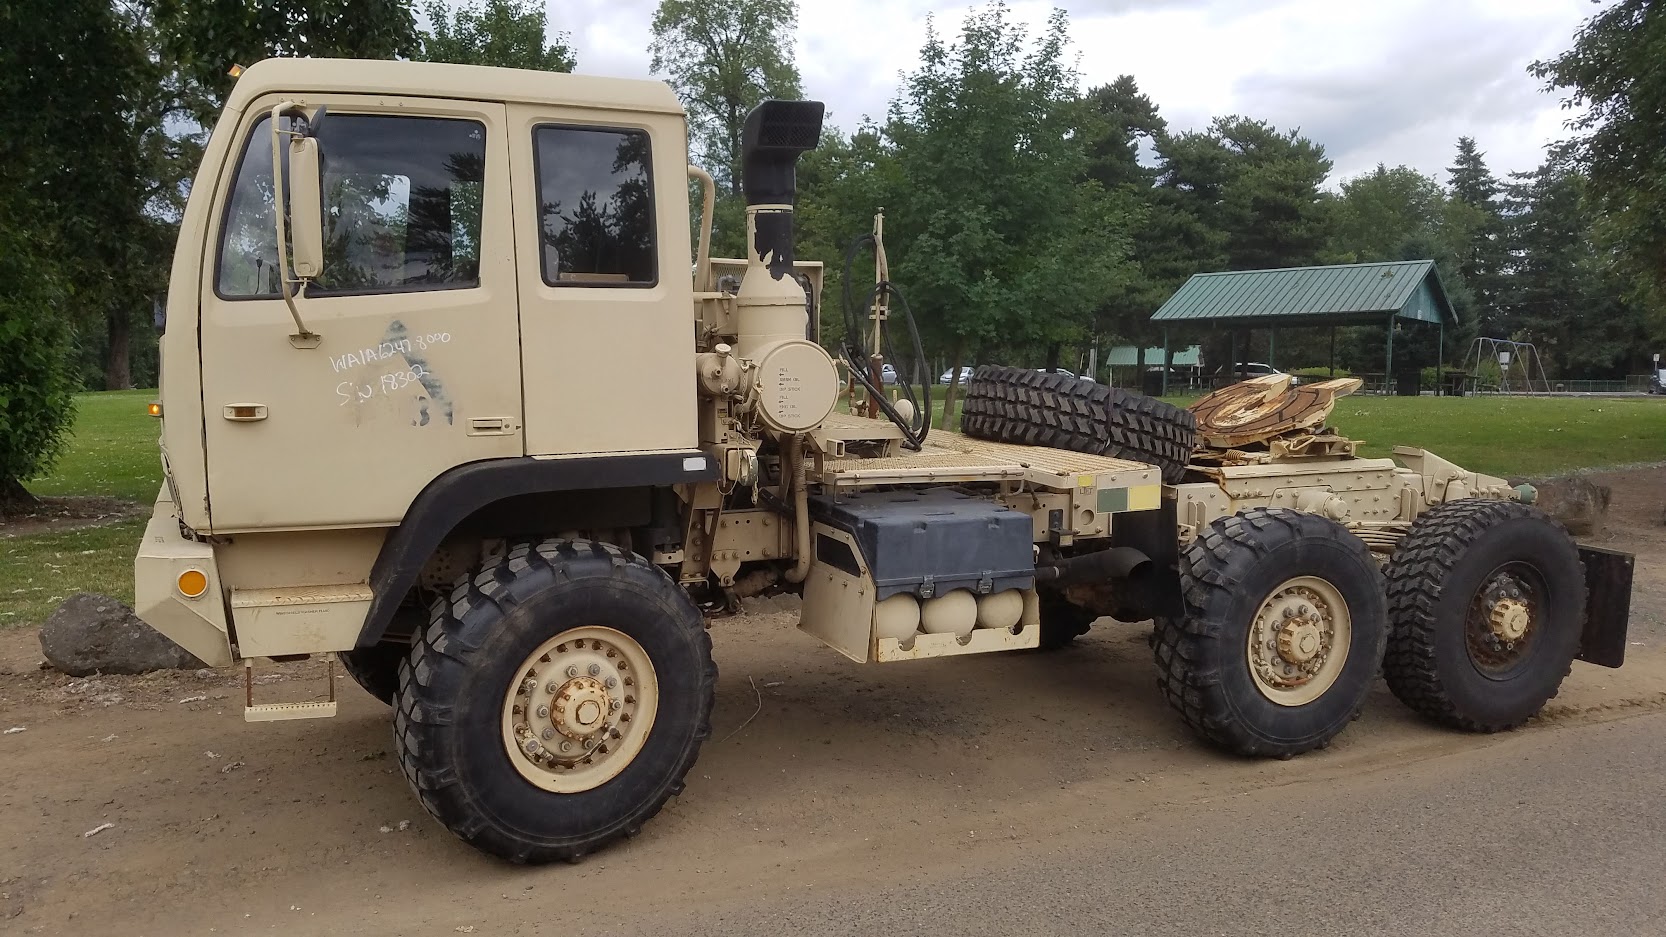
I would ply CL for LMTV search terms occasionally, and one night this past June, staring back at me from the screen was a 2000 M1088A1, about ~30 minutes away, with a clean bill of health from CAT of Portland, a new full set of 7 tires, a set of snow chains, and HIGH SPEED GEARS INSTALLED. No auction. No transport hassles. I could see/touch/sit in/test drive it!

I called. It was true. The seller bought it to build up but his wife wanted to travel now, so they bought a finished rig (gorgeous!) and were moving this one out. I set up to see it the next day with my wife. Test drive went great- it had things which needed some attention but I was pretty sure I could take care of them. We took a few minutes to chat about it and decided we'd do it. We left a deposit, came back the next day with a check, and drove it home!

On the way home from picking up:


As for what we intend to do with it, the current plan is something along the lines of this:
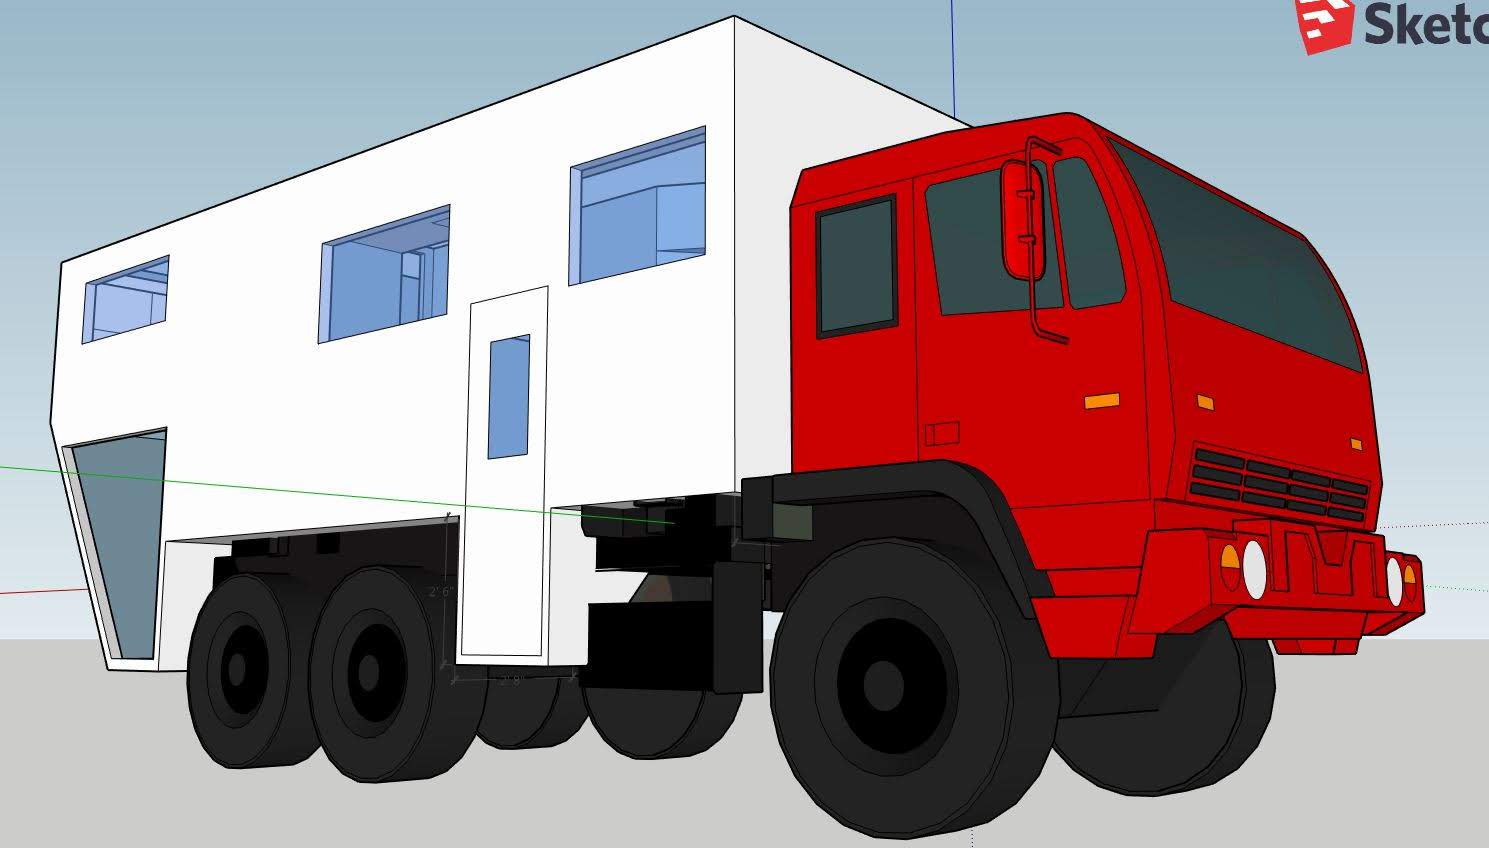

Interior-ish view:


With this becoming our reality, we have also added a cab to box pass-thru to the list of wants, which necessitates removal/relocation of a bunch of stuff. Another addition to the design brief is internal storage for spare tire and bikes. We want to have as little as possible in view and/or getting dusty or wet. We have touring kayaks we also want to keep with us on some trips and by controlling the total height of the box, I think we can get away with this (~13' 2" with the boats on the roof). I hope to make them the only gear stored on the exterior.

This will be a massive project. I have probably done all of the elements required for it, but just not all for one single project. Thanks to those who have answered the questions I have already posted. There are more coming!
 
Last edited:

ckouba

Well-known member
Steel Soldiers Supporter
562
1,527
93
Location
Oregon
First things first: put some round tires on this thing!

It felt like some of these tires were getting square and with a new set lying in the corner, it became the first "repair". I do have a decent mechanical and automotive background, but this is a whole new world for me in terms of scale of work. I read up on torque specs and other things for the wheels and lugs, ordered up some O-rings, and picked up an electric impact gun good to 450 ft-lbs. The one thing I never noticed anywhere?

  • All the studs and lug nuts on the left side of the vehicle are left hand thread

I know- read the TM's. I tried but never noticed this detail because honestly I likely was only skimming them at best. I don't even know where I eventually noticed this. I felt like an idiot. Especially since I had been using an 8 foot cheater bar on a 3/4" drive breaker bar to spin and strip one of the lug nuts.

The aftermath:


So this exercise got me acquainted with the local Napa which actually has a tech who knowledgeable with the heavier duty truck parts. After recovering my pride and picking up a few new studs and lugs for spares, I successfully changed the tires over the course of a week or so.

Out with the old:


On with the new:


While they were torn down, I took the liberty of painting the wheel outers and the axle centers too. Looking good now (although it's a crappy angle), and I began the tear down process for the 5th wheel and deck structure.

New shoes:


For my next trick, I wanted to visualize just exactly what the box on the back might look like upon construction, so I scabbed together some lumber scraps to see what the side profile would be.


This is when I started reconsidering the passthrough plan. I realized that I would have to strip off the intake and spare hoist only to construct a new intake and figure out another system to store the spare. It would still take up the same space and wouldn't be an OEM system. It started to seem like it's not worth the effort.
 

ckouba

Well-known member
Steel Soldiers Supporter
562
1,527
93
Location
Oregon
I still wasn't ready to abandon the pass through idea though. With our truck camper, that was one of the things which I had always wanted and even if we didn't use it all that much, I could see how it would be useful. After burning some additional creative calories, I thought up a fairly simple manner to load and store the spare- make a ramp which flops down to the side from the rear cargo bay and just roll the spare in and out. The space will be at least 4' tall and if I hinge two 4' pieces together, I can probably roll it up that incline if needed. If that proves too difficult, there are manual winches which I can adapt to complete the task. At this point, the true tear down began.

Decking removed, intake torn down:


Trans cooler relocated:


I knew I wanted to keep the intakes up high in the space behind the cab. Having seen solutions like this on the web, I tracked down two Donaldson PSD10's and started copying a design I had seen. Turns out it was way too flexible and the air cleaner seemed like it would vibrate back and forth, likely hitting the cab or box. That support came out.

I ended up using a pair of 2x2 square tubes on each side, mitered and tapered into the air lift beam with a perch at the top where the filters mount. They are rock solid. On the driver's side, I took a circular section out of the tubes which was large enough to fit the expansion tank, and then cut off the tank mount from the original intake and welded that in.

Expansion tank installed:


For my next trick, I needed to scab together a few elbows and tubing to connect the 5" output from the filters to the 4" input of the OEM intake. I ordered 5 to 4 inch silicone couplers and a bunch of elbows from a place I found online and picked up some straight stock at a local place. The specific component I needed was a Y-pipe which flowed nicely into the OEM intake. The other elbows were a pretty easy task.

After some careful measuring and then more careful measuring, I started to cut. And then weld.

Step 1 - Y joint


Post-weld interior of Y joint:


Due to the offset nature of the intake, the pass side upward bend would also weld directly to the Y joint. In addition, the constraints to get the Y-pipe to flow smoothly into the OEM tube required another elbow getting welded to the output end of the Y joint. In total, there are 4 elbows cut and welded to form this assembly:


After that, the rest seemed easy- just join a few 90's with some straight sections of appropriate length. Eventually, you end up with something like this:


The couplers allow a bit of flex and imprecision for the system. I had to cut ~2' of the OEM tube to get my Y-pipe to connect smoothly, but it worked out fantastically with the coupler slipping on just aft of the intake support on the motor. Almost like I planned it that way.

In the interim, I had the driveshafts out and rebuilt. This resolved most of the vibrations which persisted after the changing of the tires. There is still a little bit to go, but it is WAY better than it was when I got it.

Other things also done are the relocation of the hydraulic controls and the manual pump. These are now on the pass side behind the cab. It's not the most effective use of space, but it's what I am going with for now. I have a few loose ends to tie up but at this point, I am about ready to start thinking seriously about building the box!

As it sits today:
 
Last edited:

AllenF

Member
56
38
18
Location
Riverside, Ca
Chris, this is a great start. [thumbzup] I will be following closely. I got our 1997 M 1083 in December 2019. As you noted, buying blind from an auction and, like you, never laying eyes or hand on one in person can be a bit unnerving. But after getting it delivered and having such a great site as Steel Soldiers to guide us along the way I was stupid enough to go for it. Like you I was not willing to buy into Earthroamer and other brands, due to the cost. I also feel that the restoration process with my hands and mind will help me to better understand all of the in's and out's of the rig.
When something goes south, and it will just give it time, I know I will be far better equipped to get it resolved and I know who and how it was fixed, BY ME:naner:
Every RV has compromises but knowing what you want to have and where you will be taking it can give you the best out come and rig. Like you I am looking forward to the process.

Life-it's not just about the destination. It can often be more about the journey. So sit back and enjoy the ride, with all the bumps and burses and smooth spots too.
 

ckouba

Well-known member
Steel Soldiers Supporter
562
1,527
93
Location
Oregon
Questions were posed in another thread regarding the space benefit of relocating the spare and intake. I took out the tape measure and took some rough guess-timates which should get you close if you're thinking you want to do this.

Total space occupied by the equipment is about 24". I didn't measure this prior to stripping it down but based on adding the spaces back together, it seems close. The actual math is 25", but there may be some overlap in what I have re-installed when comparing it to what I took out.

In the configuration I have chosen, the filters and associated piping, etc... require about 11" of space between the back of the cab and the front of the camper. The filter itself is about 9" wide and I figured an inch on each side to allow for chassis flex and such, which gets me to the ~11" width . The net result is the space gained by removing all the crap and then adding stuff back in is almost exactly equal to that which the air filter occupies- about 14". Other configurations may be possible, like a low, sealed filter with a snorkel to up high for intake, which might save additional room, but I have seen my chosen configuration at work on other builds, so it's a known quantity and I felt confident it'd work.

While 14" may not seem like a HUGE amount of space, the other critical element in play was the ability to incorporate a passthrough between the cab and camper. With the intake and spare tire in their OEM location, this is not a possibility. While I know it's going to be work in the short term, I anticipate the investment to be worth the convenience in the long term. The passthrough is something I want.

For the distance from frame rail to the top of the trans, I believe the actual measurement is ~10". I plan to use 12" as the dimension to ensure clearance for my build.
 

ckouba

Well-known member
Steel Soldiers Supporter
562
1,527
93
Location
Oregon
Don't forget you can dog house a box over the tranny ... allowing for lower roof line overall. Tis my plan.
With a 1088, one frame doubler is inside the main rail and one is on the outside. The stacked rails seen on the other variants are not found on the 1088. This leaves the tops of the rear tires about ~1" (max) below the top of the main chassis frame rail, so in my case, I actually want to build upwards for clearance before building outward with the box.

Basing it off of others I've seen on the net, a floor level approximately even with the cab level will be my goal. This should give more than adequate clearance all around and still keep it to a manageable overall height (right at 12', slightly more with solar panels and protective rails maybe). As an example, this is 2ifoverland's former rig and fairly representative:


My "single-height" frame rails:


If anyone is looking to get rid of a set of the doublers off of a 1083 or equivalent, I'd be interested in grabbing them.
 

ckouba

Well-known member
Steel Soldiers Supporter
562
1,527
93
Location
Oregon
Nice. Who makes the transmission cooler. Model # ?
It's the OEM one with a new set of fans and a simple, flat shroud. I had new lines made up and fabbed up the mount. It presently sets on posts on the crossmember but I may revise that once I have the subframe constructed. I tried to keep it as simple as possible.
 

B-Dog

Well-known member
164
288
63
Location
Denver, CO
If anyone is looking to get rid of a set of the doublers off of a 1083 or equivalent, I'd be interested in grabbing them.
Hit me up this spring. I'm pretty sure I'm getting rid of mine but I'm not ready to part ways until my plan comes together a little further.

That being said, I'm not sure why you want to go up. A flat bottom box is certainly easier than having to build around the tranny but you've already gone to all the work for the pass-through so you're not taking short cuts. I guess my biggest pet peeves with a lot of builds are 1. when you see 6" of open air space under a box and 2. the stairs going to a door 5' off the ground. It feels like you should be wearing fall protection when you step out the front door. - I'm not even that old.
 

ckouba

Well-known member
Steel Soldiers Supporter
562
1,527
93
Location
Oregon
Hit me up this spring. I'm pretty sure I'm getting rid of mine but I'm not ready to part ways until my plan comes together a little further.

That being said, I'm not sure why you want to go up. A flat bottom box is certainly easier than having to build around the tranny but you've already gone to all the work for the pass-through so you're not taking short cuts. I guess my biggest pet peeves with a lot of builds are 1. when you see 6" of open air space under a box and 2. the stairs going to a door 5' off the ground. It feels like you should be wearing fall protection when you step out the front door. - I'm not even that old.
Thanks B-Dog. I may have sourced a set locally but will drop a line if that falls through.

I won't have an air gap between the box and chassis, but there will be sufficient space to allow full articulation of the suspension and avoid the tires scrubbing the bottom of the box. The tires are just at the level of the frame and the suspension has 7-8" of travel, so I will add in that plus a little margin for chassis flex and pretty quickly the numbers add up to about a foot or so above the tires.

All these vehicles involve compromise, and part of mine is to have the entry stairway partially built in (see the drawings earlier in the thread). It will complicate construction a little and take up some floor space, but I don't want a huge ladder either. In any case, I don't see how the interior floor surface can be less than ~4' off the ground. An extra 10" or 12" isn't a deal breaker for us.
 
Last edited:

ckouba

Well-known member
Steel Soldiers Supporter
562
1,527
93
Location
Oregon
I've wanted to swap seats out because even though mine were in nice looking shape, they were like riding on lumber. I had been casually keeping an eye on Craigslist and surfing this sub-forum for solutions others have used. This past week, I came across a pair of seats from a <9,000 mile 2018 Subaru Outback Crosstrek and it seemed too good of a deal to pass up- OEM leather seating in gorgeous shape. The seller was willing to let me leave him some money and take one home to see if it fit- and it did!

It wasn't too hard to mount it in the space, and more importantly, it's a massive upgrade for the front office!


I pick up an airbag/shock assembly tomorrow which will replace the completely blown out one I have on the passenger side of the horseshoe. I need to trouble shoot the lift system though, as both the air-over system and the manual pump seem to have stopped working. Time to dig into the TM's, although if anyone has a "check this first" suggestion, I'm all ears.
 

ramdough

Well-known member
1,554
1,727
113
Location
Austin, Texas
I've wanted to swap seats out because even though mine were in nice looking shape, they were like riding on lumber. I had been casually keeping an eye on Craigslist and surfing this sub-forum for solutions others have used. This past week, I came across a pair of seats from a
It wasn't too hard to mount it in the space, and more importantly, it's a massive upgrade for the front office!


I pick up an airbag/shock assembly tomorrow which will replace the completely blown out one I have on the passenger side of the horseshoe. I need to trouble shoot the lift system though, as both the air-over system and the manual pump seem to have stopped working. Time to dig into the TM's, although if anyone has a "check this first" suggestion, I'm all ears.
That seat looks great! Does it let you sit upright with some lumbar support?


Sent from my iPhone using Tapatalk
 

ckouba

Well-known member
Steel Soldiers Supporter
562
1,527
93
Location
Oregon
The seat back profile feels good to my spine and it has decent side bolsters too. It doesn't lock me in like a racing bucket seat would but it's both soft enough and firm enough to be comfortable. Being OEM-issue, I am assuming the seating surfaces will hold up to the usage it's going to see.

In addition to sliding fore/aft, its height and rake are adjustable. The driver side is powered (wouldn't have chosen that but couldn't beat the deal) and it's currently running off a cordless drill battery for the install; the pass side is manual adjust. I have only done a few little trips around town so far but it feels great. I may adjust the tilt of the bottom cushion to raise it up slightly but for now, I couldn't be happier!
 

ckouba

Well-known member
Steel Soldiers Supporter
562
1,527
93
Location
Oregon
It was a good week/weekend for the truck. Picked up the passenger seat from the Subaru and then a used cab airbag from Martin at FMTV Sales. Thurs morning, I ran up to Olympia to pick up a set of frame doublers from Quade at Overland Adventure Trucks to use as a base for my subframe. They should do the trick nicely:


While I was there, I got to look over a build he was doing on an Acela 1088. He had a beautiful pivoting subframe built up on the chassis which was a work of art. He also gave me a few pointers on what to do with mine, including to pull a leaf from the rear spring pack. That tidbit was filed away for future fulfillment.

Thurs evening, the passenger seat went in:


Twins!


Friday the cab airbag and shock assembly went in, without issue even! My cab tilt function ceased functioning so I had to tilt the cab using a jack, but it still got the job done. The difference in ride quality is night and day, and I don't miss the sonic explosion from when the old unit would bottom out or over extend and reverberate through the cab. It's getting civilized.

The piece which is puzzling/frustrating me is vibration on the road. I have a shimmy which I can't track down. The steering wheel doesn't vibrate, so I am making the leaping assumption that it's not either of the two on the front end. I swapped the spare through every rear axle position hoping that when I got rid of one, there'd be an "AH-HA" moment when I got the really bad one off the vehicle, but it never came. Once I got to ~55mph, the shake was in back in play. It's much better since I had the driveline rebuilt, and the way it's acting, I truly believe it's a tire issue and no longer a drivetrain thing. I have plans to build up a static balancer because no one around here (Portland, OR) seems to be interested in trying to balance them for me dynamically.

After spending the afternoon rotating the tires, I dug out the remove-a-leaf plan for the rear springs and set up to give it a shot. As I worked through it, it turned out to be pretty straightforward. Before long, I had the pass side spring pack out, the top leaf pulled (technically the 2nd from the top as the 1088 has an over-ride leaf as well), the spring re-installed, and the truck back on its tires. My only complication was the bolt holding the leaves all together- I thought it needed to be un-bolted prior to removing the pack from the trunnion. Try as I might, it just wasn't coming out- the bolt was spinning with the nut. A call to Quade cleared that up- the assembly drops with the pin installed and you take it out afterward. If you do this, be careful as there is a preload between all the leaves which is released when the nut comes off.

The other trick for re-install is to articulate the suspension (lift the truck by the axles with a jack) to get the axle ends of the spring back onto their perches. In full droop, the control arms for the walking axles pull them closer together which makes attaching the fixed length spring a bit challenging. Get the axles back near the standard ride height and the spring ends are much easier to reinstall.

I took no pics of the process as I was in a bit of a rush, but intend to document it better when I do the driver side.

I got to add to the to-do list as well- something in the defrost function is leaking. I didn't see coolant puddling up but when I turned on the defroster, the windshield fogged up immediately. Need to check into that.
 

ckouba

Well-known member
Steel Soldiers Supporter
562
1,527
93
Location
Oregon
More solid progress over the past week/weekend:

Spring leaf removal has been completed and the ride is WAY better than it was with the full pack. The steps in pictures-

Remove all the nuts from the spring studs sticking through the plate at the top of the rubber tower, and remove the bracket from the end of the spring:


Loosen but do not remove the nut retaining the pin through the leaves (don't worry, you won't be able to actually remove it as the pin spins freely in the hole):


Carefully remove the U-bolts, remembering that once these are removed, a couple hundred pounds of steel is technically unrestrained:


You may need to articulate the suspension to get the studs out of the holes if your axle is at full droop. The tower flexes to accommodate this when bolted but the flex loads the studs and makes them more fond of staying in the tower. Jacking up the axle relieves this pressure.

The difference in spring length vs. axle position at full droop:


Caution: leaf pin is under a bit of preload. Not a massive amount, but you should clamp it or otherwise constrain it prior to removing the pin.

Using a pair of vice grips, hold the top from spinning and remove the nut from the bottom, then pull the pin out:


Based on Quade's recommendation, I left the top spring (over-ride) in place and removed the next leaf underneath it. Upon driving it post-mod, I think this is a fantastic compromise.

Once the leaf was out, the steps were reversed to perform the install. Here's the lighter spring pack getting ready for reinstallation:


Again, to allow the springs to line up with the axles, you will need to articulate the suspension. Once it's all reassembled, the only thing left to do is install a spacer in the spring brackets to fill the gap left by the missing leaf.

There were no real secrets to the task. It doesn't seem to have changed my ride height too much or adversely affect anything, but the ride is much more pleasant now.

Next up is the heater, as that started dispensing vapor during a shakedown run after the spring work.
 
Last edited:

Reworked LMTV

Well-known member
1,449
1,124
113
Location
TN
More solid progress over the past week/weekend:

Spring leaf removal has been completed and the ride is WAY better than it was with the full pack. The steps in pictures-

Remove all the nuts from the spring studs sticking through the plate at the top of the rubber tower, and remove the bracket from the end of the spring:


Loosen but do not remove the nut retaining the pin through the leaves (don't worry, you won't be able to actually remove it as the pin spins freely in the hole):


Carefully remove the U-bolts, remembering that once these are removed, a couple hundred pounds of steel is technically unrestrained:


You may need to articulate the suspension to get the studs out of the holes if your axle is at full droop. The tower flexes to accommodate this when bolted but the flex loads the studs and makes them more fond of staying in the tower. Jacking up the axle relieves this pressure.

The difference in spring length vs. axle position at full droop:


Caution: leaf pin is under a bit of preload. Not a massive amount, but you should clamp it or otherwise constrain it prior to removing the pin.

Using a pair of vice grips, hold the top from spinning and remove the nut from the bottom, then pull the pin out:


Based on Quade's recommendation, I left the top spring (over-ride) in place and removed the next leaf underneath it. Upon driving it post-mod, I think this is a fantastic compromise.

Once the leaf was out, the steps were reversed to perform the install. Here's the lighter spring pack getting ready for reinstallation:


Again, to allow the springs to line up with the axles, you will need to articulate the suspension. Once it's all reassembled, the only thing left to do is install a spacer in the spring brackets to fill the gap left by the missing leaf.

There were no real secrets to the task. It doesn't seem to have changed my ride height too much or adversely affect anything, but the ride is much more pleasant now.

Next up is the heater, as that started dispensing vapor during a shakedown run after the spring work.
Hit those rubber boots with a spray of ATP AT205, to soften them up so they won't crack.
 
Last edited:
Top
AdBlock Detected

We get it, advertisements are annoying!

Sure, ad-blocking software does a great job at blocking ads, but it also blocks useful features of our website like our supporting vendors. Their ads help keep Steel Soldiers going. Please consider disabling your ad blockers for the site. Thanks!

I've Disabled AdBlock
No Thanks