firemedic355
Member
- 30
- 1
- 8
- Location
- Sierra Vista, AZ
I got the first 2 of my hubs flipped on the Deuce today and thought I'd throw together some quick pointers and lessons learned in the process:
1. This is NOT "only a 4 hour job" like I've heard repeatedly. I'm a very competent mechanic with quite an array of tools and it's taking me about 2-2.5 hours per hub. Granted, having an extra hand may speed things up, but not by much if you're doing this thoroughly and correctly.
2. You'll need an 8 sided 3" socket for the hub nuts. I got mine from Merle's Automotive for $24 or the NAPA KD part # is 2445 according to the XM381 thread.
3. Be ready to throw away whatever clothes you're working in or wash them 3 times alone in hot water because you'll be soaked in grease and oil.
4. Have AT LEAST 4 rolls of shop towels around
5. You'll want about 2 tubes of high temp grease per hub, so 8 to do both rear axles. This is enough to repack your bearings and pack your hubs between the bearings, which after searching and reading, seems like a good idea because your bearing will still be "bathed" in grease once it's all hot and settled in there. Those huge 5 gallon bucket paint sticks are perfect for troweling the grease out of the grease tubes and into the hub while you have it off.
6. DON'T beat the studs out without having a nut on them to protect the threads! I thought the studs would be hard enough to take some well placed blows, they're not! I spent an hour reworking threads on my first hub with a tiny file.
7. I've read elsewhere that the key slot in the top of spindle is actually supposed to have a tiny square cork gasket in it to keep your grease from seeping out once it's hot and thin. Mine didn't have any in there, nor much grease left in the bearings, so this is probably true. My seal kit also didn't come with any, so I used a dab of high temp RTV on the tab of the outer seal that rides down in that spindle channel and in the channel itself. Seems sealed to me.
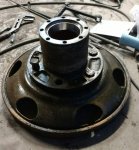
8. An old rim, or just the spoke face, which I had from cutting one off to turn into a fire pit, made a phenomenal stand to work on and anvil for beating the studs in and out. (You can see mine in the pic attached)
9. When tightening the 3" hub nuts back onto the spindle, tighten the inner one that's on the seal, while spinning the hub to make sure it's seating all the way. As per the XM381 post, torque the inner one to 50 lb-ft, then back it off 1/8th turn. Put the tabbed lock ring on, then torque the outer 3" nut to 100+ lb-ft. Lastly, bend down 2 tabs on the lock ring to secure the outer nut.
10. The $11.99 bearing packing cup tool from Tractor Supply isn't big enough for the thickness of the bearings, so save yourself that $12.
More info and pics to come.....
Attachments
-
63.8 KB Views: 137
-
57.9 KB Views: 140
Last edited:


