• Steel Soldiers now has a few new forums, read more about it at: New Munitions Forums!

  • Microsoft MSN, Live, Hotmail, Outlook email users may not be receiving emails. We are working to resolve this issue. Please add support@steelsoldiers.com to your trusted contacts.

M880 Project, Begining

M880 GC

New member
50
0
0
Location
South Carolina
Hi Guys,

New to SS, Chris introduced me to SS from another forum.

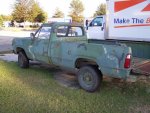
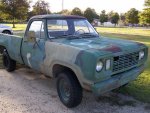
Found a '77 M880 showing less than 30K on the odometer, history unknown, here in my town, or should I say it found me. Back in the early '80's I had a nice M38 should have kept that one, oh well.

We trailerd the M880 home and with a fuel pump and fuel filter, it ran. It needs a lot of general TLC and detailing. I have already changed the oil in the diffs, t-case, engine oil and filter, plugs, cap & rotor, it's starting to run a bit better.

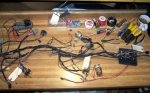
The electrics are another story. After reading a previous post about burned up ammeters and the posted bypass fix I started poking around in the dash, it wasn't pretty.

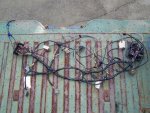
I decided to pull the entire dash harness out, spread it out and go throut it and repair or replace any bad connections. Lots of butt connectors, soldering and heat shring tubing, its finally starting to look a lot better. Big thanks to Elwenil for pointing me to look for the TM. When I found it, the blackout light wiring section was a big help. I need to get a new headlight switch socket and the locking connectors, I found part numbers for both, check with Dodge tomorrow. No more ammeter, we'll go with a voltmeter.

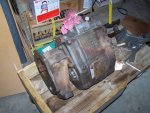
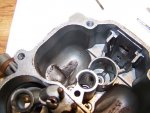
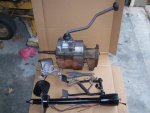
One big project concerns the transmission, right now it has the 727 and it seems good so far, this will violates the originality, but its going to get converted to a 435 handshaker. I already have the 435, clutch pedal assy, bell crank, steering column for a manual. I have a bellhousing, but it might be for an 10.4" system, I'm going to go 11". Clutch will not be any problem. I have also collected a spare dash wiring harness, hood, fenders and manuals.

When I go to fire up the new harness repair, I'll put a 30 amp or so fuse in the main power feed, pull all of the interior fuses and start plugging them in one at a time, minimize potential problems and isolate the circuits.

If this thing comes together as my "plans" see it, its going to be a tough old fashioned 8' bed 4X4 4 speed.

I'll gladly take any pitfall information you might offer like the front wheel bearing grease fittings behing the wheels, and I'll use the search first to look for old posts to learn with.

Its nothing like the projects that a lot of you have going on, but its a challange for me to have fun with.
 

Attachments

Recovry4x4

LLM/Member 785
Super Moderator
Steel Soldiers Supporter
34,012
1,806
113
Location
GA Mountains
Welcome to Steel Soldiers. Papercu in GA has a few trucks for parts including a Dodge W150 with a 4 speed. Good luck on your project!
 

Elwenil

New member
2,190
40
0
Location
Covington, VA
Looks like you are headed in the right direction. Make sure that NP435 will mate to a NP203, otherwise you will have to either disassemble the 435 to swap in a different tailshaft and transfer case adaptor, swap to another NP435 or use a NP208, NP205, or NP241 transfer case and lose the full time 4WD. The NP203 is an oddball and doesn't swap with the other common Dodge transfer cases and it's much easier to find a NP435 from an '80s model part time 4WD truck than the '75-'79 full time trucks.
 

M880 GC

New member
50
0
0
Location
South Carolina
Thanks for the comments guys.

Lanty, I'm hoping that my Mopar parts advisor over here has his stuff together, he's a parts mgr for many years and picked this trans up for me last week. I will get it tomorrow and take a picture later this week for your comments. I try to get the year of the 435 figured out.

The wiring harness bulkhead connector got extra scrutiny during the bench time. I have pulled each female connector out and cleaned them and recrimped the tension tabs. 3 of them show a bit of tarnish corrosion, so while its on the bench I'll get some extra connectors and crimp and solder them in place, that I can do. The wiring manual section is a big help.

Thanks guys.
 

Elwenil

New member
2,190
40
0
Location
Covington, VA
Be careful with the 435. As I understand, the NP203 uses the same size and spline shaft for the input but it is a different length. If your Parts Manager was working during the era of the D & W series trucks, he should have all the info you need but don't hesitate to ask here either.
 

M880 GC

New member
50
0
0
Location
South Carolina
Progress Update

I think it was a good idea to pull the harness and inspect it, replaced quite a few crimped only connectors with butt connectors, solder and shrinkwrap. I used the wiring diagram in the TM and chased the pins from the BOL connector to the harness, one discrepancy, but it matched the civi manual, thats what fuses are for.

I picked up the transmission. Lanty, can you apply your Mopar Magic and look at it and this is the tag info: 3735 974 - DL - 96 - 6 19 78 - 2 - 435. Does this match up with a 203? It had a gear on the output shaft that has a bearing. It slides off.

Might be able to put the harness in this weekend and see what lights up. Slight handicap, the previous owner didn't have the BOL knobs to work the switch with.
 

Attachments

Elwenil

New member
2,190
40
0
Location
Covington, VA
Looks like you are good to go. That has the older oval bolt pattern for the NP203 where the NP205, 208, and 241 use a 6 bolt pattern that is perfectly round. I don't have anything to verify the part number but that is a mopar number and it does look like a '78 model 4 speed. Check it over good while it's out and pay particular attention to the input bearing as they frequently have too much play and it's an easy fix while it's out.
 

M880 GC

New member
50
0
0
Location
South Carolina
Lanty,

Thanks for the review. I am thinking about replacing the input shaft because the pilot bushing race is a bit pitted, I don't want it to tear up a brass pilot. I will get the Mopar 78- parts book tonight and look up the details from the tag.
 

clinto

Moderator, wonderful human being & practicing Deuc
Staff member
Administrator
Super Moderator
Steel Soldiers Supporter
Supporting Vendor
12,596
1,124
113
Location
Athens, Ga.
Cool. If i had an M880 or a CUCV and I was going to keep it, there would have to be an MP435 or NV4500 swap.
 

M880 GC

New member
50
0
0
Location
South Carolina
What is amazing is that this old 435 sitting on a wagon looks almost as big as an NV4500, I know it must be smaller, but it's big. My Son's truck has the NV4500, mine has the NV5600. I'll take a bicture of the conversion parts collection this weekend and put it up, quite a pile and I know I'm missing a few parts. But having the parts manuals, wow that's a big help.

One other thing, on the wiring harness, someone got in there and tapped here and tapped there, then cut the wires off, these were not professional taps, this was slit open the insulation insert wire and twist taps, all gone, start over they did it twice at the BOL connector. Is BOL a correct term for the blackout light?
 

Elwenil

New member
2,190
40
0
Location
Covington, VA
No doubt the NP435 is beefy. I would also consider it to be quite a bit stronger than the NV4500. I have seen many broken and destroyed NV4500s but only one broken NP435. I'd still like to have a 4500 for the OD gear though, lol.

On the subject of he pilot bearing, be aware that your crankshaft may not be drilled out to the correct size for a pilot bushing. Most of the engines destined for automatic cars and trucks were not finish drilled. There is an easy way out and that is to use the throwout bearing for a 5.2L or 5.9L Magnum engine, Mopar Part Number 53009180. It fits in the crank where the torque converter hub rests and doesn't need the hole drilled in the end of the crank. The hole that is there is still necessary for clearance for the end of the input shaft, but it shouldn't need any attention for it to fit.
 

M880 GC

New member
50
0
0
Location
South Carolina
Status Report

I got some quality time with the truck and it is going pretty good so far. I finished the dash wiring harness tune-up, reinstalled it and hooked up the circuits and used a primary fuse between the battery and cable, then reinstalled each glass fuse and checking each circuit. As the wiring started to come back to life, I opted for direct connections for the parking lights and headlight circuits to the standard headlight switch.

Functioning circuits: Headlights high and low, parking lights, license plate, turn signals, brake lights, backups, PRNDL light, blower motor, diff lock indicator and wiper. Gages: temp, oil and fuel.

New parts, headlight switch, lots of soldered shrink wrapped butt connectors, battery cables, 14 and 16 gage fusible links.

Still needing attention: start function temporarily bypassed, 4 way flashers, dash lights. I did clean and check all dash bulbs.

I did all three major bypass repairs as detailed by MAD Electrical. Voltage check while running shows 13.5+ volts. Ammeter bypass is a good thing to look into.

I was able to run the truck for about 1 hour, possibly the most it has ran in a long time. Needs a good Dodge engine man to listen to it and give me a thumbs up or not but it sounds good to me so far. I might have carb work in the near future.

The bell housing for my conversion project doesn't fit the 435 trans, way too small at the bolt pattern.

A bit windy, but overall I'm pleased with the progress, didn't blow one fuse the whole time I was hooking it up.

Lanty, I looked up the pilot part number, we have them in stock at work. I need to look into the trans a bit later and see it it is a useable input shaft or time to replace. The clutch will not be a problem to get, I work for a clutch company. According to our records Lanty the number you provided is for a open needle bearing in a housing/carrier.

Thanks.
 
Last edited:

N1265

Active member
1,000
5
38
Location
Fremont, Ohio
After reading your post where you have the light for the PRNDL indicator but no dash lights, I am wondering : When you turn on you high beams do you get the blueish indicator light ? Or is out as well ?
 

M880 GC

New member
50
0
0
Location
South Carolina
Now it's carb time.

N1265, I was not able to check your suggestion yet, ain't dark outside but i'll check later.

The shot of the harness is the ready to install version, lots of fixes, soldering, tape and cleaning and tweaking of the terminals.

I ran it today, fired up right quick, but it had a bit of a gas smell, stalled, restarted, noticed fuel on the throttle shaft. I pulled the carb and it had a bunch of crud in the bowls from years of steel line rust, ordered a carb kit, that's a project for tomorrow.

The picture of the trans and steering column gives me visionary powers! I have the pedal cluster and bell crank, just need a 318 to 435 (11" clutch) bell housing and this will be a spring project to convert to a handshaker. The column doesn't have a PRNDL.
 

Attachments

Last edited:

M880 GC

New member
50
0
0
Location
South Carolina
Simple Problem, Simple Solution

N1265,

The dash lights didn't light up because the operator didn't have the dimmer turned up, turn up dimmer, all lights working, even the interior courtesy light WOW!

Carb kit. For the 1977 318 Carter BBD, Advance had 2 kits early and late, they ordered both turns out mine was the late. Installed kit cleaned the hard parts, got it running pretty good, no fuel leaking and it restarted hot just fine, that's nice.

Found 2 WTF's in the carb, a hole in the rear of the carb, no fittings, no threads no explanation. I stuck an M4-0.7 tap in it, fit nice, get screw tomorrow and block off a vacuum/dust leak. Next I found a small brass orifice in one of the 2 idle adj ports, screw wouldn't bottom out correctly, pulled it out all mangled, other side did not have one. Unknown.
 

M880 GC

New member
50
0
0
Location
South Carolina
The carb hole in the backside is for an EGR port connection, not used, blocked off.

Truck is running so well, I put the dash trim back on, not one fuse blown after repairs yet. I even put some gas in it. I'm sure there will be some more engine tuning, but it is doing good as is. I want to check the timing and watch for timing bounce, I understand the timing chain is a potential problem.

The previous owner installed PS, that was nice, but they did a rough job on getting the belts lined up, all ran at angles. I fixed up the ALT and PS mounts took out 1/2 Lb of body shims that they installed as spacers, made new ones out of 3/8" iron pipe, new belts, no squealing, running true.

The steering shaft had been worked on also. The rag joint bolts were loose, the top plunge joint was a mess. I had an extra shaft, used parts from both made one good shaft. Amazing how many ways you can assemble the top plunge joint wrong. Steering feels good and tight right now, to be confirmed at highway speeds.

Cleaned the T-Case shifter assy, lubed and shifts pretty good. I think it will be easier to shift with the MT instead of the AT, we'll see.

Time to get serious about the bell housing for MT conversion project.
 

farmritch

New member
2
0
1
Location
Northern Indiana
If you swap out the Manual steering box for a power one I need a manual gear for a project here on the farm , that goes for anyone else who may have a manual box laying around out of an 880
Thanks

Farmritch
 

M880 GC

New member
50
0
0
Location
South Carolina
Sorry, I don't have the old manual box, it came converted to PS.

Looks like the next project prior to converting to a 4 speed will be a timing chain. I'll pull the front cover and confirm the diagnosis though.

Does anyone know what the crescent shaped slots are in the cylinder heads, position is middle, adjacent to intake manifold, in line with the throttle shaft on both sides? It has some gunk in it and I picked it out.
 

Elwenil

New member
2,190
40
0
Location
Covington, VA
The timing chains are an easy fix. Do yourself a favor and put a double roller timing chain in there and you will never have to do it again. The passages in the middle of the head are part of the EGR/manifold heat system and are normally packed with carbon on an engine with any miles. There is a round hole with a curved hole over the top of the round one. I've seen a few that had to be chiseled out to get everything loose.
 
Top