• Steel Soldiers now has a few new forums, read more about it at: New Munitions Forums!

  • Microsoft MSN, Live, Hotmail, Outlook email users may not be receiving emails. We are working to resolve this issue. Please add support@steelsoldiers.com to your trusted contacts.

M923a2 Coolant System Drain and Flush:

87cr250r

Well-known member
1,267
1,988
113
Location
Rodeo, Ca
Napa sells both types of coolant. If you chose to go with an antique coolant you need to get strips that test for nitrites. If you chose to go with a modern coolant you need to use strips that test for carboxylates. Carboxylates don't deplete over time so testing is generally unimportant with modern coolants.
 

Defcon-1

Member
86
66
18
Location
South New Jersey
If you’ve got lots of rust & scale then flush with white vinegar.
I have to replace a leaking thermostat-housing gasket and noticed the coolant is still rusty / coffee-like so I think it's good to do another system flush on top of this. To do this with white vinegar as suggested, since it is a mild acid, how many gallons to add to the system? How long should it sit in the system before draining out?

I did install a coolant filter into the system and will also run / change that out to catch even more, but the coolant is still rusty after 4 months of usage, and I want to address the rust/scale while I'm opening up the coolant system anyway to change the gasket. I'm also changing the thermostat as well since I have it apart, ordered a new one precautionary. Do you think I could reinstall the t-stat housing (temporarily) without the t-stat installed to get everything from the block moving around? Doing the flushing procedure without the t-stat in place?

Note - Replacing item #30 in this diagram due to a small leak (also ordered the other gaskets too, #28 and #23)
1712959856846.jpeg
 

WillWagner

The Person You Were Warned About As A Child
Super Moderator
Steel Soldiers Supporter
8,539
2,758
113
Location
Monrovia, Ca.
You should also replace #26, the seal. If it is compromised you will have slow warm up and low running temps. It basically bypasses the stat if it is junk. And, with an auto trans, that could be a bad thing because there should be a diverter plug installed so that when the stat is closed, there is positive coolant flow through the trans cooler. With the seal failed, you will have very low coolant temp and below "optimal" trans oil temp.
 

87cr250r

Well-known member
1,267
1,988
113
Location
Rodeo, Ca
Use phosphoric acid to flush. It's safer for the engine. You can purchase it as concrete and metal etch at your local hardware store.
 

DampLemonade

Member
34
43
18
Location
Cannon AFB, New Mexico
To do this with white vinegar as suggested, since it is a mild acid, how many gallons to add to the system? How long should it sit in the system before draining out?
Personally I'm not a fan of vinegar in coolant flushes. I've seen it perform no better than a couple passes of water at best, and cause leaks at worst. When I flushed mine, I bought like 50 gallons of distilled water and ran that all thru until it was draining clear. There probably was a more time-effective way of doing it. I was just extra paranoid about the whole ELC / SCA / eating head gaskets / liner cavitation debate, I wanted to add as few different new chemicals as possible.

Do you think I could reinstall the t-stat housing (temporarily) without the t-stat installed to get everything from the block moving around? Doing the flushing procedure without the t-stat in place?
For flushing purposes this would be totally fine. It'll actually save a lot of time on drains/refills because you *wont* have to wait for the water to warm up to open the thermostat to circulate thru the whole system (since there is no thermostat to open, obvs). I did this exact thing with my GMC a few years ago
 

87cr250r

Well-known member
1,267
1,988
113
Location
Rodeo, Ca
If you run it without a thermostat watch your temperature. Most heavy duty engines require a thermostat in order to get water to circulate through the radiator.
 

Defcon-1

Member
86
66
18
Location
South New Jersey
You should also replace #26, the seal. If it is compromised you will have slow warm up and low running temps. It basically bypasses the stat if it is junk. And, with an auto trans, that could be a bad thing because there should be a diverter plug installed so that when the stat is closed, there is positive coolant flow through the trans cooler. With the seal failed, you will have very low coolant temp and below "optimal" trans oil temp.
Yes Sir I ordered the T-Stat with new seal as well, probably original part in there it's time to come out if opened up I say lol. That's great about the diverter-plug I actually didn't know what that was for but now it makes total sense, thank you!
 

Defcon-1

Member
86
66
18
Location
South New Jersey
Use phosphoric acid to flush. It's safer for the engine. You can purchase it as concrete and metal etch at your local hardware store.
That's a good copy, how much per gallon / the system for the flush? How long should it sit in there before draining out? I guess I'm paranoid about clogging up lines with all the rust it will remove lol.
 

Defcon-1

Member
86
66
18
Location
South New Jersey
For flushing purposes this would be totally fine. It'll actually save a lot of time on drains/refills because you *wont* have to wait for the water to warm up to open the thermostat to circulate thru the whole system (since there is no thermostat to open, obvs). I did this exact thing with my GMC a few years ago
Good to hear on this, I know most of the "material" settles so getting it out of the block quicker will help. I'll do the drain and flushes with the t-stat removed, and then do a final install on the new gaskets / seal / T-stat before adding last round of distilled water and coolant-concentrate.
 

Defcon-1

Member
86
66
18
Location
South New Jersey
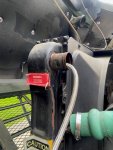
Also since I mentioned it previously, here are some pix of the coolant-filter I installed, I will be changing the spin-on after all this and opening the current one to see how much stuff was caught in the past few months and during the flush, will be interesting to see I think:
1712998903446.png1712998931636.png1712998947337.png
1712998978864.png1712999022488.png1712999067523.png
 

WillWagner

The Person You Were Warned About As A Child
Super Moderator
Steel Soldiers Supporter
8,539
2,758
113
Location
Monrovia, Ca.
There are provisions on the C for corrosion inhibitor installations. Two spots. The exhaust side has 2, soft plugs, these go into the lower and upper coolant cavities. Lower is high pressure, high is low pressure and rear of the block, same configuration.
Cummins sells the fittings that go into the rear of the block for use with 5/8 heater hose. The rear ports are mainly used for cab heating, the side ports are for accessories.

The rear fittings are slide in and use o-ring sealing and are held in place with a moon shaped retainer into a groove in the fitting secured with a bolt to the block. Some blocks had soft plugs on the exh side SOME were 3/4 pipe.

Make sure that it gets plumbed correctly. If using block supply and return, filter in needs to be the high pressure side, lower cavity, return needs to be low pressure or w/p inlet.

It can be plumbed upper, low pres, to w/p inlet.

Try to avoid using the fill line, the 1 inch hose going from the surge tank or upper radiator tank to the lower hose, during operation, a percentage of coolant goes thru this path, stat open or closed, the system is designed for this. If you tap into this line, it can cause slow warm and slow overheat. It essentially bypasses the thermostat. It adds pressure to the eye of the w/p. Max there should be no mere that 2 psi and never into a vacuum. With a tap into the fill line, the w/p eye pressure can increase to 4-5 psi depending on the hose size. Ask me how I know about this.

You CAN go to the ports in the block behind the inlet and there is no effect on the eye pressuer. DON'T ask me why or how, I just know what happens. It took a week of dyno time to figure this out and not even the factory could tell us why this happened.

Also, nothing larger than a 3/8 hose. Larger does the same as bypassing the stat and will cause slow/over heat.

C block.jpg
 

Defcon-1

Member
86
66
18
Location
South New Jersey
thats a good little setup. i really should do something like that with my A1
Ty Sir, the filter does get really hot so I know I have (decent) flow through it lol. The port on this filter-base is much wider than the (Napa?) one that a lof of guys use, and I liked how it was multi-directional instead of having to feed in from the top only. I wound up just using the hoses that were already there but I do have a parts list of where I bought from if you're interested.
 

Defcon-1

Member
86
66
18
Location
South New Jersey
There are provisions on the C for corrosion inhibitor installations. Two spots. The exhaust side has 2, soft plugs, these go into the lower and upper coolant cavities. Lower is high pressure, high is low pressure and rear of the block, same configuration.
Honestly I'm not sure what you're getting at, are you saying there is stand-alone corrosion inhibitor systems you can hook up to the engine?
 

WillWagner

The Person You Were Warned About As A Child
Super Moderator
Steel Soldiers Supporter
8,539
2,758
113
Location
Monrovia, Ca.
Not from the factory on these, there are provisions, places to connect them. The early C series didn't need them. Mid stop liners, spun steel and not cast iron. Later in life, they had them from the factory due to changes in the way the stuff moved around and how the engine fired. However, customers like cement mixers chose to use them as they tended to top off with nasty water instead of coolan. That is when they started being an option.

Newer stuff, starting in 99 or 2000 started coming with an on board inhibitor with a block mounted, shut off valve equipped filter head. The SO valve liked to break since it was plastic.
 

Defcon-1

Member
86
66
18
Location
South New Jersey
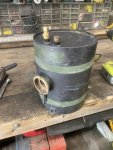
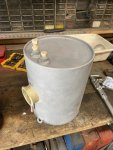
After taking more items apart, I found there was a ton of rust scale in my coolant reservoir, I bought commercial-grade cleaning vinegar (30% strength, normal vinegar is 5%) and soaked the inside of it over night (off of the truck that is). Tons of scale came out, super nasty. Then since I had it out I decided to prep it for a new paint job, off to the media-blast cabinet, looks basically new inside and out now.

1715263064941.jpeg1715263082043.jpeg

I hooked up a hose to spray out the inside of the radiator, more brown-brew came out. I figured maybe the radiator might never be 100% clean, but the treatments and flushes I did so far got a ton of it out, running pretty clear as shown in the previous post in the video. The radiator is the only part of the cooling system I didn't remove and clean out (besides the transmission oil cooler), including the hoses and lines, so between those two parts I might still be getting some brown but I'm happy with it overall. Maybe one day I'll get one of those MRAP radiator upgrades lol.

1715263837515.jpeg

I also assembled the thermostat housing back together with all new gaskets. I had it previously assembled with thermostat-housing sealant to do all the flushes, (knowing I would have to disassemble it again after the flushes), it did resolve the leak so I know that bottom old gasket was the issue, which is good peace-of-mind that I won't have to be doing this in the near-future again, hopefully lol. Now it's back together with actual OE gaskets but have to wait for the reservoir top-coat before doing a final distilled water flush on it, almost there.

1715263189838.jpeg1715263202993.jpeg
 
Top
AdBlock Detected

We get it, advertisements are annoying!

Sure, ad-blocking software does a great job at blocking ads, but it also blocks useful features of our website like our supporting vendors. Their ads help keep Steel Soldiers going. Please consider disabling your ad blockers for the site. Thanks!

I've Disabled AdBlock
No Thanks