• Steel Soldiers now has a few new forums, read more about it at: New Munitions Forums!

  • Microsoft MSN, Live, Hotmail, Outlook email users may not be receiving emails. We are working to resolve this issue. Please add support@steelsoldiers.com to your trusted contacts.


M932A2 and Mk-48 Cab conversion

agazza2

Active member
483
31
28
Location
Ahwatukee, AZ
Took the final step in no turning back yesterday removing the cab from the M932A2. The MK-48 cab is ready to go on soon once I weld the fabricated brackets to the frame extensions on the M932A2. Thanks to the inspiration from Soni and Drew with their FEMMT & SEMMT projects I wanted to also build one of these :)

I have attached a few pics of the truck from when I picked it up, and removing the cab. Hopefully this long weekend I can make some progress with the radiator, mounts, and possibly getting the MK-48 cab set back on. Cut down the battery box, and considering the drivers side step location as the new location to mount the batteries.

I am also looking for ideas on naming this build.

M932A2 Front Left side.jpgM932A2 Front Right side.jpg20150519_170456 mod.jpg20150519_173238.jpg20150519_172154.jpg20150519_175202.jpg20150519_180041.jpg
 
Last edited:

Swamp Donkey

The Engineer
Steel Soldiers Supporter
1,450
118
63
Location
Gray, GA
MSFETT = Modified Systems Forward Entry Tactical Truck, aka "Misfit" for short. Just a thought...

I missed the other two builds and had a week of reading to catch up. I'll be watching this one from day one. Good luck and don't forget pictures.
 

Shark Bait

Active member
720
58
28
Location
Charleston, West Virginia
I too am trying to find time for one these cab conversions. I ave a few MK cabs (one for my MK ands couple extra). I'll be watching this thread so please make it look easy for me. Lol. I've got 2 new rebuild M931a2's and was gonna sell one but I think this would be cooler.

Dave
 

agazza2

Active member
483
31
28
Location
Ahwatukee, AZ
Yes, a lot of planning has been going into this, and with the Soni's and Drews builds on here they have already went through the things that are more difficult to figure out. Already have my air throttle (Williams Controls 117888 from Finditparts) for the engine, and 1:1 Hub City parallel gear box (Model 22 P/N0220-01512) for the steering. Now in the process of locating the steering yokes that clamp together. I will post all the part numbers as I go along with this build hopefully making easier on others doing the same build.

Hub City Parallel Box 0220-01512.jpgWilliams Controls 117888.jpg
 

agazza2

Active member
483
31
28
Location
Ahwatukee, AZ
Starting on actually two builds.....well one is a model of a M977. I did get a chance to actually start on my cab brackets and mounting them to the frame extensions, and unbolt the radiator and check the fit when rotated 90 degrees. I think it will work fine with some slight modifications and new mount brackets. I will also add some more reinforcement brackets to the from mount. And once the back is mounted, I will trim off the front square edge to follow the body line/Front guard.

Also ordered two short Oshkosh steering shafts (3634273) online to get the needed End steering yokes (spicer 10-4-183) which are 1" smooth with keyway and clamp bolt.This will fit the 90 degree steering transfer boxes, and the hub city parallel gear box. I will also use one shaft to go from the steering box up to the parallel box.

M977 HEMMT.JPG20150525_115553.jpgSpicer 273.jpg
 

Attachments

Last edited:

agazza2

Active member
483
31
28
Location
Ahwatukee, AZ
MK-48 and M932A2 Build

Thanks to the help from M35A2-AZ and Castle Bravo today helping set the MK-48 cab on the M932A2 chassis today. It went very smoothly with Albert's wrecker and his excellent helper (his wife) operating the wrecker boom. The cab came out exactly as I had visioned it with just about 1" to spare at the top of the radiator. I will take some more pictures of the mount location, and radiator mounting this afternoon when I go out to put up a shade structure over the top of the engine and trans so I can work in this 105 degree temperature. A few photos attached of this mornings progress setting the cab on.

20150531_070744.jpg20150531_070728.jpg20150531_083223.jpg20150531_083214.jpg
 

agazza2

Active member
483
31
28
Location
Ahwatukee, AZ
Air Lines and Electrical progress

This weekend I concentrated on moving the wiring harness forward and determining the best spot to cut the wires, and add in about 7 feet of wire. Where the wire originally went into the cab on the M932A2 has the least amount of wires. All the tape is striped back, and wires that stay outside of the cab are pull back. My wire will arrive tomorrow from Eriks Military & Industrial Surplus from Escondido California. I have to say I highly recommend him for his parts. Great prices and good selection of part. Splicing of wires will begin this week. I will take photos and document what path the wires take.

I also ran all the new air brake and air accessory lines this weekend. I removed all the M932A2 fabric cover lines, as they would have took multiple adapters to hook to the new air lines. I disconnected the fabric cover air lines where they connected to the original nylon air brake lines. I went through 100' of 3/8" line and 80' of 1/2" and so many fittings. Air brake line and conversion cost so far around $330.00. Still need to go and buy an additional 20' of 3/8" and various fittings to complete the connections.

Started to hook up the lines inside the cab to the new lines. Here are the numbers that connect outside/inside the cab that I am using:
Front Axles Switch - from M932A2
71 - Air Supply line from Vacuum manifold in center section of cab compartment
706 - Delivery line to transfer case (not used for M932A2 conversion) replace MK-48 switch with M932A2 switch
69 - Delivery to front axle.

Service Brake Button
611 - Supply Air line
612 - Delivery Air line

Trailer Brake Button
611 - Supply Air Line loops from Spring Brake button
662 - Delivery Air Line

Trailer brake lever - Johnson Bar (on truck/tractors only)
27 - Supply Air Line - comes from vacuum manifold
663- Deliver Air Line

Air Throttle
415 -Supply air line for air throttle pedal
416 - Delivery to engine air throttle

Air Horn
38- Supply line is fed from vacuum manifold in center section of cab compartment39
39 - Delivery line to air horn, comes down through the middle of the cab into open area.

Air pressure gauges
610 - Primary air pressure gauge
041 - Secondary air pressure gauge

Tachometer and Speedometer cable
I will add a pass-through connector to both the speedometer and tachometer cable. Re-routed the cables, and the tachometer cable comes almost to the front of the cab, and will need a 3-4ft extension cable, and the speedometer cable comes about 10" forward of the back of the cab and will need about a 7' extension cable.

Ordered 1 side step for the cab, and looking for 1 more, and the chain drop down extension step for both sides.


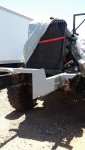
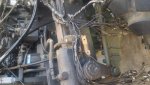
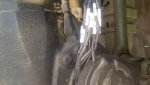
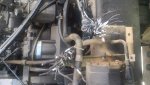
A few photos attached, more to come once the air lines are tied down.


20150607_125137.jpg20150607_125132.jpg20150607_130822.jpg
 
Last edited:

agazza2

Active member
483
31
28
Location
Ahwatukee, AZ
Not much progress to report from last weekend. Have relatives in town for the next few weeks. I did have to remove the passengers side air manifold to clean out the passages. The cab has been sitting awhile, and all the passages seemed to be plugged with dirt. They were actually plugged with dead earwigs (I think that is what they are called) that have made these small passages home.

I am going to next change out the treadle valve (brake pedal assembly) with the one from the M932A2 as I know that it works fine. Air lines 623 and 665 will then be free to use for the CTIS air lines into the cab, if I decide to mount it in the center compartment where the circuit breakers reside. The other place was to mount the CTIS module behind the passengers seat, and use (2) bulkhead air line connectors.

Plan on working on the gauges for the dash, and steering shafts in the garage at home and stay out of the 110 degree heat. I should be posting more photos in the next few days
 

agazza2

Active member
483
31
28
Location
Ahwatukee, AZ
Yes wreckerman, it is a dry heat for a few more weeks till the Monsoon season starts. I should be thankful that we do not get the humidity that Alabama gets :cool:
 

agazza2

Active member
483
31
28
Location
Ahwatukee, AZ
Spent yesterday separating out more wiring to determine which ones needed to be cut and additional wiring added in. There are 40 wires that where separated and cut, labeled one by one with cable labels to make it easy to go back together. The section that goes in the cab was routed to the proper place, and temporarily taped so it can be removed and spliced to new prestolite mil spec wire. Need to order some 12 gauge wire for the one that feeds the power switch. A few pics of the progress.
 

Attachments

Top
AdBlock Detected

We get it, advertisements are annoying!

Sure, ad-blocking software does a great job at blocking ads, but it also blocks useful features of our website like our supporting vendors. Their ads help keep Steel Soldiers going. Please consider disabling your ad blockers for the site. Thanks!

I've Disabled AdBlock
No Thanks