• Steel Soldiers now has a few new forums, read more about it at: New Munitions Forums!

  • Microsoft MSN, Live, Hotmail, Outlook email users may not be receiving emails. We are working to resolve this issue. Please add support@steelsoldiers.com to your trusted contacts.

Master Cylinder Replacement

kenn

Well-known member
170
513
93
Location
Texas
As I dug into the rear axle and replaced the wheel cylinder, I knew I'd need to bleed the system and did a thorough inspection of the master cylinder and airpack. They appear to have been both replaced at some point but there was a small amount of leakage from the master cylinder around the rubber boot and possibly around fittings. I ordered a NOS unit and proceeded to replace it rather than rebuild. Like every project, Murphy shows up. I read the TM and watched tactical repair's video.

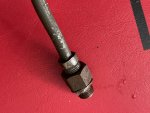
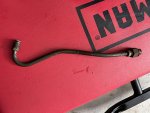
I managed to get all the way close to the end but couldn't get the brake fluid fitting off of the line between the master and the air pack (at the master). Mine is a 1/2" nut and even with a flare nut that fit snugly, it still rounded off completely. Knowing it is now ruined, I bent it straight and loosened the nut going into the back of the master and just unscrewed the whole assembly.

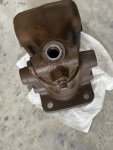
Time to remove the master. Not so fast! This unit has the three bolts at the side/bottom of the unit unlike my new old stock. There was NO WAY to get it out as I couldn't back it into the hole in the cross member as it was about 1/16" of an inch too big overall. I contemplated trying to dremel the hole open a bit but that's pretty thick metal and I don't have the right bit... Finally I removed one of the side bolts in the master and managed to slide it into the crossmember hole and get it out. Since I've ruined the line, I'll have to order another and work on something else until it arrives.

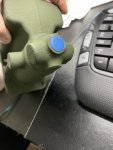
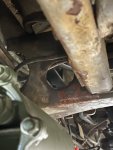
Pictures of the master to air pack tube, now bent straight, the flare nut stripped round, the hole in the cross member where it needed to slide out, and the old master (bolt removed) and the new one without the bolts.

Lesson for anyone contemplating this: If you have the type with the side bolts, you'll need to remove one of them to get the master out. No ifs, ands, or buts.
 

Attachments

kenn

Well-known member
170
513
93
Location
Texas
I'm amazed at the stupidity of motor pool people. The "maintenance" on this truck was likely performed by a motor pool rather than previous owners. First owner bought it as surplus and stored in his garage for 14-15 years. Second owner bought it and had buyers remorse. Lied his arse off on what needed done but that's another story. Anyway, there is a cotter pin that holds the brake pedal lever to the master cylinder. It goes on the inner hole with the spring on the outer hole.

Private knucklehead didn't have the right size cotter so he used the outer hole and put the spring on the inner hole. That put the spring rubbing each time the brake lever was moving. See the attached diagram of how it is supposed to be. Further, the cotter pin had the loop side facing the ground and was barely separated at the top. If that comes loose...

I'll get the right size pin and likely replace that spring just to be sure.
 

Attachments

SCSG-G4

PSVB 3003
Steel Soldiers Supporter
5,367
3,378
113
Location
Lexington, South Carolina
As I dug into the rear axle and replaced the wheel cylinder, I knew I'd need to bleed the system and did a thorough inspection of the master cylinder and airpack. They appear to have been both replaced at some point but there was a small amount of leakage from the master cylinder around the rubber boot and possibly around fittings. I ordered a NOS unit and proceeded to replace it rather than rebuild. Like every project, Murphy shows up. I read the TM and watched tactical repair's video.

I managed to get all the way close to the end but couldn't get the brake fluid fitting off of the line between the master and the air pack (at the master). Mine is a 1/2" nut and even with a flare nut that fit snugly, it still rounded off completely. Knowing it is now ruined, I bent it straight and loosened the nut going into the back of the master and just unscrewed the whole assembly.

Time to remove the master. Not so fast! This unit has the three bolts at the side/bottom of the unit unlike my new old stock. There was NO WAY to get it out as I couldn't back it into the hole in the cross member as it was about 1/16" of an inch too big overall. I contemplated trying to dremel the hole open a bit but that's pretty thick metal and I don't have the right bit... Finally I removed one of the side bolts in the master and managed to slide it into the crossmember hole and get it out. Since I've ruined the line, I'll have to order another and work on something else until it arrives.

Pictures of the master to air pack tube, now bent straight, the flare nut stripped round, the hole in the cross member where it needed to slide out, and the old master (bolt removed) and the new one without the bolts.

Lesson for anyone contemplating this: If you have the type with the side bolts, you'll need to remove one of them to get the master out. No ifs, ands, or buts.
Been there, done that same way!
 

INFChief

Well-known member
722
1,348
93
Location
New York
As I dug into the rear axle and replaced the wheel cylinder, I knew I'd need to bleed the system and did a thorough inspection of the master cylinder and airpack. They appear to have been both replaced at some point but there was a small amount of leakage from the master cylinder around the rubber boot and possibly around fittings. I ordered a NOS unit and proceeded to replace it rather than rebuild. Like every project, Murphy shows up. I read the TM and watched tactical repair's video.

I managed to get all the way close to the end but couldn't get the brake fluid fitting off of the line between the master and the air pack (at the master). Mine is a 1/2" nut and even with a flare nut that fit snugly, it still rounded off completely. Knowing it is now ruined, I bent it straight and loosened the nut going into the back of the master and just unscrewed the whole assembly.

Time to remove the master. Not so fast! This unit has the three bolts at the side/bottom of the unit unlike my new old stock. There was NO WAY to get it out as I couldn't back it into the hole in the cross member as it was about 1/16" of an inch too big overall. I contemplated trying to dremel the hole open a bit but that's pretty thick metal and I don't have the right bit... Finally I removed one of the side bolts in the master and managed to slide it into the crossmember hole and get it out. Since I've ruined the line, I'll have to order another and work on something else until it arrives.

Pictures of the master to air pack tube, now bent straight, the flare nut stripped round, the hole in the cross member where it needed to slide out, and the old master (bolt removed) and the new one without the bolts.

Lesson for anyone contemplating this: If you have the type with the side bolts, you'll need to remove one of them to get the master out. No ifs, ands, or buts.
I think I see Teflon tape one the MC to Hydrovac fitting.
 

ToddJK

Well-known member
1,321
4,518
113
Location
Sparta, MI
It's amazing what we will find on some of these trucks, what the motor pool guys did to quickly fix things, the stuff we don't even know what the previous owner was thinking type of fixes, ect, lol.

In my old deuce, the shop I bought my truck from, they used wrapped the lower radiator hose in radiator tape and never said anything about it. The wires from the turn signal flasher was cut and taped off because the old one shorted out, but yet they didn't unscrew the plug from it to disconnect it. The resistor for the "low" heater setting was wrapped in black tape, melted to mimic nasty black tape french fries, and the driver side head light was plugged in wrong even though they said they replaced it and it didn't work so there was something else going on 🤦...
 
Last edited:

kenn

Well-known member
170
513
93
Location
Texas
I think I see Teflon tape one the MC to Hydrovac fitting.
You do... There's some kind of metallic-like silverish stuff that I have found on every fitting I have removed so far including ones for coolant. In most cases it is completely broken down and there's very little structure to it as I clean it off but some are still a little "tapey".
 

kenn

Well-known member
170
513
93
Location
Texas
I have installed my remote reservoir and the new master cylinder. I got a new line from Mikes and it is now installed. Unfortunately, brake fluid is oozing slowly around the bleeder screw on the air pack. Should I replace it or pull it and put some paste thread seal on it? I've tightened it down pretty darn tight and don't want to damage it.
 

Mullaney

Well-known member
Steel Soldiers Supporter
Supporting Vendor
7,716
19,766
113
Location
Charlotte NC
I have installed my remote reservoir and the new master cylinder. I got a new line from Mikes and it is now installed. Unfortunately, brake fluid is oozing slowly around the bleeder screw on the air pack. Should I replace it or pull it and put some paste thread seal on it? I've tightened it down pretty darn tight and don't want to damage it.
.
Any chance you could steal the bleeder off your old Brake Booster?
Maybe swap one for the other and solve your problem?

Might be that the current bleeder got mashed or something like that?
 

kenn

Well-known member
170
513
93
Location
Texas
.
Any chance you could steal the bleeder off your old Brake Booster?
Maybe swap one for the other and solve your problem?

Might be that the current bleeder got mashed or something like that?
The bleeder screw is the one on the air pack where the line comes out of the back of the master cylinder into the "top front" of the air pack. I didn't get any kind of replacement with the new master cylinder. I believe they are the same as the wheel cylinder bleed screw but, of course, my wheel cylinders didn't come with new ones, either, so I can't steal those. I'll check ebay...

Edit - in case anyone comes along and sees this thread, the part number for the wheel cylinder screws and the air pack screw is NOT the same as I saw posted elsewhere. According to the 34P, it is as below:

2530-00-287-8252 7539268 19207 BLEEDER VALVE,HYDRAULIC EA 1

Eastern surplus has Qty 1 for $4.00 which is great but $27 for shipping is silly. It should go in an envelope with about $1 worth of postage. I found them on fleabay as well so I just did that. I'll probably use a thread sealer and let it dry a bit before I put it in.

I'm not sure how fast it will gravity leak out fluid but the fluid is brand new so I may clean the area up really well and let it drain into a catch so I can put it back. Dot 5 is not cheap!
 
Last edited:

davidb56

Well-known member
1,020
1,237
113
Location
Bonners Ferry Idaho
.
Any chance you could steal the bleeder off your old Brake Booster?
Maybe swap one for the other and solve your problem?

Might be that the current bleeder got mashed or something like that?
my local AZ store had some bleeder screws in stock. Often bleeders are not vehicle specific, just like a few different grease zerk fittings fit a billion different apps...........except those damn IH TD 9 track rollers.
 

rustystud

Well-known member
9,280
2,987
113
Location
Woodinville, Washington
The bleeder screw is the one on the air pack where the line comes out of the back of the master cylinder into the "top front" of the air pack. I didn't get any kind of replacement with the new master cylinder. I believe they are the same as the wheel cylinder bleed screw but, of course, my wheel cylinders didn't come with new ones, either, so I can't steal those. I'll check ebay...

Edit - in case anyone comes along and sees this thread, the part number for the wheel cylinder screws and the air pack screw is NOT the same as I saw posted elsewhere. According to the 34P, it is as below:

2530-00-287-8252 7539268 19207 BLEEDER VALVE,HYDRAULIC EA 1

Eastern surplus has Qty 1 for $4.00 which is great but $27 for shipping is silly. It should go in an envelope with about $1 worth of postage. I found them on fleabay as well so I just did that. I'll probably use a thread sealer and let it dry a bit before I put it in.

I'm not sure how fast it will gravity leak out fluid but the fluid is brand new so I may clean the area up really well and let it drain into a catch so I can put it back. Dot 5 is not cheap!
Bleeder screws seal by metal to metal contact. The thread sealer will do you no good. You need to "reseat" the contact surface by tightening and loosening and retightening several times. Your creating a new sealing surface on the Master Cylinder. You can use a small amount of "jewelers polish" to assist in the resealing. Then get a new bleeder screw and install it.
 

kenn

Well-known member
170
513
93
Location
Texas
Bleeder screws seal by metal to metal contact. The thread sealer will do you no good. You need to "reseat" the contact surface by tightening and loosening and retightening several times. Your creating a new sealing surface on the Master Cylinder. You can use a small amount of "jewelers polish" to assist in the resealing. Then get a new bleeder screw and install it.
Thanks! I know they seal by seating and not threads but the screw itself appears to be steel and not brass so it's going to take a lot to get it to seat if it is galled or in any way not flat/rounded on the end. I replaced the master because it was old and appeared to be leaking from more than one area. That said, I'm pretty sure it was leaking from this location previously so and my loosening it to bleed it just upset an already poor seal. As I have a new one coming, I'll wait for the new one and try to reseat it vs. the old one and see where that gets me first.
 

kenn

Well-known member
170
513
93
Location
Texas
Another update. I got the bleeder screw to stop leaking by taking out the old and giving the brake pedal a quick tap to squirt some fluid. In with the new screw and tightened down but then discovered it was also leaking from the bolt just below that in the air pack. I circled in the diagram in the attached picture. I put a socket on it and tightened it about 1/8th. For the moment, it seems I have stopped my leaks around the master and air pack. Getting closer to getting back on the road.
 

Attachments

Top