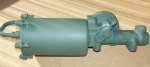
As I dug into the rear axle and replaced the wheel cylinder, I knew I'd need to bleed the system and did a thorough inspection of the master cylinder and airpack. They appear to have been both replaced at some point but there was a small amount of leakage from the master cylinder around the rubber boot and possibly around fittings. I ordered a NOS unit and proceeded to replace it rather than rebuild. Like every project, Murphy shows up. I read the TM and watched tactical repair's video.
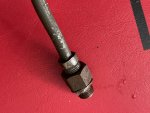
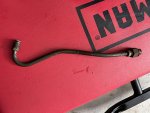
I managed to get all the way close to the end but couldn't get the brake fluid fitting off of the line between the master and the air pack (at the master). Mine is a 1/2" nut and even with a flare nut that fit snugly, it still rounded off completely. Knowing it is now ruined, I bent it straight and loosened the nut going into the back of the master and just unscrewed the whole assembly.
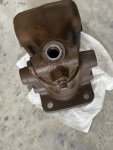
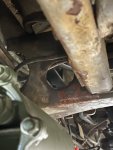
Time to remove the master. Not so fast! This unit has the three bolts at the side/bottom of the unit unlike my new old stock. There was NO WAY to get it out as I couldn't back it into the hole in the cross member as it was about 1/16" of an inch too big overall. I contemplated trying to dremel the hole open a bit but that's pretty thick metal and I don't have the right bit... Finally I removed one of the side bolts in the master and managed to slide it into the crossmember hole and get it out. Since I've ruined the line, I'll have to order another and work on something else until it arrives.
Pictures of the master to air pack tube, now bent straight, the flare nut stripped round, the hole in the cross member where it needed to slide out, and the old master (bolt removed) and the new one without the bolts.
Lesson for anyone contemplating this: If you have the type with the side bolts, you'll need to remove one of them to get the master out. No ifs, ands, or buts.
I managed to get all the way close to the end but couldn't get the brake fluid fitting off of the line between the master and the air pack (at the master). Mine is a 1/2" nut and even with a flare nut that fit snugly, it still rounded off completely. Knowing it is now ruined, I bent it straight and loosened the nut going into the back of the master and just unscrewed the whole assembly.
Time to remove the master. Not so fast! This unit has the three bolts at the side/bottom of the unit unlike my new old stock. There was NO WAY to get it out as I couldn't back it into the hole in the cross member as it was about 1/16" of an inch too big overall. I contemplated trying to dremel the hole open a bit but that's pretty thick metal and I don't have the right bit... Finally I removed one of the side bolts in the master and managed to slide it into the crossmember hole and get it out. Since I've ruined the line, I'll have to order another and work on something else until it arrives.
Pictures of the master to air pack tube, now bent straight, the flare nut stripped round, the hole in the cross member where it needed to slide out, and the old master (bolt removed) and the new one without the bolts.
Lesson for anyone contemplating this: If you have the type with the side bolts, you'll need to remove one of them to get the master out. No ifs, ands, or buts.
Attachments
-
 65.4 KB Views: 19
 -
 57.7 KB Views: 21
 -
 143.6 KB Views: 21
 -
 206.8 KB Views: 21
 -
 63.7 KB Views: 19
 ...
...