• Steel Soldiers now has a few new forums, read more about it at: New Munitions Forums!

  • Microsoft MSN, Live, Hotmail, Outlook email users may not be receiving emails. We are working to resolve this issue. Please add support@steelsoldiers.com to your trusted contacts.

MEP-016B Generator Startup

seek

Member
69
0
6
Location
Mocksville nc
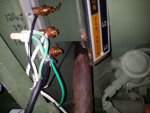
I got time to run my generator some using the front outlets only for load since my electrician has not set me up yet. I wanted to just run to be sure my rings were seated.

I got it tuned in using a heater and a big work light on the other outlet. I decided I wanted to add more load and in doing so I blew both fuses. That can be bad because you are likely to burn up your regulator with no load and that's what happens when your fuses blow. So beware and have extra fuses. Lesson learned without damage.

I found some fuses at Los that are marked 15a 250v packaged for microwaves.
 
Last edited:

seek

Member
69
0
6
Location
Mocksville nc
MEP-016b 3 phase 120v wiring setup

I wanted to update this thread. My electrician came out today and he had never seen one. We went over everything, meaning i had posts printed out from here and had a corrected manual before we even cranked it up. Delks had been out here a couple months ago and did a fine job but the electrical matters i still was not satisfied with so i got a plain electrician to come out.

I have said before many times my interest was in 120v. I wanted it to produce all it could and 3 phase seemed best so what you see in the photo the L0 lug is on top out of view. No jumpers are made inside the control box on my machine so its not 120/240 modified. The selector switch in the control panel is set to 120v 3 phase and what i am getting is
L0 is dead

L1 is 120v
L2 is neutral because I have a ground jumper run from L2 to the ground bump on the bottom frame (per manual)
L3 is 120V

The photo shows as best i could, 2 separate 120v outlet boxes each separate using 3 wire cable. he tied the grounds together.
so I will balance my load by putting some things on one outlet box and some things on the other outlet box

He was impressed with this machines capabilities as was I. So everyone rely on a meter not what you read. Although by reading you can find what you are looking for as i have done.

I got 30 amps on 3kw out of this deal top that with a retail machine. this has been a long hard journey. harder than it needed to be. i hope this helps others.
 

Attachments

Last edited:

seek

Member
69
0
6
Location
Mocksville nc
I don't know what to tell you. Meter says what it says and that part of manual is not in question.

The thing with these machines they were adaptable and therefore could be different things for different situations.

I really have no faith in what you say, said. I paid professionals to check my machine and I reported what they said so people would not have to listen to the crap you don't say. When people need answers that's just what they need.

I found on my journey that they were configured and modified in different ways and that's why a meter is a must. My post is explict enough someone can figure out there they need to be.

You feel free to crawl back under your rock where you keep that can of worms used to answer people with questions on a mep-016b
 
Last edited:

seek

Member
69
0
6
Location
Mocksville nc
Calm down, ace. I posted nothing insulting to you.

Not sure how well your genset is wired, but you?...heh heh
The wiring is a template/roadmap when I get more outlets I will add the better wire. But again you have blessed me with your presence and added nothing. Thank you for leaving again. Please be assured there is nothing more you can add Mr. Negative.
 

seek

Member
69
0
6
Location
Mocksville nc
I had time to draw it out and make some notes on pdf. Use a meter and double check your setup. Moving the jumper to the backside L2 is almost mandatory the split lug will only safely hold so much wire. #6 is heavy enough to take the heat its close..real close to muffler.
 

Attachments

Last edited:

seek

Member
69
0
6
Location
Mocksville nc
I re-ran the neutral. I opened the control box and removed the 2 screws and nuts that held the re-connection switch to the side of the box and dropped the re-connection switch out of the way and removed the nut on the backside of L2 and fixed the white neutral wire to the stud with a #6 ring terminal.

I did not have any large spade terminals so I made one out of the spare ring terminal and loosened the nut on the frame earth ground bolt and fixed the other end between the bolt and frame. So now that big fat neutral wire is out of the way and permanent so to speak and provide for a better connection on those split connection bolts

II will replace the temporary second outlet with another heavy duty box when I get around to it.

In my setup I have decided to add a second grounding rod and use that for the green grounds off the outlet boxes. I never want to be lite up because a #6 copper wire breaks between the grounding rod and frame.
 
Last edited:

dependable

Well-known member
1,720
187
63
Location
Tisbury, Massachusetts
In my setup I have decided to add a second grounding rod and use that for the green grounds off the outlet boxes. I never want to be lite up because a copper wire breaks between the grounding rod and frame.
Now you've spilled the can, and the worms are all over the porch.

Look into it, as I know you will not believe me.
 

seek

Member
69
0
6
Location
Mocksville nc
I wanted to point out that I have seen two types of control boxes if you were to have one like mine you will need to drill the back corner weep hole in order to feed the #6 wire in or out as you choose. I drilled my hole out and then used a dremel to smooth the hole to protect the insulation on the wire from abrasion and slipped a few lengths of shrink wrap over the insulation for added safety. I was able to use a modified vacuum hose to completely clean the area after drilling and used ties to hold it against the frame and sort of center the wire in the hole.
 

Attachments

seek

Member
69
0
6
Location
Mocksville nc
I am using a solid #6 wire for my ground and think that's a mistake. It's to rigid and I am using it as a portable on wheels and the ground is already important but with me re-making the ground each time I need to make it easy and simple. I am thinking treating it like a welder. Using a flexible heavy cable.
 

turnkey

New member
757
2
0
Location
wadsworth,ill
WOW, this is some thread all about 1 little old genset.......Try playing with the big boys, 30kw plus... now they have some cool toys......Good thing to have the profs. come around do the setup for ya.......Me, I just bought a Genset at Lowies and had the guys install and test it with a 5 year maintenance contract....There all better now ...Have fun with your rig.
 

seek

Member
69
0
6
Location
Mocksville nc
You must be really bored to be reading threads on a 3kw military generator and not own one. I considered taking your path and buying a disposal generator like they sell at retail and buying some piece of mind to cover it.

The attention I gave this thread was simply because I wanted what I could not find one thread for a newbie and a 3kw generator in making it safe and useful. It's wonderful you stopped in and shared your personal experience, you definitely enhanced it. Be sure you stop back in the first time you need to run yours for a few weeks during an outage and write about how it went and how often you need that warranty you bought. Does the warranty cover bringing blankets and hot cocoa in case your generator fails? I hope so. I see you say you had professionals setup yours up too,Yeah, enjoy your toy.
 
Last edited:
Top
AdBlock Detected

We get it, advertisements are annoying!

Sure, ad-blocking software does a great job at blocking ads, but it also blocks useful features of our website like our supporting vendors. Their ads help keep Steel Soldiers going. Please consider disabling your ad blockers for the site. Thanks!

I've Disabled AdBlock
No Thanks