dschoolxlt
New member
- 5
- 8
- 3
- Location
- Youngstown, Ohio
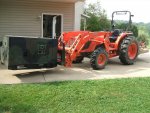
Hey Folks, long time lurker, but new MEP owner. I picked up a new to me MEP-803. This ones been tier 1 reset and had the Tobyhanna remote monitor modification. Fortunately it had the loop back plug and fired right up.
After reading the forums, I did the standard onceovers, replacing bad fuel lines. Fluid changes and new batteries. It didn’t have the quad winding fuse, so that was added also. I have the parts for the ultimate wellnut update. So that’s on the agenda for the next decent day I have off. Otherwise So far no issues. I’m pretty much able to run the entire house on it with no issues.
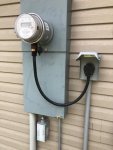
I poured a pad for it and used Generac control cabling for it. This has three #4 hots/neutral. one #8 Ground & six #18 control wires. I figured this was best since I’m roughly 100feet from my main panel. This is currently set up with an interlock and back feed 60amp breaker. I also added a disconnect inline at the set itself as the “fixed” sets need a disconnect within sight and the next closest would be in the house panel.
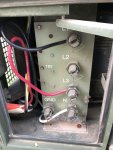
The bonding strap was removed as it is bonded in the main panel. I did drive a grounding rod at the set and wired it to the genset frame itself. I still have some conduit items to sort out yet. But all is functional.
I’m likely going to go with the Klopp controller for it to get the two wire start.
Is there a specific outdoor rated 100amp automatic transfer switch that’s recommended? I’m in northeast Ohio. So I believe we follow 2017 NEC as far as regs
Here’s the set up so far

After reading the forums, I did the standard onceovers, replacing bad fuel lines. Fluid changes and new batteries. It didn’t have the quad winding fuse, so that was added also. I have the parts for the ultimate wellnut update. So that’s on the agenda for the next decent day I have off. Otherwise So far no issues. I’m pretty much able to run the entire house on it with no issues.
I poured a pad for it and used Generac control cabling for it. This has three #4 hots/neutral. one #8 Ground & six #18 control wires. I figured this was best since I’m roughly 100feet from my main panel. This is currently set up with an interlock and back feed 60amp breaker. I also added a disconnect inline at the set itself as the “fixed” sets need a disconnect within sight and the next closest would be in the house panel.
The bonding strap was removed as it is bonded in the main panel. I did drive a grounding rod at the set and wired it to the genset frame itself. I still have some conduit items to sort out yet. But all is functional.
I’m likely going to go with the Klopp controller for it to get the two wire start.
Is there a specific outdoor rated 100amp automatic transfer switch that’s recommended? I’m in northeast Ohio. So I believe we follow 2017 NEC as far as regs
Here’s the set up so far
Attachments
-
 134 KB Views: 81
 -
 78.1 KB Views: 85
 -
 55.7 KB Views: 82
 -
 122.3 KB Views: 79
 -
 125.2 KB Views: 71
 -
 131.6 KB Views: 70