• Steel Soldiers now has a few new forums, read more about it at: New Munitions Forums!

  • Microsoft MSN, Live, Hotmail, Outlook email users may not be receiving emails. We are working to resolve this issue. Please add support@steelsoldiers.com to your trusted contacts.

Mep802a shorted out, running rough

Korgoth1

New member
191
5
0
Location
radford, va
Alright, I fiddled with it some more this evening, got the oil leaks fixed and ran it with 6250watts on it. Anymore and it bogs the engine, so I'm going to see what the injector's spray patterns look like. I already cleaned them, if the spray pattern is the least bit funky Im sending them to be rebuilt/replaced along with the pumps.

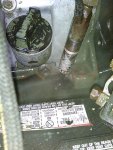
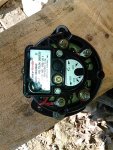
On another note, I found the alternator looked alittle funky

IMG_20151204_161312_456.jpg

Or starter, not sure which one is causing the interference fit...
 

jamawieb

Well-known member
1,436
557
113
Location
Ripley/TN
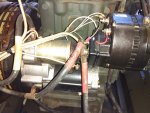
The alternator is upside down, there should be some clearance between the alternator and starter. After you flip it over, it will sit higher and be out of the way.
 

Korgoth1

New member
191
5
0
Location
radford, va
Well I checked the spray pattern of the injectors, and they were not bad, but the front cylinder was running hotter than the rear so I'm going to send them off anyway.

IMG_20151209_145041_734.jpg

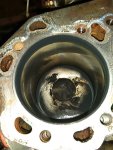
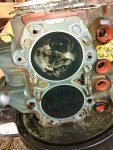
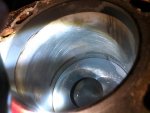
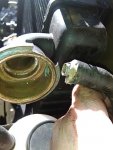
I went ahead and pulled the head, as you can see the front cylinder shows it's not fueled right.

IMG_20151209_163759_919.jpg

IMG_20151209_163353_296.jpg

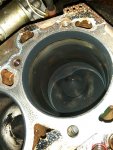
The engine must have stopped with the rear cylinder's valve open, then it sat for awhile. You can see where condensate has rusted the cylinder wall

IMG_20151209_163814_329.jpg
IMG_20151209_163917_458.jpg
It cant be felt with a fingernail, but it does tick me off.

Alot of rigging on this set...
IMG_20151209_152958_536.jpg
 
Last edited:

Korgoth1

New member
191
5
0
Location
radford, va
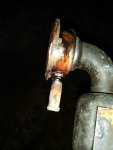
Got the overflow nipple soldered back on.
IMG_20151210_171858_326.jpg
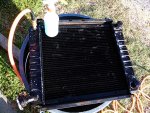
Then pressure tested and cleaned the radiator
IMG_20151210_152748_486.jpg
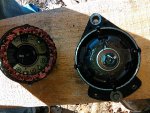
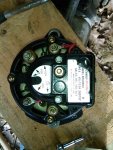
They must have assembled the alternator backwards, or someone has took it apart before.
I took it apart and turned it 180* so it doesn't interfere with the starter anymore.

IMG_20151210_143918_203.jpgIMG_20151210_144113_092.jpgIMG_20151210_150025_806.jpg
 
Last edited:

Guyfang

Moderator
Staff member
Moderator
17,070
24,992
113
Location
Burgkunstadt, Germany
Try this trick. With the engine running, loosen the clamp for the injector/Pump is just a tad loose. Put a wrench on it and turn it a hair right or left. Just a tad. See if the engine runs smoother. Then try the other injector/Pump. Got this idea/trick from the very best LAR I know. He used it lots in his 5 deployments. So give it a try!
 

Guyfang

Moderator
Staff member
Moderator
17,070
24,992
113
Location
Burgkunstadt, Germany
Well I checked the spray pattern of the injectors, and they were not bad, but the front cylinder was running hotter than the rear so I'm going to send them off anyway.

View attachment 598395

I went ahead and pulled the head, as you can see the front cylinder shows it's not fueled right.

View attachment 598396

View attachment 598397

The engine must have stopped with the rear cylinder's valve open, then it sat for awhile. You can see where condensate has rusted the cylinder wall

View attachment 598398
View attachment 598401
It cant be felt with a fingernail, but it does tick me off.

Alot of rigging on this set...
View attachment 598400
Keep in mind, these sets are not new. And many were any number of times down range. Then some of the TIER repairs were done by people who had NO IDEA. So yeah, a lot of "Field fixes" were done. Thats what kept me very much on the road for 8 years here in Germany.
 

Korgoth1

New member
191
5
0
Location
radford, va
Haha, I hear ya, I believe with alittle tlc this unit will be good to go. I got the injectors ordered for $50 a piece, and I'm trying to find a competent injector shop to test and rebuild the pumps if necessary. With this many hours, the injection system needs to be overhauled anyways.

My local guy wants $150 a pump, but he is not familiar with these pumps

He mentioned replacing seals, and from what I've read there are no seals in these little pumps, so that doesn't inspire confidence with me...

So if any of you guys know a good shop that has messed with these before please pm me, I would appreciate it.
 

Guyfang

Moderator
Staff member
Moderator
17,070
24,992
113
Location
Burgkunstadt, Germany
Korgoth,
Since you are looking into your set deeper then skin deep at this time, here iare some observations on the fuel tank of the MEP 802 and 803. The tank is where it all starts. Good clean fuel, much less trouble with the engine. The big difference between you and the Army is that the Army uses JP-8. It is a much more “aggressive” fuel. Much harder on rubber or synthetic parts. More on that later.

A good way to start “looking” into the corners is to remove the front cover, figure 6, item 18. Take a gander inside. Often you will find that the fuel float switch, figure 17, item 10 has been “modified”. By that I mean the plug, figure 17, item 6 has been replaced by simply cutting a plug off an old switch and grafting it on the new switch with crimp connectors. Ugly, prone to come apart, but works. Most the time. This switch drove the military and all honest generator repair personnel crazy for YEARS. I heard that it was to be “upgraded”, but the LAR who told me that also rolled his eyes.

I will list the problems with this switch.

  1. JP-8 tended to “eat” the float material away. Then the magnets (needed to open and close contacts FL-1 and FL-2) embedded in the floats dropped out to collect in the bottom of the tank. With all the other junk.
  2. The contacts, (FL-1 and FL2) in the switch stem often burnt due to vibrations. The floats jumping up and down a million time an hour, opening and closing the contacts is not good. They burnt open, no contact, or welded closed, continues contact. Not good. More to that also later.
  3. The replacement plugs and pins were unobtainable for years. Hence the “modifications”. When at long last pins and plugs became available, the special tools needed to install or remove them were unobtainable.
  4. The wires from the plug to switch were thin and easy to damage.
  5. The gasket was often lost, damaged or made of TM covers. So the old RTV tube came out. More to that later.
  6. The locking nut, used to raise or lower the float switch in the tank often was loose of maladjusted. If the switch was set to low in the tank, vibrations often caused the contacts (FL-1) to open, causing the set to shut down for low fuel, even when the tank was full. Or contacts FL-2, to turn on the low fuel light on the fault indicator. If the switch is to high in the tank, the set shutdown for low fuel, with half a tank. Or even better, the FL-2 contacts also turn on the aux. electric fuel pump when the S-1 Start/Run switch is in the in the aux fuel run position. This often led to fuel pouring out of the fuel tank filler neck, from the fuel tank cap. The cap is vented, to keep pressure in the tank equal to outside air pressure. If the vent is closed or much more often the case, plugged with rust and dirt, the set will stop running, for no fuel.
Here a few words to the fuel tank level switch, figure 17, item 4. It was also something that drove people crazy for years. Mostly the arm, holding the float bulb would get loose and give false readings. Then it would fall off. I once found four floats in a fuel tank. The float goes up and down, moving a wiper arm across a coil. The increase or decrease of resistance is what moves the fuel level meter, M-5, figure 10, item 7. This coil often burnt/shorted out. This switch can also be adjusted for depth in the tank, but I have never seen the need to. Right out of the box, it worked just Jim Dandy.

RTV. A wonderful invention. But not every RTV is friendly to fuel systems. Use one that is compatible to diesel if you JUST HAVE to use it. DO NOT USE RTV Black. It turns into something like thin silly putty. It even feels nasty in your hand. Plugs the electric fuel pump real well.

Look at figure 6, item 22, plate, hold down. It is there to hold the fuel tank down. If the bottom of the hold down, (the foot) is missing, it can and will eat a hole in your tank. I saw this often in the 2007-2008 time frame. Many companies that were using personal, I won’t call them repair personnel, did shoddy TIER 2 Work both in Germany and Letterkenny, Pa. For some reason, this part was often installed without the foot. Or the whole bracket was missing.

The fuel tank adapters, figure 17, items 41 and 43. These fittings were often bad. I think JP-8 had a lot to do with this problem. The fitting consists of a metal fitting, and a rubber expanding plug. You screw in the fitting, and the fitting pulls up a nut embedded in the rubber plug. Works like a charm. The problem was almost always that someone like me tried to get the fitting just that last little bit tighter. At some point it will tear the rubber. Most the time it’s not a big problem. Until you move the set, if you overfill the tank or have lots of vibrations. Then you will have a problem. Fuel everyplace. So get it snug, but not real tight. It should not turn when you try to twist it in the tank, that’s good enough. And don’t forget the washer, item 42. It not going to seal right without it.

You can, if your forearms are not like Charles Atlas, stick your arm into the fuel filler neck and operate the fuel level sender and fuel level switch. Good way to see if things work, and you do not have to take everything apart. At the same time you can look for ugliness. By that I mean slimy stuff, sand, dirt, crap, fuel floats and dead things. Should you find that it’s not real clean, I would suggest pulling the tank. A lot of work. If you do, just pull the top cover, disconnect the radiator hoses and take out all the screws on the skid base. Disconnect all wires and hoses. Lift it up and you have the tank where you need it. Yes, I left out a “few” other things. But you will get the idea if you have to do it.

This was long, but if it helps you or anyone else, that’s good.
 

Korgoth1

New member
191
5
0
Location
radford, va
Well parts finally came in and I got it back together.

Note when ordering the fuel pump shims from Kraft power, the color codes are different and make sure you are both using metric or standard when ordering.

Also, don't get the decarb gasket set as it doesn't come with 2 gaskets you actually need(exhaust single gasket, and timing cover gasket), you are better off ordering the gaskets you need separately, making the waterpump, timing cover gaskets, and sourcing the various orings and copper washers for injectors locally.

Anyway, after starting it up, it ran very nicely, no smoke at all(I only put in new injectors) I let it warm up while watching for leaks. Shut it down to hookup for a load test, and restarted it, only running on the front cylinder, rear pump isnt pumping fuel. I pulled the top of the pump, and the piston doesn't rotate when moving the fuel rack, somehow the tang has popped out of the rack.
 

Korgoth1

New member
191
5
0
Location
radford, va
Alright, got the rack engaged, the pump must have slipped while I was tightening it.

Ran it under load, still would not pull more than 6200watts, when I shut it down I noticed a hissing leak type sound. Cranked the engine and watched the injectors, noticed the front cylinder leaking smoke around the injector. Took it out and cleaned it really good, new sealing ring and started to clamp it down. Noticed the injector clamp scoots forward when tightening it down, putting the injector in a bind, making it leak.
 

Guyfang

Moderator
Staff member
Moderator
17,070
24,992
113
Location
Burgkunstadt, Germany
Fuel pumps jumping off the rack was one of the worst problems the 802 and 803 ever had. For years.

When inserting the pumps, be very careful. When they are just about fully in, twist them a tad right and left, to feel if they are in the rack. You can also move the fuel linkage, (lever, external start/stop, TM 9-2815-252-24P, figure 9, item 45) back and forth a tad, to feel if the pumps are in the rack. They should both rotate a milemeter or so when in the rack properly. Then tighten them down.
 

Guyfang

Moderator
Staff member
Moderator
17,070
24,992
113
Location
Burgkunstadt, Germany
Different subject, but as long as you have your head stuck in there, check the engine and main gen shock mounts. TM 9-6115-641-24P,figure 23, item 9, and figure 26, item 10. See if they are cracked. If the cracks are deeper then 4-5 milameters, you need to keep an eye on them if running prolonged time periods, say a month or longer. This was a serious problem downrange. I saw a set that the rear mounts failed, the generator canted to the right and pinched the battery. It wore a hole in the side of the battery half the size of my fist. AND ate up the fan and fan guards. The set did NOT stop. Shows you how tough they are. To prevent cracks, rub a little silicone grease in the rubber parts once a year. Also check to see if both washers were reinstalled on the mounts. Often that did not happen.
 
Last edited:

Korgoth1

New member
191
5
0
Location
radford, va
Ok, had some time to diagnose the leaky injector, it is the injector itself, a Stanadyne (new from the big auction site seller mss_diesel_solutions) Apparently the sealing surface of the injector has been warped, or was never machined properly to begin with, I bought 2 of them and the other injector seals fine in either cylinder with a new sealing washer, the old injectors seal fine aswell.
 

Chrispyny

Member
294
12
18
Location
NY
Don't mean to hijack a thread, just a quick question. My 802 was made in 2000. So 15 years later, should i trust the rubber motor mounts? They do have some cracking in them even tho the genset is like new and only has 22 hours on it. I feel, if i could snag a couple rubber mounts somewhere at an affordable price, i'd be happy to take the time to replace them. would any lister petter place like kraft power have these in stock at an affordable price ?
 

Guyfang

Moderator
Staff member
Moderator
17,070
24,992
113
Location
Burgkunstadt, Germany
Chris,

If the set is 15 years old and has 22 hours and looks like new, then it probably went through Tier 2 RESET. As I remember, the rubber baby bumpers, (front and rear shock mounts) were an automatic change item. So if they are cracked, someone forgot them, or the mounts went south real fast. How bad are they cracked? Have you looked at the rear mounts? If the cracks are not more then 1-3 mm deep, why worry? You could let them go even farther if you keep an eye on them. I dont think its a lister peter supplied part. The cage code in the TM lists 30554. That's the code for DOD. They get them from several sources. No help there. I cross referenced it to two more suppliers. Cage code 81860, Barry Wright Corp., and cage code 5P059, Tech Products Corp. The mount is common to several different weapons systems. Give both places a call, see what they want for the mounts.

The front mounts are easy to change without a big fuss. I took off the top cover, then I put a wooden block under the engine. Removed the mounting hardware and drove a wedge in from both sides of the wooden block. Raised engine a bit and replaced them. The back, are another story. I did it with out removing lots and lots of parts and panels and all that crap. But it is a bit rube goldberg. I took out the mounting hardware and inserted a tanker bar under the main AC, with a wooden block under the bar. Had someone I trusted to lift the main AC with the bar, and swapped the mounts out. One at a time. Got to watch out for your fingers. And it took several tries to get it right. If someone had a copy of FEDLOG, they could tell us what other weapons systems use this mount. Might make it easier to locate them.
 

Chrispyny

Member
294
12
18
Location
NY
Chris,

If the set is 15 years old and has 22 hours and looks like new, then it probably went through Tier 2 RESET. As I remember, the rubber baby bumpers, (front and rear shock mounts) were an automatic change item. So if they are cracked, someone forgot them, or the mounts went south real fast. How bad are they cracked? Have you looked at the rear mounts? If the cracks are not more then 1-3 mm deep, why worry? You could let them go even farther if you keep an eye on them. I dont think its a lister peter supplied part. The cage code in the TM lists 30554. That's the code for DOD. They get them from several sources. No help there. I cross referenced it to two more suppliers. Cage code 81860, Barry Wright Corp., and cage code 5P059, Tech Products Corp. The mount is common to several different weapons systems. Give both places a call, see what they want for the mounts.

The front mounts are easy to change without a big fuss. I took off the top cover, then I put a wooden block under the engine. Removed the mounting hardware and drove a wedge in from both sides of the wooden block. Raised engine a bit and replaced them. The back, are another story. I did it with out removing lots and lots of parts and panels and all that crap. But it is a bit rube goldberg. I took out the mounting hardware and inserted a tanker bar under the main AC, with a wooden block under the bar. Had someone I trusted to lift the main AC with the bar, and swapped the mounts out. One at a time. Got to watch out for your fingers. And it took several tries to get it right. If someone had a copy of FEDLOG, they could tell us what other weapons systems use this mount. Might make it easier to locate them.
I'll take a better look tomorrow as to how bad they are. Pretty sure not bad at all but i'm all about preventative maintainance.
It actually wasn't a reset. It was part of some military police unit per the stencils on the trailer and fell out of rotation or just wasn't used. There were 5 other 802's on trailers feom 2010 that also fell out of rotation. All five had 8 hours or less on them. No resets. Original like new. Thats why i had to do my own fuse mod for the stator. Nothing was done. Dunno what goes on at fort drum, but they have some mighty fine equipment coming from there into govplanet for auction!

Guyfang, if i get you the pics of the stencils on the trailer, would you be able to determine wheremy mep camr from ?
 
Top
AdBlock Detected

We get it, advertisements are annoying!

Sure, ad-blocking software does a great job at blocking ads, but it also blocks useful features of our website like our supporting vendors. Their ads help keep Steel Soldiers going. Please consider disabling your ad blockers for the site. Thanks!

I've Disabled AdBlock
No Thanks