• Steel Soldiers now has a few new forums, read more about it at: New Munitions Forums!

  • Microsoft MSN, Live, Hotmail, Outlook email users may not be receiving emails. We are working to resolve this issue. Please add support@steelsoldiers.com to your trusted contacts.

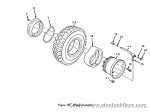
Mounting Split Rims w/tires

Cdub

New member
1,082
2
0
Location
New Milford, NJ
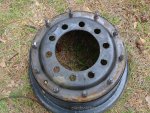
I have the need to dismount and mount a tire on the Super Single Combat Rim. Is it a job I should send out or attempt myself. I know I'll need to replace the large " O " ring between the rims and who to get it from would be a big help.

Thanks,

C'dub
 

Attachments

sermis

Active member
1,844
17
38
Location
Temple, TX
A lot simpler and safer than split rings. Unbolt the 10-or 20 bolts and use a tire hammer to break the bead loose and remove the 2 halves. Clean and reassemble. O ring might be ok if it is not leaking now.
 

DDoyle

Well-known member
Supporting Vendor
1,825
81
48
Location
West Tennessee
Re: RE: Mounting Split Rims w/tires

sermis said:
A lot simpler and safer than split rings. Unbolt the 10-or 20 bolts and use a tire hammer to break the bead loose and remove the 2 halves. Clean and reassemble. O ring might be ok if it is not leaking now.
I would presume one would first deflate the tire before loosening bolts? I've no first-hand experience with these.

Regards,
David
 

timntrucks

Well-known member
Steel Soldiers Supporter
4,037
119
63
Location
Ponchatoula LA
not bad of a job, i dont most by myself, i used some tire soap even on the oring with no problems, i didnt use new orings just cleaned and soaped them up. the trick to being by your lone self is to not put the tire on its side leave it standing up . TIm
 

jwaller

Active member
3,724
19
38
Location
Columbia, SC
does anybody have the correct torque for the 10 bolt wheels? I was looking around and the 16 bolt rims say up to 500ft lbs. that seems very high.
 

Westech

CPL
6,104
209
63
Location
cow farts, Wisconsin
Deflating the tire is a good thing. The tech's sometimes don't do that here and just use the beed braker and BOOM!! there goes the tire and it scares the customer 1/2 to deth. Kinda funny the first time, the second not so much.
 

DavidB

Active member
329
52
28
Location
Southeast Wi.
Removing valve stem , deflateing tires always makes a safer/easier job.Tires are one thing about a military vehicle that will defanatly hurt bad when taken for granted.Horse play has no place around a good shop!
DavidB
 

dma251

Member
649
17
18
Location
Arlington, Washington
When I did all mine I just torqued them down as tight as my IR impact would tighten 'em. I don't think you could over tighten these with reasonably sized tools. 500 ft lbs seems appropriate to me. The key is REALLY TIGHT.


You definitely can do this yourself. Use the rubber beadlock donut as a wheel stand and flop the tire down over the wheel that way. Or try to do it standing up, but I found that a bit harder to manipulate and keep from falling over all the time.

Remember - lift with your knees!
 

Cdub

New member
1,082
2
0
Location
New Milford, NJ
Well the dis-mount and mounting went very well.

I did take some time spraying down the well bolts with some WD-40 the day before. Which made them come off much easier with the impact gun.

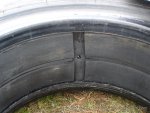
The bead on the small half came off by using some spoon dollies that I use to do body work. I'm sure some tire spoons would have worked better. I used the two spoons together working the rim and tire back and forth. I used plenty of Tire Mounting Lube which really seemed to do the trick. I keep the tire up right and started working on the larger half. I had to work the base of the valve stem past the bead which didn't give me to much trouble. Before I realized it the larger half was just about falling out by itself. The bead lock was very large and thick and wasn't going to fall out by itself. So I tied a rope around the bead lock and made it as flat as possible. It took a little work but it came out. The spoons worked very well during the hole dis-mount.

The wheel halves, O ring and valve stem seemed to be in good enough shape to return the wheel back together with the new tire. I reinstalled the bead lock and released the rope that was keeping it flat. More of the tire lube helped get it into position. I tried working with the tire still up right but it was difficult to keep the wheel square in the tire. So I laid down the tire with the large half in the tire down on some 6 x 6 block and added more of the tire lube before installing the small half making sure the O ring was seated properly. I installed the smaller half and started bolting down the wheel halves in the direction you would back and forth alternating from nut to nut. The wheel was together and was time to air it up. She's set at 60lbs. with no major leaks. I will return tomorrow for a check on the pressure. I hope she holds.......all and all it took one hour from start to finish and I was a very proud of a job well done

Tomorrow I will change out another tire and wheel. I hope to have the same luck as I did today.....

Cheers,

C'dub
 

gimpyrobb

dumpsterlandingfromorbit!
27,786
759
113
Location
Cincy Ohio
I bet you don't. I'm not wishing a hard time on you, just it always seems like I get the easy one first and spend the next three days trying to do what took an hour the day before! Good luck with it.
 

Cdub

New member
1,082
2
0
Location
New Milford, NJ
gimpyrobb said:
I bet you don't. I'm not wishing a hard time on you, just it always seems like I get the easy one first and spend the next three days trying to do what took an hour the day before! Good luck with it.
I sure hope that's not the case. I'm experienced with the first one and know something about what I've done the day before. This should make things go much faster the second time around and so on and so on..........

Funny thing is........

In the body shop I watched a glass guy take out a windshield from a car. The next one I tried myself.....and ya know what........We didn't call any one in any more to change the windshields......Hahaha.....

Lesson learned....If you don't try it, you'll never know if you can........!!!

seya,

C'dub
 

Cdub

New member
1,082
2
0
Location
New Milford, NJ
Well it looks like the second wheel went easier and faster then the first one. I think it had a lot to do with the fact that I bought two different tire spoons to help with the job. The longer extension help a great deal with plenty of leverage. The dismount took only 15 min. from un-bolting the rim to removing the bead locker from the tire. I did find something very interesting about the second wheel though....

Very strange from the start..........

I went to use my 1 1/8" socket and it was too large for the nut on the rim bolts. The actual size was 15/16". Which I though was a little strange but I went and got another socket that would fit. When I separated the rim I found that the rim sealed differently then the first.

I came to this conclusion about the two types.

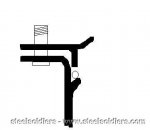
Type I - Rim bolt nuts take a size 1 1/8" socket. The smaller half of the rim seals on the top of the O-ring using a rectangle type of O-ring.

Type II - Rim bolt nuts take a size 15/16" socket. The smaller half of the rim seals on the outside of the O-ring sliding down the side using a round O-ring. It's a more common type of O-ring seal.

Has anyone found this on their Combat rims.......???

Are your combat rims type I or type II........??

Cheers,

Craig
 

emmado22

Moderator
Super Moderator
Steel Soldiers Supporter
7,058
149
63
Location
Mid Hudson Valley NY
Sounds like you have a mixture of A1 and A2 type rims.. A2's if I remember correctly have the bigger studs/nuts. Becareful with the smaller ones, they tend to break upon overtightening.. Thats why they went to the bigger A2 ones....
 

steelsoldiers

Administrator
Staff member
Administrator
5,270
4,067
113
Location
Charleston, WV
Mine were the A2 type, obviously. I did the first one myself. Once I was satisfied that I could do it, I took the next one to the tire shop and paid someone else to do it. Watching the tire guy do was much more satisfying that doing it myself :) The A2 o-rings come out looking like triangles, but that's just because they were memory-set down in the groove. I used a Parts Number correct o-ring the first time and it worked just fine. The second time I used a 1/4 x 20" commercial truck o-ring sourced from a friend and it worked just as well.
 

Cdub

New member
1,082
2
0
Location
New Milford, NJ
Chris,

Did the smaller half of the rim fit on top of the O-ring or did it slide down along the side of the O-ring...??

Thanks,

C'dub
 

Cdub

New member
1,082
2
0
Location
New Milford, NJ
Hi Chris,

Thanks so much for taking the time to post up the pic for me and the detail of the O-ring is the same as the first wheel I replaced the tire on.

I've found that my M925a1 has.............

four wheels with the 1 1/8" nuts (possibly A2 wheels)

three with the 15/16" nuts (possibly A1 wheels)
 

steelsoldiers

Administrator
Staff member
Administrator
5,270
4,067
113
Location
Charleston, WV
Craig, when you get a moment sometime, put a gauge on the clamp-ring studs. I'm curious to know what the difference is in the stud size, if there is one. My rims used 10 1-1/8" nuts to secure the clamp ring and used 2 15/16" nuts to secure the CTIS wheel valve to the same studs. The 1-1/8" were steel-threaded lock nuts and the 15/16" were some sort of ny-lock nuts. Maybe whoever put your wheels together last just used the smaller nuts all the way around. Just curious...
 
Top
AdBlock Detected

We get it, advertisements are annoying!

Sure, ad-blocking software does a great job at blocking ads, but it also blocks useful features of our website like our supporting vendors. Their ads help keep Steel Soldiers going. Please consider disabling your ad blockers for the site. Thanks!

I've Disabled AdBlock
No Thanks