• Steel Soldiers now has a few new forums, read more about it at: New Munitions Forums!

  • Microsoft MSN, Live, Hotmail, Outlook email users may not be receiving emails. We are working to resolve this issue. Please add support@steelsoldiers.com to your trusted contacts.


My BIG M925A2 Project Truck Is Home

steelsoldiers

Administrator
Staff member
Administrator
5,246
3,932
113
Location
Charleston, WV
New Year's Eve was especially greasy and difficult at John Winslow's. I am in a big time crunch to get the truck done so I worked on Thursday for most of the day, this morning for a few hours, and then I'll be back there again tomorrow.

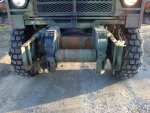
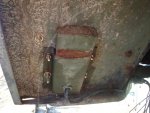
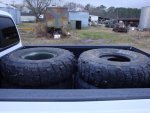
My first project on Thursday was scavenging some more parts off of the parts truck. I finally got the oil pan off of the parts engine. After wrestling with that I pulled off the winch control valve and a spring brake actuator.

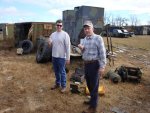
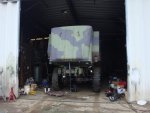
I headed back up the hill, fired up the 925A2, and returned to the parts truck to gather the goodies. I took the dent-free oil pan to John's shop to perform the swap. The guys were nice enough to let me use the shop and air tools to make the swap easier. It was a great feeling to be inside out of the rain and rolling around on a concrete floor with a creeper!

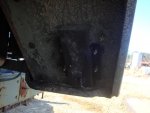
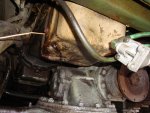
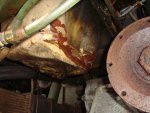
The oil pan swap was a huge PITA. The bolts came out easily and the pan broke free without much effort. The biggest issue is that there is very little clearance between the engine/tranny/frame/front end to get the oil pan out. I actually had to jack the frame up to take the weight off the axle and let it droop to make enough room to get the pan out. Pete helped me stack up some crib block and then we used the air jack to lift the truck.

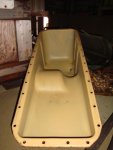
Once I got the pan out I went to work on the old pan gasket. It was glued to the block so it took a lot of scraping to get the mating surface clean. I banged my head a dozen times and was absolutely covered in oily filth by the time the block was clean. I also cleaned up the new pan, laid down some black RTV, and pressed the new gasket into place.

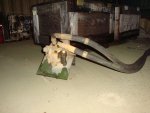
The old pick up tube was a little bent and it was caked with sludge because it was slammed right up against the inside of the old pan. I removed it and swapped in the new pick up tube with a new gasket.

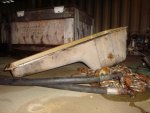
Once that was done it was time to get the pan back in position. Pete had to help me get the pan in position. We had to jack the truck up and loosen the pick up tube to get it into place. I gave it a good cussing to make sure it knew who was boss. Once we had a few bolts started, Pete left for the day and I snugged down the rest of the fasteners. It was pitch black by then and plenty cold so I wrapped it up for the day.

The guys at Winslow's needed the shop today so I went down really early today to finish the job. I put in a couple of bolts that I couldn't see to put in the other day and then double checked the rest of them. Once that was done I filled the new filter with clean oil, removed the old filter, and snugged the new one up. Then, I had to pour in 5 gallons of fresh oil that had the viscosity of molasses. It took forever for it to drain down through the valve train! I gave it a while to get to the pan and then I checked the dipstick.

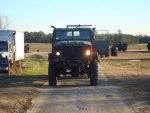
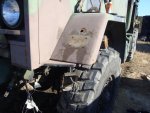
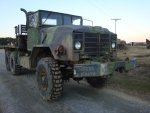
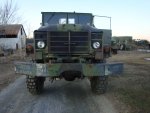
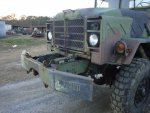
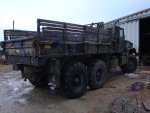
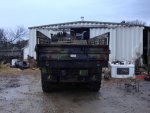
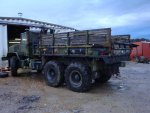
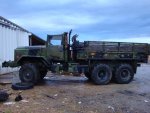
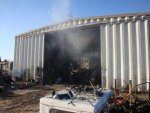
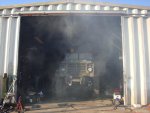
Everything looked good so I proceeded to start the truck. It was good and cold so the garage was filled with smoke. It took a good while for it to clear out as you can see from the pics.

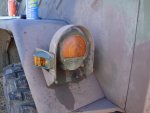
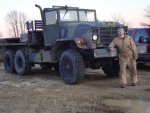
I took it for a quick test run and it ran great with no leaks. Woohoo. I will return early tomorrow to finish the wiring/lighting, mount the bumper, and install the bedsides. It should be a productive day. It's coming together nicely and I can't wait to go for an extended test drive.
 

Attachments

DanMartin

New member
1,276
16
0
Location
Hillsboro, Oregon (USA)
Most excellent Chris! It's really coming along well.

Would love to see the dented old pan....

Considering what you started with, this is amazing progress. I can't wait to see it tooting down the road!
 

steelsoldiers

Administrator
Staff member
Administrator
5,246
3,932
113
Location
Charleston, WV
Thanks guys. As promised, here is an update from today. It was the windiest, bitterest day on the project by far today. Phew! Good thing I had my kero heater going in one of the conex boxes. I had to take a break every once in a while to thaw out!

My number one priority today was functioning lights and signals. I had to finish splicing the hood harness back together to achieve that. The good news is with all the splicing I did on the headlight harness, I only mixed up one pair of wires. I got the blackout drive lights wire mixed with the dash lights wire. It should be an easy swap. After splicing for about an hour with my icy, numb fingers, I got everything working except the turn signals. I went round and round the truck looking for a bad ground, bad wire, bad flasher or something else that would kill the signals. Last thing I tried was swapping out the turn signal lever and that did the trick! All of my signal lights worked except the right front. I may have a bad wire in the harness or something. I will chase that down next time.

The second project of the day was swapping out the bent bumper for a good used one. I found a straight bumper on a 939 carcass in John's field so I loaded up the old bumper on the 5-ton along with my tools and went to fetch it. I had it off of the truck in about 30 minutes because I had already soaked the bolts in Kroil a few days ago. I loaded it on the truck with the other one and headed to the shop. I used the impact to remove the lower shackle mounts from my A2 bumper and to mount them to the original 939 bumper. I had to do that because only the A2 trucks have the upper and lower shackle mounts. The impact made pretty quick work of that swap. Then, I hoisted the bumper and mounts into position on the frame, lined up the holes, started all of the bolts, and ran them down with the impact. Now it looks like a truck!!

Next time, I will get the bed sides and tailgate installed along with the passenger seat and mirror assemblies. It should be ready for the trip home after that so long as I have my paperwork in order. Oh, and I need to install a new cab top too. The old one about blew off the truck during my test drive today!
 

Attachments

steelsoldiers

Administrator
Staff member
Administrator
5,246
3,932
113
Location
Charleston, WV
Here are a few pictures of the finished bumper installation and a picture of me with the truck. I figured I should have at least one photo with the truck so I set up the camera on an 818 fender, hit the timer, and ran to my truck trying to look casual. :p
 

Attachments

cranetruck

Moderator
Super Moderator
Steel Soldiers Supporter
10,350
74
48
Location
Meadows of Dan, Virginia
Good work Chris, personally, I don't like working in this kind of weather unless necessary, I give you credit for that. Removed a few more parts from the parts M925 the other day and had to use gloves to keep my hands warm, no fun.

Check your original bumper for markings before scrapping it.
 

mckeeranger

Member
779
3
18
Location
Eastern Kentucky
Here are a few pictures of the finished bumper installation and a picture of me with the truck. I figured I should have at least one photo with the truck so I set up the camera on an 818 fender, hit the timer, and ran to my truck trying to look casual. :p
The truck is coming together very nicely. You've done well.

And...working in this weather, you are definitely hard core.
 

steelsoldiers

Administrator
Staff member
Administrator
5,246
3,932
113
Location
Charleston, WV
Thanks everyone. It sure is an amazing difference from when I hauled it off base!

Jason, I plan on blasting the frame, running gear, and bed when I get it home. The cab is going to need a good bit of rust repair before it is ready for media blasting. I got my fail safe module from Clark Truck Parts.
 

Scarecrow1

New member
1,355
1
0
Location
Florence , S.C.
Man I'm impressed ....You are a very talented person , and with the drive to match as well . I don't know your plans for the old girl but I think when she done you will be lost without a project to work on ......Oh well There are plenty more broken old girls out there ;-)
 

onegmjack

New member
1,080
8
0
Location
Kingsport TN
Great looking job.Theres is not anything more fun than reviving the dead.Chris you are my kind of rebuilder.Keep up the excellent work.Dwight
 

steelsoldiers

Administrator
Staff member
Administrator
5,246
3,932
113
Location
Charleston, WV
Mike, thanks for the kind words. I plan on making this truck very nice so I'm sure I have at least another year of repairing rusty panels, replacing rusty bolts, swapping out air lines, sand blasting, panel fabrication, etc... The good news is now that it is running and driving I can have some fun with it in the meantime. I do have my eye on the next truck project though! Yes, I am sick. :razz:

Thanks Dwight. I do get a great sense of satisfaction from saving a truck from the scrapper. This one was borderline beyond repair when I got it.
 

BKubu

Well-known member
Steel Soldiers Supporter
4,725
1,088
113
Location
Gaithersburg, MD
Chris, I will second your last sentence..."borderline beyond repair." You deserve some serious credit for resurrecting what was really a residue truck, no offense intended.
 

steelsoldiers

Administrator
Staff member
Administrator
5,246
3,932
113
Location
Charleston, WV
No offense taken, Bruce. It was a pile of junk when I got it!

Jason, I am planning on straight OD with a black chassis, black wheels, and the Seabee logos on the doors.
 

wsucougarx

Well-known member
6,951
65
48
Location
Washington State
This thread is outstanding! Chris you may have started this thread to show your progress on resurrecting this piece of military hardware. However, your thread goes much further than that. I'll be honest with you. When I saw the initial truck, my thoughts were less than positive. However, watching your progress through the rebuilding of this workhorse has been a HUGE inspiration! Your persistence and vision is truely something to be in awe about. When I see a truck in less than favorable condition, my thoughts are wow what a piece of ****. Seeing the transformation of what it was to what it is definately will make me think twice about what I am looking at. Thank you for continuing this project and keeping us uptodate. BZ
 

steelsoldiers

Administrator
Staff member
Administrator
5,246
3,932
113
Location
Charleston, WV
Thanks Mike!

I felt like a major slacker because it had been 2 weeks since I worked on the truck so a work session was scheduled for today at Winslow's. I managed to talk my brother and Dad into going with me. I knew I was going to need their help because today was bedside and tailgate day. We were fortunate enough to dodge the rain during our work session. It poured overnight so the field was a sloppy mess, but it warmed up above 60 and the sun was out so we weren't complaining.

The first thing we did when we got there was start stripping the spray-on bedliner off of the hinges and mating surfaces where the bedsides hit. We chalked a line, scored it with a utility knife, and then used a big scraper blade to separate it from the bed. My Dad and I fought with that for a bit whit Chad went over and knocked the hinge pins out of the donor tailgate. Then, I went with Chad to find a few more hinge pins while Dad finished the bed clean up.

After we had the bed prepped, I fired up the truck and we rode down to the parts truck to get the bedsides and troop seats. We pulled the troop seats first. They are a little rotten in paces, but they'll work for while until I can find some fiberglass seats.

Next, we freed up the bedsides and loaded them onto the 925A2. We hauled the bedsides/side racks/troop seats up the hill for installation. We manhandled the sides into position and knocked the pins in after giving them a generous coating of grease. Then, we mounted the tailgate and tightened up the locking pins. With a little convincing, the troop seats went back into position completing the installation. Now it looks like a truck!! I am so pumped to see this thing coming together. I will work one or two more days next weekend to finish up a lot of little stuff before taking it on a long shakedown run.

The last thing we did today before Chad and Dad took off was load up a set of LAV wheels/Michelin XL's into the back of Chad's truck. We used the Bobcat to make the loading easier. The tires are going to be swapped onto Chad's M37 rims in place of the rotten/bald NDT's.

The guys had to take off after that so I planned on finishing up a few little things before dark, but no sooner than they pulled out on the hard road it started pouring the rain! I quickly gathered my tools while getting soaked to the bone before heading to John's shop to weather the storm. I hung out in the shop and chatted with Ricky about the latest 5-ton bob-truck project. Finally, the rain died off and I was able to get a few more truck pics.

This project is really coming along now. More updates coming after next weekend's work sessions. Stay tuned!
 

Attachments

Top
AdBlock Detected

We get it, advertisements are annoying!

Sure, ad-blocking software does a great job at blocking ads, but it also blocks useful features of our website like our supporting vendors. Their ads help keep Steel Soldiers going. Please consider disabling your ad blockers for the site. Thanks!

I've Disabled AdBlock
No Thanks