• Steel Soldiers now has a few new forums, read more about it at: New Munitions Forums!

  • Microsoft MSN, Live, Hotmail, Outlook email users may not be receiving emails. We are working to resolve this issue. Please add support@steelsoldiers.com to your trusted contacts.

My replacement XM820e2 recovery and modification thread

goldneagle

Well-known member
4,450
896
113
Location
Slidell, LA
I finally brought home my newly acquired 1971 XM820e2 from Jeff Davis's compound near Camp Shelby. I want to thank Jeff for the recovery, storage and assistance in getting it road worthy.

I purchased this truck 5 years and 1 day since I purchased the same model truck from Fort Polk, LA. I had to sell the other M820 4 years ago due to money issues. Sirblissful purchased it from me and took it to Texas to be rebuilt and modified. Unfortunately the truck was torn apart but never put back together. What a shame! She was a beautiful truck and ran well when sold. I really missed that truck!

So when the opportunity came to buy an identical truck I could not resist for the price purchased! I had paid $10k for the truck after fees for the first one. I only paid $3k for the replacement. Here is a picture of the original M820A2 before I sold it: M820A2_Final_1.jpgM820A2_Final_1b.jpg
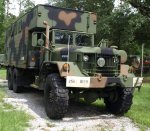

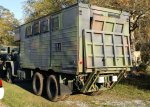
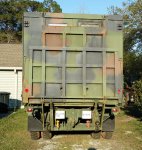
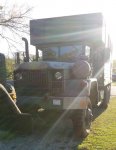
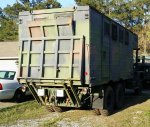
The replacement XM820e2 is not as pretty. Needs some body work and paint. It drove well for the 80 mile trip home towing my M1008 behind it. I was averaging 52 MPH all the way home. Here are some quick photos I took when I got home: XM820e2_1.jpgXM820e2_1a.jpg
XM820e2_1c.jpgXM820e2_1b.jpg

XM820e2_1e.jpgXM820e2_1d.jpg
 
Last edited:

goldneagle

Well-known member
4,450
896
113
Location
Slidell, LA
Nice GE........I love the lift gate.
Thank you Richard. Me too. That is what I missed the most about the truck. I was using it as a drawbridge for transferring cargo between my truck and a semi. I also used it as a work platform for servicing equipment (since I could adjust the work height)
 

5tonman1971

New member
323
0
0
Location
Lima ohio
That's still a really nice truck very minor cosmetics that I can see. You got it for a great price too! I'd like to find one sometime I think they are really neat!
 

goldneagle

Well-known member
4,450
896
113
Location
Slidell, LA
I forgot to add some interesting info I found out about this particular truck. I noticed 2 faded stickers on the truck that I have seen on another truck before. One was on the front of the driver side fender and the other was on the driver side door. They are travel stickers. This truck was in Camp Victory in Kuwait. I have a M109A2 that was in the same camp. SO they served in the same camp in the past. They are also both Mississippi national Guard trucks. I think it's neat to have the history of the vehicle's life. It is an interesting clue.
 

gunboy1656

Active member
3,587
22
38
Location
Beaver Falls, PA
What was the date on those tags?

It is nice seeing things that fall into place like trucks possibly being in the same location. My truck and 2 trailers were found to ll come from the same unit (purchased 2 years apart)
 

goldneagle

Well-known member
4,450
896
113
Location
Slidell, LA
What was the date on those tags?

It is nice seeing things that fall into place like trucks possibly being in the same location. My truck and 2 trailers were found to ll come from the same unit (purchased 2 years apart)
No visible dates left on the stickers. Very faded and cracked.
 

goldneagle

Well-known member
4,450
896
113
Location
Slidell, LA
I decided to do some preliminary inspection of the truck today. Put the transfer case in Neutral and the tranny into neutrol. Pulled the PTO engage lever forward while holding the clutch in. Started up the truck and could see the PTO shaft turning the hydraulic pump for the liftgate. I dropped the liftgate down and used it to climb into the box. My first objective was to figure out how to secure the large swinging door above the truck cab. Luckily it was as simple as reinserting the hook at the end of the rod into the bracket attached to the door. Once attached all I had to do was pull a lever that secured the door shut.

I then walked around just looking at the walls and the electrical components. I was able to turn on the 24 volt lights. All the 120 volt components seemed to be intact. There are no heating or A/C units installed. They were removed previous to the sale.

I did notice the aluminum ladder that is stored inside the box is missing the hooks that attach it to side of the truck below the door opening. I will fabricate replacement hooks for it later. The truck is also missing the jacks used to support the extensions of the sides when the walls are opened out. It is also missing the handles that operated the liftgate control and lock the side walls when retracted for driving. Also missing is the wrench used to crank out the 2 side walls. It would be nice to have the original handles but i can easily substitute ratchet handles with sockets to do the same task.

The condition of the truck seems to be a lot better than I expected. The paint is faded and there are some surface rust spots to soda blast and paint. THe cab itself is 95% plus rust free. The floor is in near new condition! The truck came with a arctic cab cover. It's a bit stretched above the windshield due to holding lots of rain water. It has a totally different support bows than the standard soft top. There are two 1/2" thick rod bows going from side to side instead of the usual 3 going front to back.

I am thinking of installing some sheetmetal from the first bow to the top of the windshield frame in order to keep the soft top from sagging with rain water. I can also attack sun visors and other components to the metal once it is in place. I can use bolts or rivet nuts to help attach the components and then slide some padding to protect the soft top from being punctured. I will add some pictures tomorrow showing the bows.

I also repaired the door lock on the passenger side door. It just needed some lubrication. I also adjusted the round mirror bracket on the passenger side.

I check out the thick extension cord stored under the truck. It is supposed to attach to the truck and a large generator set. The cord looks unused and has a date of 2008 on the jacket. Not bad for a truck built in 1971!

I am looking for at least one really good M818 metal battery box. The ones on there right now are the plastic ones. One has all the J-bolt holes broken out and thee 2nd is all warped. If anyone has one for sale PM me with cost.
 

goldneagle

Well-known member
4,450
896
113
Location
Slidell, LA
Nice rig GE!
Now I want one!
Will you be building this out for your new camper?
Going to keep it mostly original. No camper plans. I will use it as an inclosed cargo truck. Also the liftgate makes a great work platform for repairing equipment. Adjustable height and plenty of room for tools and parts.
 

goldneagle

Well-known member
4,450
896
113
Location
Slidell, LA
Here are a couple of pictures I took of the truck in the rain today. The color of the paint looks a lot better when wet. It is a better example of how nice the truck will look when I finish repainting it.


M820_wet_1a.jpgM820_wet_1.jpg
 

goldneagle

Well-known member
4,450
896
113
Location
Slidell, LA
I started to work on the air ride seat mod on Sunday. Removed the springer seat. Cut 2 pieces of 1/16" sheetmetal to the same dimensions of the metal base of the springer seat. I used the springer seat base as a template to mark the holes for the bolts that secure the seat to the floor.

I drilled out the 4 holes through both layers of sheetmetal. I then scraped, scuffed, primed and painted the floor in the truck cab. I installed the springer seat in the passenger side of the cab. Only the 2 front holes lined up with the holes in the floor. Will have to drill new holes in the base to line up with the holes in the floor.

I cut and welded three 12" long Unistrut channels to the sheet metal base. I used the pre-drilled holes in the air ride seat base to line up the Unistrut channels for welding. I then primed and painted the 2 sheetmetal bases for the seat.

Once the paint dried I bolted the air ride seat to the Unistruts. I lifted the new seat into the truck and secured it to the floor through the pre-drilled holes in the base. When I tested the seat I found that it was still too low for my comfort. I definitely have more clearance between my belly and the steering wheel, but I have to bend my knees quite a bit to get my feet above the clutch and brake pedals. It was too late to do anything about it that evening.
 

goldneagle

Well-known member
4,450
896
113
Location
Slidell, LA
I thought about it quite a bit about the seat height last night. I decided I wanted to raise it higher to get more comfort in using the brake and clutch pedals. The easiest way i could think of was to add another layer of Unistrut channels on top of the existing ones. I went to the supply house and got more 3/8" channel nuts. I cut some more Unistrut channels 12" long. I bolted them on top of the original channels using the channel nuts. I then bolted the air ride seat to the top of the new stack of Unistrut channels. I reinstalled the air ride seat into the cab. I connected the seat belt assemblies to the new seat. When I tested the seat I was very satisfied with the final results.

Here are some pictures:Seat_Mod_1.jpgSeat_Mod_1a.jpgSeat_Mod_1b.jpgSeat_Mod_1c.jpg

I decided to work on the sagging vinyl top issue as well. The vinyl top collects a lot of rain water between the middle bow and the front of the windshield. This cab has an odd vinyl top setup. Instead of the 3 thin bows going from front to back it has 1 very beefy bow going from side to side above the door openings. The vinyl is stretched from the weight of the rain water. I cannot get the sag out.

I decided to add a stiff plywood or metal piece that would sit on top of the windshield and on top of the beefy bow on the other end. I found a leftover piece if aluminum sign 21" wide by 48" long and 1/8" thick. I installed it into position. I then cut a piece of 1/2" polyethylene foam to fit above the aluminum sheet. I plan to use nut rivets in the sheet aluminum to attach accessories to the ceiling of the cab. I will also add sun-visors to the truck. I am using the polyethylene foam as an insulator to keep the nut rivets and screws from damaging the soft top above.

Here are some preliminary pictures:

Soft_Top_Mod_1a.jpgSoft_Top_Mod_1.jpg
 

goldneagle

Well-known member
4,450
896
113
Location
Slidell, LA
Sweet Rig. Are you going to add 14.00s to it or keep it stock?
I would like to put 14.00-20 on the M820 but I am not sure i can afford it yet. I am already going with super singles on my M923 and leaning towards 14.00-20 on my M936 wrecker. I can always upgrade the M820A2 to the 11.00-20 G177 tires from the NDTs that are on there now. I will have at least one set of G177s when I super single the M923.
 

goldneagle

Well-known member
4,450
896
113
Location
Slidell, LA
Today I decided to finish installing the sun visor and aluminum backing plate in the ceiling of the M820. When I measured it I found that the 48" long plate was not long enough to attach the sun visor to. It needed to be extended. All I could find was a piece left over from the road sign that was 12" by 12". Si I cut it in half and attached each half to the end of the aluminum plate. I cut radius corners to keep it from poking a hole in the vinyl top. Once I attached the extension pieces I measured out the location of the sun visor and mounted it using four 5/16" bolts. I then cut a new 1/2" thick polyethylene foam piece to cover the entire back of the aluminum plate. Here is a picture of the foam attached:Visor_Mod_1d.jpg

I then lifted the plate with the sun visor attached into position above the windshield. I used 1/2" conduit straps to attach the aluminum plate to the heavy duty bow in the center of the soft top.


Visor_Mod_1c.jpgVisor_Mod_1b.jpgVisor_Mod_1a.jpgVisor_Mod_1.jpg

I am going to paint the aluminum flat black at a later time.
 
Top