• Steel Soldiers now has a few new forums, read more about it at: New Munitions Forums!

  • Microsoft MSN, Live, Hotmail, Outlook email users may not be receiving emails. We are working to resolve this issue. Please add support@steelsoldiers.com to your trusted contacts.

New Cummins HMMWV project in the works!

steelsoldiers

Administrator
Staff member
Administrator
5,250
3,959
113
Location
Charleston, WV
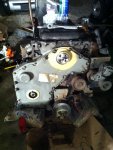
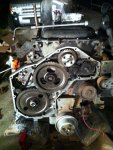
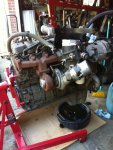
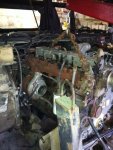
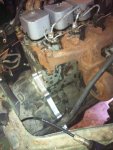
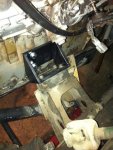
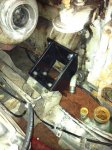
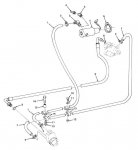
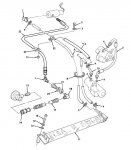
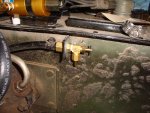
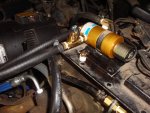
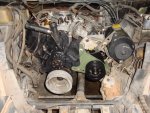
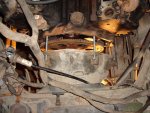
Oh, an auxiliary ground harness, now I get it. I'll make one up. Thanks for the pics! Could you take some close-ups of the plumbing for the CDR and fan clutch when you get a moment?
 

TedG

Well-known member
1,133
38
48
Location
MI USA
Chris,

I do not really have pictures but the manual has good figures. Plus it is difficult to expain. See below.

For the DWF kit, here is the complete installation instructions for it with drawing (thanks to the hummerknowledgebase)! Deep Water Fording Kit - Installation


BTW: everyone must be afraid of you since no one said "look in the -24P" !!!! hahaha
 

Attachments

Last edited:

steelsoldiers

Administrator
Staff member
Administrator
5,250
3,959
113
Location
Charleston, WV
LOL, thanks Ted. I have looked in the -24P by the way so none of y'all better talk any crap! :razz: I just like real pics instead of line drawings. Crawling over a complete vehicle is even better when you are working on a basket case because the -24P doesn't show the exact location of some components or how they are attached. I need to see if I can meet up with Julian to look at his. The next HMMWV I do will be easier after putting this one together.

I found the hose that runs from the solenoid to the clutch tangled up in the hydro-boost lines in the engine compartment. It had a bulkhead fitting running through a broken piece of plastic. I finally figure out that it belonged to the fan system and that the plastic must be a piece of the missing fan shroud.
 

powerhouseduece

Active member
1,440
4
38
Location
Pasadena, Md
It's good to see your getting to work on it. I still have that stack of cummins stuff for you. I guess our paths will cross one day and youll finally get them :)
 

steelsoldiers

Administrator
Staff member
Administrator
5,250
3,959
113
Location
Charleston, WV
Thanks Ted. That really helps with the visualization. I wish you were closer. I'd come drool on all of your HMMWV's.

Matt! Good to hear from you. I thought you forgot about me and the Cummins adapters. Glad to know you still have a stack for me. Maybe I can sneak out east and meet you at Rausch Creek after things settle down a little at home.
 

steelsoldiers

Administrator
Staff member
Administrator
5,250
3,959
113
Location
Charleston, WV
Well, based on our last visit to the OB/GYN, it looks like this is going to be my last work weekend for a while so I have to get a lot of stuff done this weekend. I have kept the mailman, the UPS man and the FedEx man hoppin for the last couple of weeks as my parts orders came in. I think the coolest delivery was when the Estes man showed up at my office with a pallet full of 24-bolt rims. They look friggin sweet. Can't wait to mount the tires and tighten all 96 of those nuts down by hand :cookoo:

The last major bit was acquired yesterday afternoon when I ran down to Clark Truck and picked up a take-out 60A alternator. I'm like a big kid in a candy shop when I go there. They always have the coolest stuff in the shop and the parts warehouse is massive. It's nice being so close.

Here's the punch list before attempting to start it:

  • install new oil pan, pick-up and dipstick
  • install intake manifold and air horn
  • install install oil filter base, adapter and filter
  • install PS pump bracket, pump, hoses, and cooler
  • install alt bracket and alt
  • install engine wiring harness
  • install trans/engine oil cooler
  • install radiator brackets, radiator, water x-over, and hoses
  • install exhaust donuts and y-pipe
  • install injection pump shut-off
  • install new fuel filters and air filter
  • install fuel tank plug
  • install batteries
  • install water pump pulley, fan clutch and fan
  • install belts
I think that's it. That's enough right? I'm sure there will be some parts left over on the garage floor LOL. I'll post an update with pics later this weekend. Stay tuned!
 

steelsoldiers

Administrator
Staff member
Administrator
5,250
3,959
113
Location
Charleston, WV
Well, overall it was a pretty productive weekend. I worked for most of the day on Saturday and got a good bit of the engine put back together. I had about a 2 hour delay when a rubber injector line isolator fell into one of the intake ports right before I stuck the manifold back on. I had to use a screwdriver and a piece of wire like a set of chopsticks to fish it out of there. I need to get one of those flexible claws next time I go to Sears. I usually have rags stuffed in the runners, but like I said, I was just getting ready to put the manifold on. Other than that, it went pretty smoothly.

I forgot to mention one of the issues I had a couple of weeks ago. I was trying to bolt the torque converter to the flex plate, but couldn't get the bolts to line up. I tried a few different holes and then discovered that the bolt circle was different. I found out the hard way that the HMMWV bolt circle on the TC is larger that the civi truck one. Doh! Thankfully, I had some long bolts to thread into the block to keep the trans and block aligned when I pulled them apart with the hoist. I unbolted the engine mounts from the block, supported the trans, slid the engine forward with the hoist, swapped the flex plate, slid it back and re-bolted it up. The biggest PITA was again bolting the mounts to the block.

Anyways, back to the Saturday work session. I got the intake manifold, water x-over, thermostat, temp sending unit, rear water jacket block-offs, trans throttle position cable, alt bracket, air intake support bracket and heater hose barbed fittings reinstalled. The engine is starting to look pretty good. I didn't get anything done yesterday because I had a bunch of things to do to get the house ready for yesterday's baby shower. Next, I need to install the oil pan, cooling stack, injector return lines, fuel tank drain plug, starter, batteries, battery cables, glow plugs, engine wiring harness, PS pump, belts and fan. I should be able to test fire the engine after that. Phew, there's a lot of stuff crammed in that engine bay! I'll get some pics up soon.

Anyone have a PS pump pulley, the high pressure hose from the PS pump to the hydro-boost or a fan clutch hydraulic control valve for sale?
 

steelsoldiers

Administrator
Staff member
Administrator
5,250
3,959
113
Location
Charleston, WV
Well, a lot has been accomplished since the last update. I installed all of the accessory brackets, accessories, the fan drive, belts, all new hoses, radiator shroud, radiator mounts, radiator, oil cooler, PS cooler, fan clutch actuator, fuel drain, and other bits in the engine compartment. Then, I moved to the dash where I repaired 11 cut wires that went to the gauge cluster. Thankfully, 7 of them still had the metal tags intact so there wasn't too much tracing needed.

Once most of the gauges worked, specifically the oil pressure gauge, I decided to try and spin it over. I flipped the switch and lo and behold it started spinning and I got oil pressure! I left the glow plugs out to make sure there wasn't any diesel or oil in the cylinders, so it cranked over nicely. Since it was cranking, it was time to add some diesel to the tank and see if it would run. Lots of cranking produced no fuel at the filter, so I suspected the fuel pump. I found an old 24v pump I had laying around and jerry rigged it up. Soon, I had fuel pumped up to the filter. I plugged the fuel pressure sensor hole in the top of the housing, plugged in the fuel shutoff wire, and cranked it over until I saw fuel coming out of the return fitting on the top of the pump. I installed new glow plugs, a new controller and plugged up the harness. It only took a few revs after that for it to fire to life. I haven't installed the y-pipe yet so it sounded like an old-school big block. I kinda liked the sound, hmmm... may have to change that muffler out for a Flowmaster, LOL.

Bad news is my mechanical pump is shot. Good news is that I have a new one arriving tomorrow and should have it installed this weekend for my first long test run and maybe test drive!! Enjoy the pics. The first one shows the long bolts I used to keep the trans lined up with engine when swapping out the flex plate. The rest of the series shows the engine build up, the fan control valve hoses and fittings, and the drain valve. Sharp HMMWV eyes will know that the valve isn't a factory fitting. I assembled it out of hardware store parts instead of buying a new one for $60-75. Turned out pretty good I think.

Stay tuned! Hopefully, I will have some video footage to post very soon.
 

Attachments

steelsoldiers

Administrator
Staff member
Administrator
5,250
3,959
113
Location
Charleston, WV
It's a great feeling firing up a project for the first time, ain't it? Better hurry, Rausch creek is next weekend! :razz: :beer:
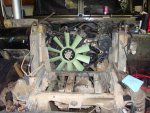
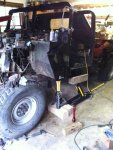
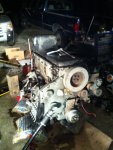
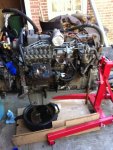
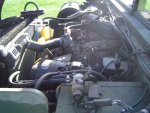
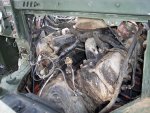
Dang, don't guess I am going to make this one! I better set my sights on Aberdeen and the spring Rausch rally. It was great to hear it run. That engine looked like a real piece of junk when I got it, but it cleaned up nice and sounds good.

Glad you got her running,I wish I was at that stage.
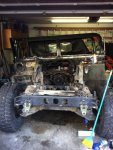
Thanks John. I am enjoying your project too. It reminds me of my M925A2 project with all the missing bits and pieces. Good luck!
 

steelsoldiers

Administrator
Staff member
Administrator
5,250
3,959
113
Location
Charleston, WV
I got the fuel pump changed out on Saturday, but it still won't stay running. My guess is I am getting air in the lines somewhere. I bought some clear tubing at lowes to install at the IP return line, between the lift pump and the tank, and between the lift pump and the filter housing. Hopefully, it will be pretty obvious where it is coming from. I followed the lines all the way back to the tank as far as I could see. Everything looked good except where the return line had been rubbing on the t-case. I will need to replace that line before it starts dumping fuel on the ground.

I also found a leak where the steel flared line hooks to the lift pump. I think the flare is dinged up because it won't seal even with tape on the threads. I bought a fitting to go from flared to barbed. I will bypass the steel line using some covered 3/8" rubber line. I may get fancy at some point an run a new line with AN fittings.

I worked a little on Sunday evening too. I got the starter shimmed, the converter cover installed, and the exhaust y-pipe bolted up. I couldn't stand the noise from the open headers in my closed garage any more, LOL. The neighbors are probably happier now too. I would have to say that so far, my two least favorite jobs from this project are hoisting the starter with one hand while trying to get bolts started and getting the bolts installed on the passenger y-pipe/header junction. That sucked. I need smaller hands.
 

TedG

Well-known member
1,133
38
48
Location
MI USA
Chris,
Make sure your filter bowl is full of fuel. An easy way to remove the air in the supply system is to put a suction device on the outlet of the filter and pull a vacuum until you have a constant supply of fuel. I use a siphone tube for this. Other problematic areas: the check valve in IP head. If this is plugged/stuck is will not allow excess fuel to leave the IP and the engine will not start/die. Taking it apart/back together can be a PIA so be careful. Also the fuel return line if plugged will cause a similar problem. Remove fuel cap, remove fuel return line from engine and then blow air into system towards tank (remove fuel cap or BOOOM will be heard!).

In the future, do the Y pipe first and then the starter. It can be done with starter installed but getting to the bolt near the starter is difficult. Starters for humvees are heavy and doing it by yourself puts you in "the man" club! It is scary thinking that if it falls, you are going to be damaged!

Good luck!
 

steelsoldiers

Administrator
Staff member
Administrator
5,250
3,959
113
Location
Charleston, WV
Ted,

Great info as usual. I need to put you on speed dial! I will perform all of your checks and hopefully the solution will be readily apparent.

That starter is a big mother. It did slip out of my hand when the creeper rolled without warning. It chipped the friggin concrete floor so I know it would have dented my skull!:shock: Doing the starter second would have helped for sure.
 

acmunro

Member
532
4
18
Location
Reynoldsville,PA
I forgot to mention one of the issues I had a couple of weeks ago. I was trying to bolt the torque converter to the flex plate, but couldn't get the bolts to line up. I tried a few different holes and then discovered that the bolt circle was different. I found out the hard way that the HMMWV bolt circle on the TC is larger that the civi truck one. Doh! Thankfully, I had some long bolts to thread into the block to keep the trans and block aligned when I pulled them apart with the hoist. I unbolted the engine mounts from the block, supported the trans, slid the engine forward with the hoist, swapped the flex plate, slid it back and re-bolted it up. The biggest PITA was again bolting the mounts to the block.
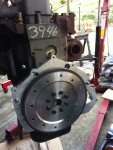
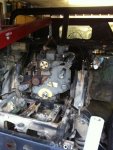
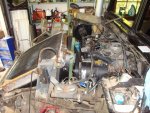
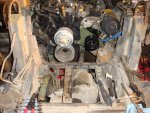
I have used HMMWV 6.2 flex plates on CUCV trucks. I wonder if the K20 had a 700r4 trans ? I know the flex plates are listed by either TH400 or 700r4. I didn't know what the difference was that must be it.
 

steelsoldiers

Administrator
Staff member
Administrator
5,250
3,959
113
Location
Charleston, WV
So, a lot has changed since I made my last post about this project. It turned out that the "running" engine I purchased and swapped in had a bum injection pump or several leaky injectors or some combination of the two. That coupled with the stinking PCB that stayed on after the key was switched off and fried 8 new glow plugs fueled my growing distaste for all things 6.2L. Finally, I had enough and yanked the 6.2L out and sat it on the garage floor next to the original locked up engine. Sorry 6.2L fans :p

I cleared a path to the back of the garage where my Cummins 6BT was hanging on an engine stand. There were a few things that needed to be tended to before I could test fit it. I had to pull the old front sump oil pan and pick-up off and put a rear sump setup off of a Dodge Cummins. Then, I removed the massive air compressor/PS Pump setup. I was hoping to keep the compressor, but it took up a lot of room and the PS Pump was way too hi-flow for the stock hydro-boost system. Then, I tabbed the killer dowel pin to keep it from destroying my gears, front case, cam, etc... later on. Finally, I bolted up the adapter plate and flex plate that I sourced from fordcummins. I was going to use the bread truck 4BT adapter, but didn't like the idea of having to tilt the engine or trans. I kept the 3L80 trans for now, but have plans to replace it with a 4L80E/242 combo or maybe an Allison/Atlas combo eventually.

Now for the tricky part, if you are doing a swap like this in your garage, you have to remove all of the body mount bolts except for the rear, which are left very loose. This is so you can raise the front of the body high engine to clear the engine between the frame and body. Next time I do one of these swaps, I will have a garage with a lift so I can remove the body altogether. It would make it much easier. Anywho, once the body was tilted up, I was able to slowly shove the engine into place for a test fit. It took a ton of fiddling around with the position of the engine, since I was working alone, but I was finally able to mate the engine and trans. Then, I could see there were multiple clearance issues that needed worked out. There was interference between the balancer and the front cross-member, between the oil pan and the front yoke and between the front drive-shaft carrier bearing mount and the oil pan. I studied the whole situation for a few hours, trying to decide what to do next. I decided in the end to move the whole drivetrain back 3". That would fix most of my clearance issues on the front end. I also decided to drill some new holes in the carrier bearing mount so I could move it about an inch.

I made a transmission mount extension plate that was bolted to the cross-member using the mount holes. I then removed the driveshafts and slid the engine/trans back 3". Once I had it exactly where I wanted it, I was able to mock up some engine mounts out of pieces of cardboard that were used to cut pieces of 3/8" thick flat bar. I tacked the mounts together, checked the fit while bolted to the engine and then removed them for finish welding and painting. Then, I could finally bolt then engine in solid and get the hoist out of the way. I took the driveshafts to a local shop to get the front re-tubed 3" longer and 3" taken out of the rear shaft.

Here's a few pics to start with:
 

Attachments

WillWagner

The Person You Were Warned About As A Child
Super Moderator
Steel Soldiers Supporter
8,400
2,440
113
Location
Monrovia, Ca.
I still have picsof the e-brake stuff if you need it....I spaced :-(
 
Top