• Steel Soldiers now has a few new forums, read more about it at: New Munitions Forums!

  • Microsoft MSN, Live, Hotmail, Outlook email users may not be receiving emails. We are working to resolve this issue. Please add support@steelsoldiers.com to your trusted contacts.

New MEP004A owner looking for light-off sanity check

1800 Diesel

Member
768
26
18
Location
Santa Rosa County, FL
So first thing I would do is take out the float switch from the day tank. Then flip the start switch to run flip the battle short switch on and then look in there and see if fuel is coming out of the solenoid at the top of the day tank. Slide the top float up and see if it stops if that is working then you are getting fuel to where it needs to be and you just need to bleed the filter canister so you can get fuel to the IP. It is gravity feed after day tank all the way to the IP.

Check it out.
Lee,

Restarted after fixing oil leak..adjusted RPM/freq to 60...oil pressure not as high as I would expect (under 40 psi)..everything looking/sounding good after about 2 mins run time and then I hear a clattering sound up front--sounding like fan hitting some of the newspaper I had in the "bilge" soaking up the oil. Then I noticed coolant leaking onto the batteries...shut it down right away & was saddened to see some damage to an otherwise perfectly good radiator. Can't tell what happened but obviously a bolt or nut was laying somewhere close enough to the fan to get pulled up and it impacted the lower right (alternator side) of the radiator tubes. Leak is repairable but sure didn't need the aggravation & added cost of a radiator removal & repair...found a 3/8" nut & lock washer down below the oil pan, but can't identify where these came from...I didn't remove any fasteners, only did the filter work. I also checked the fan hub and found four hex bolts in place securing the fan.

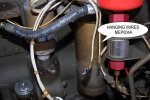
On the bright side, engine sounded very good, voltage & freq stable & alternator charging good...still need to figure out the two wires hanging next to the ether canister...
 
Last edited:

leedawg

Member
270
11
18
Location
Napa / CA
Lee,

Restarted after fixing oil leak..adjusted RPM/freq to 60...oil pressure not as high as I would expect (under 40 psi)..everything looking/sounding good after about 2 mins run time and then I hear a clattering sound up front--sounding like fan hitting some of the newspaper I had in the "bilge" soaking up the oil. Then I noticed coolant leaking onto the batteries...shut it down right away & was saddened to see some damage to an otherwise perfectly good radiator. Can't tell what happened but obviously a bolt or nut was laying somewhere close enough to the fan to get pulled up and it impacted the lower right (alternator side) of the radiator tubes. Leak is repairable but sure didn't need the aggravation & added cost of a radiator removal & repair...found a 3/8" nut & lock washer down below the oil pan, but can't identify where these came from...I didn't remove any fasteners, only did the filter work. I also checked the fan hub and found four hex bolts in place securing the fan.

On the bright side, engine sounded very good, voltage & freq stable & alternator charging good...still need to figure out the two wires hanging next to the ether canister...
Sounds great sorry I did not respond till now. Yeah the site was down then I went out shooting for the rest of the afternoon so was not really near the computer and then was playing video games all night lol.

Sounds like a runner though, sorry I guess I should have mentioned make sure everything is clear. Ive found a lot of misc bolts and nuts around inside both of the units that I got. I went through and made sure there was nothing in the in intake manifolds and around the fan and radiator that could get sucked in. Pulling the radiator is not that hard though the tops of these things come off pretty quickly. I just had mine off today in the morning when I was posting to ya. Think there are like 20 bolts you just take out and lift it off then you have great access to everything. Then just unbolt the radiator and slide it out all done. I dont know much about reparing a radiator I would imagine you would have to solder it to fix it or braze it maybe. Welding probably does not work... Does a shop do that for you? Sourcing a new one might be a bit spendy and harder to do for sure.

Oh and as far as those wires dont worry bout it both of mine have the same thing. Appears as though they are unused in the wiring harness perhaps they were utilized in some way by the precise variants of the sets we have. But the utility sets do not use these wires and they were tapped off from the military. There are two of them with little ring type bolt on connectors crimped onto the ends of the wires. I just finished building my load bank for mine today so going to be loading em up and testing them tomorrow if it does not rain on me. Can post up some pics if ya want. Have you done the single phase conversion on your set yet? That is probably the next thing your gonna want to do. Any way congrats on getting it to start up and run will be interesting to see how well your gov holds the rpm when you start hitting it with a load. One of mine flucuates probably bout 5 hz the one with the rebuilt IP however holds it bout 1 hz either side from full load to nothing pretty good. So im debating rebuilding the other ones IP even though it is pumping. Any way take care congrats again.

Lee
 

1800 Diesel

Member
768
26
18
Location
Santa Rosa County, FL
Lee,

As to the FOD issue--a good lesson learned for me...the radiator looked to be fairly new also...I should be able to clean up the damaged tube and solder it. Just didn't need another thing on my "list"... aua

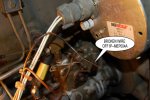
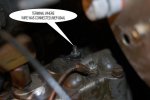
I'm thinking the broken wire on the IP may have caused the no-start situation. Seems once I repaired that she fired right up...I included photos of the 2 wires by the starting aid canister and then of the broken wire connection on the IP. Hopefully once I put a load on it I can see how the governor is responding. Sounds like you have a good setup for doing load tests--that's something I need to work on but have no spare money at the time... After Christmas & New Years (and after repairing radiator) I'll be doing the single phase conversion on this one.
 

Attachments

1800 Diesel

Member
768
26
18
Location
Santa Rosa County, FL
I would just have the radiator repaired at a shop. This way they can boil it and clean it while it is out.
Wish I could just take it to a shop, but then I'd have to pay the nice man to do the repair. Since I have no cash, I'll have to do the repair myself...but you're correct--the best solution for radiator repair is to take it to the shop!
 

Triple Jim

Well-known member
1,377
294
83
Location
North Carolina
Luckily when you damage a radiator like you did, the part that needs fixing is usually easy to get to with solder and a big iron or copper, as opposed to when one springs a random leak.
 

1800 Diesel

Member
768
26
18
Location
Santa Rosa County, FL
Luckily when you damage a radiator like you did, the part that needs fixing is usually easy to get to with solder and a big iron or copper, as opposed to when one springs a random leak.
Yep--I'll probably pull the radiator so I can down-hand the soldering and also get good access for cleaning & prepping the joint...guess it could have been worse. Just don't like it when I make mistakes like that...tough being a mere human...:cry:
 

leedawg

Member
270
11
18
Location
Napa / CA
Lee,

As to the FOD issue--a good lesson learned for me...the radiator looked to be fairly new also...I should be able to clean up the damaged tube and solder it. Just didn't need another thing on my "list"... aua

I'm thinking the broken wire on the IP may have caused the no-start situation. Seems once I repaired that she fired right up...I included photos of the 2 wires by the starting aid canister and then of the broken wire connection on the IP. Hopefully once I put a load on it I can see how the governor is responding. Sounds like you have a good setup for doing load tests--that's something I need to work on but have no spare money at the time... After Christmas & New Years (and after repairing radiator) I'll be doing the single phase conversion on this one.

THe first wires by the ether start in your pic we all have those hanging in our sets. Just part of the wiring harness, I think they were used on the precise variants but I do not know since I have never seen a precise unit.

THe broken wire on your IP is probably the ground wire. If it was not then the set would have never started because that solenoid has to be on for the injection pump to start pumping. As soon as power is cut to that solenoid thats what shuts down the fuel flow to the injectors. So yeah its possible it was not making a very good connection between the frame and the lack of ground the connection would cut out and hence shut it down.

As for load bank yeah it seems to work alright I built one super cheap. Ill take some pics of it tomorrow and post them up for you to see. I honestly built it for probably bout 130 bucks. Its basically a giant hot water heater. Will start another thread tomorrow so you can see it.

Lee
 

1800 Diesel

Member
768
26
18
Location
Santa Rosa County, FL
THe first wires by the ether start in your pic we all have those hanging in our sets. Just part of the wiring harness, I think they were used on the precise variants but I do not know since I have never seen a precise unit.

THe broken wire on your IP is probably the ground wire. If it was not then the set would have never started because that solenoid has to be on for the injection pump to start pumping. As soon as power is cut to that solenoid thats what shuts down the fuel flow to the injectors. So yeah its possible it was not making a very good connection between the frame and the lack of ground the connection would cut out and hence shut it down.

As for load bank yeah it seems to work alright I built one super cheap. Ill take some pics of it tomorrow and post them up for you to see. I honestly built it for probably bout 130 bucks. Its basically a giant hot water heater. Will start another thread tomorrow so you can see it.

Lee
Thanks Lee on the load bank setup..one day in the new year, I'll be removing a perfectly good electric HW heater when I start converting all our heavy load stuff to gas--in this case it'll have to be LP since there's no NG in our area. Anyway, I'll have the elements available from this heater and will also have a couple oven range elements too when I pull that monster out of the kitchen...can't wait 'til that day comes....

Anyway, our gang needs to close up for the day..we just did Christmas presents so we can do a road trip to in-laws on Christmas day....Merry Christmas to you and all the great guys & gals on the SS site!
 

leedawg

Member
270
11
18
Location
Napa / CA
Thanks Lee on the load bank setup..one day in the new year, I'll be removing a perfectly good electric HW heater when I start converting all our heavy load stuff to gas--in this case it'll have to be LP since there's no NG in our area. Anyway, I'll have the elements available from this heater and will also have a couple oven range elements too when I pull that monster out of the kitchen...can't wait 'til that day comes....

Anyway, our gang needs to close up for the day..we just did Christmas presents so we can do a road trip to in-laws on Christmas day....Merry Christmas to you and all the great guys & gals on the SS site!

Merry Christmas to you to.

Here is a quick pick of the load bank I was talking about you could set up something like this for well under 150 bucks very cheap...

IMAG0730.jpgIMAG0732.jpgIMAG0733.jpgIMAG0734.jpg


Like I said essentially a large hot water heater. The switches on top of the breakers allow me to turn on one element at a time. Two elements are connected to each breaker and I did not feel like putting in another entire sub-panel to put in four more breakers for the other 3 elements so I just doubled them up and put in some 20 amp single pole switches to turn off one on each breaker allowing one element at a time. All parts from homedepot for under 130 dollars.
 

1800 Diesel

Member
768
26
18
Location
Santa Rosa County, FL
Merry Christmas to you to.

Here is a quick pick of the load bank I was talking about you could set up something like this for well under 150 bucks very cheap...

Like I said essentially a large hot water heater. The switches on top of the breakers allow me to turn on one element at a time. Two elements are connected to each breaker and I did not feel like putting in another entire sub-panel to put in four more breakers for the other 3 elements so I just doubled them up and put in some 20 amp single pole switches to turn off one on each breaker allowing one element at a time. All parts from homedepot for under 130 dollars.
Now that's what I call thinking outside the box. Will definitely try to use the same concept on the unit I will build too. I assume you can replace the existing elements with higher wattage ratings as needed?
 

1800 Diesel

Member
768
26
18
Location
Santa Rosa County, FL
Luckily when you damage a radiator like you did, the part that needs fixing is usually easy to get to with solder and a big iron or copper, as opposed to when one springs a random leak.

Pulled the radiator over the weekend and began cleaning up the damaged areas. Looks like at least two tubes will need soldering. When I looked closer at the tubes, it appears they are made of aluminum--definitely not something I expected...or possibly the tubes are made of tinned copper? The fins are definitely copper but the tube show no evidence of any copper. Does anyone know what the tubes are made of?
 

Triple Jim

Well-known member
1,377
294
83
Location
North Carolina
If the fins are copper, I'd bet that the tubes are brass or copper. The assembly process may have solder coated them so they look silver colored. Joining aluminum to copper is not something a radiator manufacturer would choose to do.
 

1800 Diesel

Member
768
26
18
Location
Santa Rosa County, FL
If the fins are copper, I'd bet that the tubes are brass or copper. The assembly process may have solder coated them so they look silver colored. Joining aluminum to copper is not something a radiator manufacturer would choose to do.
That's what I was hoping... I'll do some sanding on it this week and maybe the copper will show through...didn't really want to try soldering aluminum...Thanks.
 

1800 Diesel

Member
768
26
18
Location
Santa Rosa County, FL
If the fins are copper, I'd bet that the tubes are brass or copper. The assembly process may have solder coated them so they look silver colored. Joining aluminum to copper is not something a radiator manufacturer would choose to do.
It looks like the tubes are brass. I completed the solder repair and did a basic leak test with the radiator filled up above the upper tank level by about 18"...no leaks. Reinstalled radiator and all other components that had to come off. Wednesday we'll do a light-off, run it long enough for the coolant temp to come up and then check for leaks again. Hopefully the repair will hold.

On another subject--has anyone noticed how the fan blades on these units are not symmetrical? Not to say the fan assembly isn't balanced, but just that two of the blades are closer together than the other three blades...hopefully there's no special position on the water pump flange because I didn't notice the fan blade oddity until after I removed it.
 

PeterD

New member
622
6
0
Location
Jaffrey, NH
...
On another subject--has anyone noticed how the fan blades on these units are not symmetrical? Not to say the fan assembly isn't balanced, but just that two of the blades are closer together than the other three blades...hopefully there's no special position on the water pump flange because I didn't notice the fan blade oddity until after I removed it.
AFAIK, the position doesn't matter. I never 'indexed' my fan, and have had no problems with it... I was surprised (as you were) that it was not symmetrical too. I believe this was done to allow it to be removed with the shroud in place.
 

Triple Jim

Well-known member
1,377
294
83
Location
North Carolina
Often engine fans have the blades at oddball spacings to prevent them from whining. They're balanced, even though they look like they aren't.
 

1800 Diesel

Member
768
26
18
Location
Santa Rosa County, FL
AFAIK, the position doesn't matter. I never 'indexed' my fan, and have had no problems with it... I was surprised (as you were) that it was not symmetrical too. I believe this was done to allow it to be removed with the shroud in place.
Makes sense as the configuration does allow the R&R of the fan with shroud in place. On a side note, I am always impressed (most of the time) with the engineering & maintenance planning that went into the MEP gensets...As a shipbuilder I'm also impressed with the high quality workmanship of both the Libby & J.R. Hollingsworth products...
 

1800 Diesel

Member
768
26
18
Location
Santa Rosa County, FL
Often engine fans have the blades at oddball spacings to prevent them from whining. They're balanced, even though they look like they aren't.
I expect this would be a factor too. Maybe reducing some of the fan "roar" too...Planning to do a light-off in about 2 hours...don't want to wake up too many neighbors nursing their headaches or just trying to sleep in....thanks for the info.
 
Top
AdBlock Detected

We get it, advertisements are annoying!

Sure, ad-blocking software does a great job at blocking ads, but it also blocks useful features of our website like our supporting vendors. Their ads help keep Steel Soldiers going. Please consider disabling your ad blockers for the site. Thanks!

I've Disabled AdBlock
No Thanks