• Steel Soldiers now has a few new forums, read more about it at: New Munitions Forums!

  • Microsoft MSN, Live, Hotmail, Outlook email users may not be receiving emails. We are working to resolve this issue. Please add support@steelsoldiers.com to your trusted contacts.

No help needed with M109 Restore..

goldneagle

Well-known member
GE it may seem like no one is tracking this thread, but that is far from the truth. It is just no one has any need to make major comments (IMO) your work seems top notch and you are giving the rest of us great ideas. I would love to know the specs on the seats, & how you installed the air line. the pics on the back floor told me tons and now i am sure i will take mine out when the weather breaks and i have time & $. your looks great. Same for the electric panel, the vent door, and the heater vent... Not wanting to leave out someone posted a pic of there truck with the inside walls stipped, same thank you. Now i know what to expect on that. The muffler looks great, also something i would like to do...need to make my truck quite. I wish to turn mine into a camper and am not sure what system to try to tackle first, power (24V, chargers, batts and solar) or water systems (fresh & black) or the fuel would like to increas tank size/storage and have many ideas running in my head. So your thread is great, keep up the good work. Thank you. A059FMJ5.56mm[thumbzup];-)
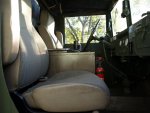
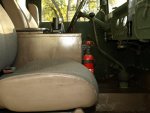
Thank you for your comments. As far as the seats are concerned they were Low Rider Air Ride Seats. I bought them on Ebay from semipartsman of Wisconsin. They post a lot of used truck parts and AIR RIDE seats on Ebay. Great discounts on shipping. I only had to add about 1-3/4" in hight to match the hight of the box seat. This was done with the Unistrut/angle adapter rig i made to install the seats using the original mounting holes in the floor.

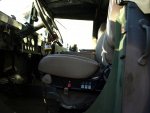
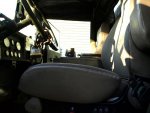
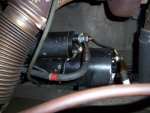
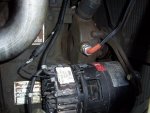
Air lines were made of 1/4" copper tubing that I ran by the door opening inside a 1/2" hose. I ran it along the back wall.
 
Last edited:

goldneagle

Well-known member
UPDATE:

I installed the console yesterday. Nice and solid! One glitch, the shifter hits the front edge of the box! I should have sat in the seat and depressed the clutch to make sure the shifter was going through the full motion of the shift! My bad! SImple solution, bend the shifter forward.

I removed the shifter and took it to a friend's shop. We used the hydraulic press to bend the shifter at the original bend to adjust the location when in 1st, 3rd, and 4th gear. Well we got it right first try! Got it home, installed it and tested. NICE! Comfortable to shift and looks like it belongs there! So now my console project is complete.

I found some small LED lights on clearance for $4 at Home Depot. These are the size of hockey pucks and have 3 LEDs in them. They are meant to clip on to item or can be Velcro'd into place. Just push the button on the face and they light up. Batteries were included! I installed one inside the console on it's back wall. i also installed one on each of the 3 center bows of the cab. They slide along the bow so you can adjust where you want the light. So now I have 3 inexpensive dome lights in the cab.

I will take pictures of the upgraded cab tomorrow. Trust me!
 
Last edited:

papabear

GA Mafia Imperial 1SG
I don't know...I thought my M185A3 was good enough, but after Zout's ride...and now yours I might have to try some uprades:oops:

Good job troop!![thumbzup][thumbzup]
 

timntrucks

Well-known member
Steel Soldiers Supporter
he is definitely making all us think of doing some upgrades to some trucks. those lights are nice in the cab[thumbzup]
 

papabear

GA Mafia Imperial 1SG
There are limits!!

he is definitely making all us think of doing some upgrades to some trucks. those lights are nice in the cab[thumbzup]
Zev is a good troop and is doing an outstanding job...but

If I see dice or anything hanging from the windshield I'm gonna barf...lol :lol::grd:
 

oldMan99

Member
very nice GE - I have found more keep abreast of what your doing than you realize even if someone does not post - they are watching the progress.

Seats looks great
Yeah, what he said... :)


And yeah, GREAT JOB..!!


Questions about the insulation;

How do you attach it to the walls, inside of the hood, inside a hard top....

On the link you gave for the insulation I saw that they had a picture page and several people have installed it on the floor. If I understand this product properly, it is sort of like bubble wrap with small air bubbles?? If so, don't the bubbles on the floor pop with use?

Can you apply a double layer of it to the walls/roof?

Lastly, have you driven the truck since you installed the insulation and if so, how does it do blocking heat through the floor and how much does it quiet the ride?

Again, GREAT JOB, GREAT THREAD!!
 
Last edited:

goldneagle

Well-known member
Yeah, what he said... :)


And yeah, GREAT JOB..!!


Questions about the insulation;

How do you attach it to the walls, inside of the hood, inside a hard top....

On the link you gave for the insulation I saw that they had a picture page and several people have installed it on the floor. If I understand this product properly, it is sort of like bubble wrap with small air bubbles?? If so, don't the bubbles on the floor pop with use?

Can you apply a double layer of it to the walls/roof?

Lastly, have you driven the truck since you installed the insulation and if so, how does it do blocking heat through the floor and how much does it quiet the ride?

Again, GREAT JOB, GREAT THREAD!!
The insulation is not aluminum bubble wrap. It had heat resistant insulation in between aluminum layers. I have not installed it yet! It is installed using spray contact cement. Double layer should be easy, just use the spray cement between layers.

Since I just installed the seats and console I did not want to remove them already just to insulate. I will do that later after I add some more features. I just bought a battery equalizer that i will be wiring into the cab with 2 separate fuse blocks.
 

oldMan99

Member
The insulation is not aluminum bubble wrap. It had heat resistant insulation in between aluminum layers. I have not installed it yet! It is installed using spray contact cement. Double layer should be easy, just use the spray cement between layers.

Since I just installed the seats and console I did not want to remove them already just to insulate. I will do that later after I add some more features. I just bought a battery equalizer that i will be wiring into the cab with 2 separate fuse blocks.
I see... seems I misunderstood the construction of it. Should be no problem putting it on the floor then.

Can you paint it? (I am thinking probably not).

When you do put it in please be sure to take some pictures of it and the a review of how well it works to block heat and sound..

Thanks!!

Keep up the great work!
 

goldneagle

Well-known member
I see... seems I misunderstood the construction of it. Should be no problem putting it on the floor then.

Can you paint it? (I am thinking probably not).

When you do put it in please be sure to take some pictures of it and the a review of how well it works to block heat and sound..

Thanks!!

Keep up the great work!
I am planning on covering the floor portion of the insulation with a rubber or vinyl mat or sheeting to protect it from damage. I will use contact cement to fuse the pieces together. This is done to allow for curves and angles in the floor layout of the truck.
 

Katahdin

Active member
Just wanted to offer up some pics of what I've been working on these last few weeks:

1) NOS Starter, the original one intermittently grinded against the fly wheel but might be salvageable as a spare. I just wanted to move on from that issue, lots on the plate left to do.

2) Coolant Heater, I'd actually bought this last spring from Westfolk but didn't need it until now. I've tested it down to 20 degrees and I was able to start up the engine without using the flame heater and there's a variety of mixed fuels in the tank.

3) Added a winter cover, wanted to see how it looked before I repainted the front end and air out the preservative smell.

4) Moving my painting operation indoors out of the 20-30 degree temps so I can work on smaller parts. Really beginning to dislike Carc. I just try to remove it and sand it down where I can without spending an eternity on it, so the it's not a showroom restoration but it is an improvement. Some of the tie down hooks and ladder brackets in these pictures came from DUG's box.

5) Hardtop, pushing out the dents where I can and repainting, this one was definitely stood on. The window has a lot of overspray I hope to remove. There was some light rust where the hardtop pieces joined and it needs new gasket material, I'm hoping a garage door gasket will work. I did take the 109 for a drive on Saturday to the local Fish & Game club with the top off. It was 25 degrees and I was wearing a mad bomber rabbit fur hat. I got a few laughs and strange looks. :D
 

Attachments

jbingvtx

Member
I just read this entire thread..I am impressed!! I really like the recycled toolbox console, it fits the cab nicely but the storage is unreal. The air ride seats have got to be great..mine has springer seat that doesn't spring and no amount of cursing seems to help. I am officially subscribed and awaiting the next episode. Great Job!!
 

goldneagle

Well-known member
I just read this entire thread..I am impressed!! I really like the recycled toolbox console, it fits the cab nicely but the storage is unreal. The air ride seats have got to be great..mine has springer seat that doesn't spring and no amount of cursing seems to help. I am officially subscribed and awaiting the next episode. Great Job!!
Thank for the encouragement I appreciate it! I have a small issue to deal with the involves the engine not running properly at higher RPMs. I think I may have put water into the fuel system when I let the fuel go low in the tank while I was working on it. I hope it is just a matter of draining the fuel filters or replacing them.

My next mod is the insulation of the cab and then installing the Vanner Battery Equalized I bought along with three 12 circuit fuse panels. One 12 volt and one 24 volt fuse panel for the cab and one 24 volt or 12 volt fuse panel for the box.

I also ordered a Curtis class 4 trailer hitch to add to the truck for civi or low military trailers.

Later (when I can afford it) A/C for the cab.
 

Cigarjoe

New member
I have a question about the floor. I saw the pics with the floor out and the ribs exposed. So from those picks it looks as though the wood is exposed on the underside. So my question is this. If the wood is exposed did you use treated wood? It did look like the right color for treated wood. If you didn't I would not go any farther and redo it with treated. I would even go a step farther and use marine grade ply wood to be extra safe because its a shame to do that nice of work and have to redo it later after it starts to come apart. Even if its treated and painted it deteriorate faster with water road dirt and salt were as marine grade will do the same but take a lot longer to do. The one drawl back marine grade is it is very very pricey. I have seen it go for 4x8 sheet from as low as $90 to as high as $300 depending what try of wood it is. But it lasts for ever. I'm not sure it was just a thought.
 
Last edited:

Sirblissfull

New member
:grin:I dont think Zev knows there is any other kind of wood its hard to tell though. He spends alot of time talking about nails bolts screws and paint.

He lives in a hurricane zone and built his house to with stand explosions and the apocalypse. His idea of over engineering makes the Army look unprepared. :grin:
 

goldneagle

Well-known member
:grin:I dont think Zev knows there is any other kind of wood its hard to tell though. He spends alot of time talking about nails bolts screws and paint.

He lives in a hurricane zone and built his house to with stand explosions and the apocalypse. His idea of over engineering makes the Army look unprepared. :grin:
As Shane said, I did a lot of thinking and engineering before I put the floor back down. I even installed a vinyl barrier between the metal supports and the PRESSURE TREATED plywood so that the chemicals in the plywood would not corrode the metal. The self tapping screws used were pressure treated wood rated.

I may spray undercoating on the plywood once it has had a chance to dry real good. Pressure treated plywood has a 40 year life expectancy so I will not need to replace it until I am 92, if I live that long! 2nd layer was exterior glue plywood. :grd:
 

oldMan99

Member
I had read one thread about a M109 camper conversion and that OP mentioned a couple times the metal cover or liner or something like that on the bottom of the box. This had led me to believe that there was a sheet metal cover over the underside of the box that enclosed the ribs/joists (Whatever you want to call them) and of course closed in the bottom side of the floor.

Is this not the case? In looking at the pictures on this thread it sure looks like there is no cover/liner closing off the bottom.

Just wondering for clarification.

Assuming there is no metal covering, I think the plan to undercoat it after the wood seasons/dries some is very sound. I would look into one of the commercial bed liner products. That stuff is all but nuclear bomb proof. They do make do it yourself kits but putting it on the bottom and getting 100% seal/coverage could take a very long time and would be pretty difficult to be sure you have absolutely no gaps. On the inside to protect against something like leaking or burst plumbing the do it yourself stuff would be real easy if you did it before you installed anything and the floor was still bare. Bring it up an inch or two onto the wall and you have a completely waterproof tub over your floor. As you make holes in the floor for plumbing and so forth you can reseal them with some more of the coating and be good to go till your at least 102... :)

I only mention this because in all my years water has caused me more problems than just about anything else. Broken/leaking pipes, leaks in the roof, shower enclosures that do not seal 100%... Home, truck, RV, storage buildings, steel conex boxes... they all leak sooner or later and when they do it is never good. So now I go way nuts overboard to protect against the damage and to try my best to prevent it from leaking in the first place.

Stage 1 is to try to seal up the outside as best that can be done. Stage 2 is to assume it is going to get wet and build it/protect it so that when it does get wet it can stay that way for months (if undetected) without causing any harm.

92? My grandmother lived to 106 and was sharp as a tack to the last day. Not sure I want to be replacing flooring at 92....lol.... :) (Of course at that point I just might not care anymore..... Sigh..)
 
Top