• Steel Soldiers now has a few new forums, read more about it at: New Munitions Forums!

  • Microsoft MSN, Live, Hotmail, Outlook email users may not be receiving emails. We are working to resolve this issue. Please add support@steelsoldiers.com to your trusted contacts.

Oil Bypass Filter for M35 and other...

goldneagle

Well-known member
4,438
874
113
Location
Slidell, LA
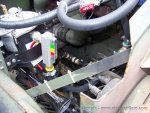
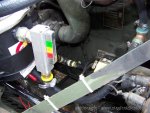
I have been reading a lot of the posts about Oil filter modifications, relocations and pre-lube. While searching on Ebay I ran across a Bypass Oil Filter Kit that I think the members would jump at... I contacted the seller and he told me he has at least 80 of these units available. They run 12/24 volts.

Here are some specs on the Filter System:

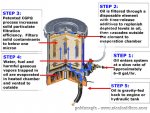
Puradyn PF-12 20 qt. Bypass Oil Filter KIt

Here is a link to the Puradyn Web Site:
http://www.puradyn.com/products/elements.html

You can get them for $110 shipped if you ask the seller nicely..

Feel free to contact me and I will give you his contact info...

I want to thank everyone that posted all the info on oil filter changes and mods. It was very educatioal!!
 

goldneagle

Well-known member
4,438
874
113
Location
Slidell, LA
Does anyone know how much pressure is present in the oil discharge line coming from the bottom of the turbo charger? I was thinking of putting a T in line where the short rubber hose connects it to the engine block and using it as a return for the bypass oil filter setup. Any feedback would be appreciated.
 

SasquatchSanta

New member
1,177
18
0
Location
Northern Minnesota
I can't answer your question about the turbo discharge line BUT there is a capped port in the block between the turbo and the firewall on the LDT engine that is reserved for the dip stick tube in the LDS. Depending on flow out of the by-pass filter, it might be large enough. I would tap into the oil sampling (post filter) port to feed the by-passs filter
 

cranetruck

Moderator
Super Moderator
Steel Soldiers Supporter
10,350
75
48
Location
Meadows of Dan, Virginia
The oil pan is turned around on some engine models, so there are two different locations for the dip stick. The port that isn't used is ideal for a return line from the bypass filter (and/or crankcase breather filter if one is installed).
I'm using 3/8" "Push-on" fittings here and it works well (location "B").
As far as supply to the bypass filter, Ernie's "Post filter" choice is probably as good as mine, which happens to be the "Pre filter" port....
 

Attachments

M543A2

New member
Steel Soldiers Supporter
1,063
10
0
Location
Warsaw, Indiana
There is no pressure in the turbo return tube. It is a gravity drop for the oil from the turbo to the crankcase. It should work fine as a return point for your filter.
Regards Marti
 

cranetruck

Moderator
Super Moderator
Steel Soldiers Supporter
10,350
75
48
Location
Meadows of Dan, Virginia
M543A2 said:
There is no pressure in the turbo return tube. It is a gravity drop for the oil from the turbo to the crankcase. It should work fine as a return point for your filter.
Regards Marti
Yes it would, but much harder to plumb into, while the unused dip stick port is ready to go.....
 

goldneagle

Well-known member
4,438
874
113
Location
Slidell, LA
I received the oil bypass filter kit today. Nice kit with lots of fittings and mounting brackets for the filter housing. The discharge tube is 3/4" barbed fitting -so it looks like he spare dipstick port is out of the running for use in this installation. I pulled out my spare turbocharger with fittings that I got from a spare multi-fuel engine. I found the fitting and short hose that connects the oil return from the turbo to the engine. The fitting is a 1" NPT male to barbed hose. The discharge tube from the turbo is just a 1" smooth pipe.

I decided to do the following modification:

1- Remove the 1" adapter from the engine block
2- Install a 1" brass close nipple to the engine block
3- Install a 1" brass T to the close nipple
4- Attach the 1" adapter removed from the engine to the top of the 1" T
5- Install a new hose and clamps between the turbo and the 1" T
6- Install a brass 1" to 3/4" reducer to the side of the 1" T
7- Install the 3/4" barbed hose adapter provided with the kit into the 3/4" adapter.

I will install the filter housing on the air filter side of the engine compartment. (Probably over the air horn assembly.) I will post pictures later.
 

cranetruck

Moderator
Super Moderator
Steel Soldiers Supporter
10,350
75
48
Location
Meadows of Dan, Virginia
That's a lot of capacity for a bypass filter.....the picture above only shows 6 to 8 gal/hr. If it needed 3/4" for proper flow, then I would be concerned about creating so much flow in the turbo drain that it could upset the drain from the turbo, a big no-no.....

IMHO, the dipstick port is plenty good, some bypass filters I looked at only need 1/8 opening for the drain.
 

goldneagle

Well-known member
4,438
874
113
Location
Slidell, LA
The filter uses a 3/16" hydraulic hose for the feed tube and a 3/4" for gravity feed discharge. I doubt that the 3/16" tube will feed so much oil through the filter housing as to interfere with the 1" gravity discharge from the turbo charger.

I spent most of the morning running around trying to find hydraulic hose and fittings fro the oil bypass system. After going to several places I got most of the parts i needed.

When I came home I started to work on my new project. First I removed the clamps and rubber hose from the turbo discharge tube. I then removed the hose adapter from the engine. I had to cut part of the turbo discharge tube in order to install the 1" T into the opening in the engine block. (I used a 1" hydraulic T with a 1" NPT male on one end) I installed the 1" barbed adapter to the end of the T. After trying for an hour to install the hose back between the turbo drain tube and the barbed fitting I gave up on the idea.

The problem is that the two fitting do not line up. The turbo discharge tube had a bend in it to allow it to line up with the barbed adapter on the engine block. I had to cut the bend in order to get the fittings in. Now I will need to use a torch to heat up the discharge pipe and bend it more to line up with the barbed adapter. My friend is coming over tomorrow morning to look at the problem and help me fix it.

I managed to tie in the feed tube assembly to the Sample port next to the oil filters.

Thats as far as I got today.

I will have pictures of the installation as soon as I can.
 

ARMYMAN30YearsPlus

In Memorial
In Memorial
3,585
7
0
Location
Parkville, MD
What model did you get I see they have a variety based on oil capacity of the engine? It looks like the duece would need at least a model 24 or larger. Is that price shipped to a stateside zip code and what do replacement filters cost? I have been looking at old truck junk yards for a lubrifiner for quite a while.
 

bottleworks

New member
920
2
0
Location
Central NC
I would not use the turbo discharge tube. The turbo needs to have no back pressure. By adding an additional flow in that discharge line, you may be creating one. I would guess that bypass filter also fits in the same category (considering the discharge port size).
 

goldneagle

Well-known member
4,438
874
113
Location
Slidell, LA
Well for good or bad the bypass filter is now plumbed in. We took off the discharge tube from the turbo and heated it up with the cutting torch. We made a bend in the pipe so it would line up better with the barbed adapter. We got it right the first try! I bought a new hose to replace the cracking one I removed from the turbo yesterday. We put the hose on the barbed fitting and then on the turbo discharge tube. We then lined up the bolt holes and bolted the tube on to the turbo. After tightening the two stainless steel hose clamps the bypass of the discharge was complete. We took two 1/4" x 4" steel plates and cut them to 10.5" long. Using three 1/4" bolts we attached it to the fender next to the air horn support. We installed the mounting bracket to the support piece and installed the oil bypass filter assembly. We attached the discharge tube and feed tube the filter housing.

There is a small 1/8" tubing that I need to attach to the air filter housing. Also need to attach the electrical tomorrow.

I picked up the bypass coolant filter assembly today. We installed the same support plate as we used with the oil bypass filter. We mounted it between the new oil bypass filter and the air filter housing. Tomorrow I will hook it up as well.
 

goldneagle

Well-known member
4,438
874
113
Location
Slidell, LA
timntrucks came by yesterday and dropped off the heater for my truck. After replacing the frayed wire I decided to cut the heater housing down like I saw done in another thread. I cut the housing 5" shorter and reassembled. I scraped off the rust and primed the whole housing with Zinc spray. I then painted it military green. I measured and cut a shelf out of some 1/16" thick metal I had removed from my generator project. I mounted the heater to the shelf and attached the shelf to the fender with 3 bolts.

The following day I started to work on the plumbing for the heater and coolant bypass filter. I drained the coolant out of the radiator. I took out the old shut off valve that was supposed to feed the heater and replaced it with a new 1/2" ball valve with a 5/8" barb adapter at the end. I removed the 3/8" plug that was located below the tap for the heater hose. I installed a 1/2" ball valve with 3/8"-1/2" reducer. I attached a 5/8" barbed adapter to the end of the valve.

I removed the temporary plug from the water pump right above the alternator. I tried to install a 3/4" brass service elbow into the opening but the alternator was in the way. After loosing up the alternator I was able to install the service elbow, a close nipple and a 3/4" brass T. I installed 5/8" barbed adapters in the 2 remaining openings of the 3/4" T. I attached the four 5/8" heater hoses to the heater and coolant bypass. All plumbing is now complete. I will take some pictures on December 24 and post them.
 

goldneagle

Well-known member
4,438
874
113
Location
Slidell, LA
Well I got the heater motor replaced today. I also replaced the oil filters and did an oil change using the Mobil 1 Turbo Diesel Truck Oil. I am attaching the pictures I promised!
 

Attachments

goldneagle

Well-known member
4,438
874
113
Location
Slidell, LA
Next step in the project was to wire in the heater for the bypass oil filter. After looking under the dashboard I decided not to attempt to tap into any of the existing lines. Instead i decided to run a line to the batteries. As I pulled the batteries out from under the truck I came up with a better solution. I would tap into the receptacle used to jump start the truck. Its a heavy duty power source already in he cab! I disconnected the ground wire from the batteries. I unbolted the HOT wire from the receptacle terminal and installed a #6 THHN wire on top of the existing wire terminator. I sleeved the wire in a 1/2" air hose I had in stock to protect it from damage. I ran the tubing/wire along the bottom of the passenger side bulkhead, up the floorboard and over the glove compartment and down near the heater vent. I installed a small fuse block I got for $26 at NAPA and terminated the wire into the terminal on the block. Now I have plenty of spaces that I can install additional devices to. (Radio, CB, etc.)

I grounded the 1st black wire from the heater to the mounting bolt with star washers. I ran a #12 wire inserted into a 3/8" air hose to the firewall. I was able to pop out one of the plugs and run the wire/hose into the cab near the air supply valve. I ran the wire along the copper pipe to the dash panel. I was able to find a plugged hole in the dash and removed the plug. Had to enlarge the hole to fit my new LED lighted switch. Had to run a short ground wire to the switch and a wire tot the fuse box for power. I used the 15 amp fuse that came with the bypass filter in the fuse box. (It uses those nice flat colored fuses) MY friend, who is knowledgeable in electronics suggested that I use a resister in the ground feed to the LED so the 24 volt will not burn it up. I installed the resistor he gave me and covered with a 1/4" rubber hose to keep it from grounding to the firewall where the wire is connected. This took care of the bypass oil filter installation.

It takes a while for the oil to fill the bypass filter and register in the float vile. I rechecked the oil level and had to add 2 more quarts of oil to the truck. That makes 26 quarts total.

My next project under the hood was to install a cable controlled shutoff valve for the heater. Since the weather in Louisiana is different on a daily basis you never know if you need heat or A/C any particular day. Sometimes you need heat in the morning and A/C in the afternoon!!! The valve would allow me to turn off the hot coolant flow to the heater block with the bull of the handle. (without having to open the hood and closing the ball valve) I found a empty spot on the dash at 7 o'clock m the steering column and drill a hole there for the pull switch. I was able to locate a plugged hole above where the steering column where it goes through the firewall. I ran the cable assembly through the hole in the dash and the hole in the firewall. I installed a rubber grommet in the hole. After cutting the heater hose and installing the valve it was time to connect the cable to the valve. I cut the cable to length and bent the center wire around the stem that controls the valve. I used a terminal crimp to hold the loop together. I inserted a push nut over the stem to keep the loop from coming off. Remote heater valve was now complete!

Last project under the hood was to install a 1' long 5/16" all-thread to support the heater shelf to the frame. I drilled one hole through the shelf above an existing hole in the frame from the original heater install. I used 2 nuts and washers on each end to secure the shelf in place. SOLID as a rock!

Thats it for my projects under the hood. I will take some more pictures and post them soon.
 

goldneagle

Well-known member
4,438
874
113
Location
Slidell, LA
Here are the pictures I promised to post:
 

Attachments

Top
AdBlock Detected

We get it, advertisements are annoying!

Sure, ad-blocking software does a great job at blocking ads, but it also blocks useful features of our website like our supporting vendors. Their ads help keep Steel Soldiers going. Please consider disabling your ad blockers for the site. Thanks!

I've Disabled AdBlock
No Thanks