• Steel Soldiers now has a few new forums, read more about it at: New Munitions Forums!

  • Microsoft MSN, Live, Hotmail, Outlook email users may not be receiving emails. We are working to resolve this issue. Please add support@steelsoldiers.com to your trusted contacts.

poppop,s M37 restore thread

poppop

Well-known member
2,316
39
48
Location
Brooklet, Ga
I have not made much progress in the last several days but the winch is almost finished. I have one seal still to pick up and the store was closed yesterday. If I had that seal I could finish it in a half hour. The new shift fork came in and it is installed with a longer set screw. The old fork was damaged because it appeared the set screw was below the fork edge which meant when forced to engage it rocked back and forth and elongated the hole. This allowed the shaft to turn in the fork so the lock holes on the shift lever did not line up.

The previous owner had found all the hard parts to put it back together. One bearing cap for the input shaft apperaed to be new and was cast iron where the other end seemed orginal to the winch and was alunimum. Both had the same part number on them so I installed the iron one on the drive shaft end. It seems to me that end will have more pressure exerted on it. There were several gaskets on the aluminum one, some thick and some thin. I dry fitted these until I have a little preload on the bearings and only needed one thick gasket and one thin one. The only thing left now is to glue the gaskets and install end caps permanently. The brake was oil soaked and still needs a little more cleaning then it can be installed and adjusted. Then when I get the last seal it can be buttoned up for good. the only thing it will need then is the top plate which is missing. I may try to build one as stated earlier or just buy one from Snake River
4 x 4.

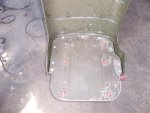
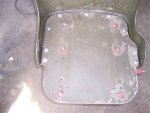
Both seat bottom cushions came new with the truck. I have worked on the drivers seat and intended to install the new cushion. I assumed it would be fastened to the wood bottom and then the steel back bolted on. That could not be done as then the bolts could not be installed and tightened. I have a question for the experts, is the cushion supposed to be mounted to its own board and then just set in place in the seat, or am I missing something?????
I have to get some plywood for the passenger seat bottom anyway so I assume I will cut a piece for the drivers seat also.
 

zout

In Memorial
In Memorial
7,744
154
63
Location
Columbus Georgia
Taking a break here from trying to find out where ya hid them windshield screws in that package.
The bottom metal plate is bolted in direct. The wood bottom to the cushion gets what are called T bolts - kind of like threaded nut zerts - they have pointed on the sleeve end that bit into the wood to keep them from spinning on you when your tightening them. I cannot remember what size they are but NAPA should have them or a fabric store - just take a pic of you walking into a fabric store for me please when you go.

The foam cushion gets contact cemented to the board them.

Lay the board on the metal platform - reach up and under and mark your holes Lloyd - get the T bolts first before ya drill anything to make sure the size is right.

Done with break - going back to look for screws
 

Recovry4x4

LLM/Member 785
Super Moderator
Steel Soldiers Supporter
34,012
1,813
113
Location
GA Mountains
On day at a time Lloyd. Get the hinges in the back and hip oiled up before and serious bending. The truck looks fabulous. Squirtruck will have some company on the trails with your M37 .
 

poppop

Well-known member
2,316
39
48
Location
Brooklet, Ga
Dave, my seat does not have a metal bottom like yours on the WC. I have the original wood bottom that shows prints where the metal back was bolted to it under the bottom. The holes on top are counter drilled for what looks like large metal flat washers to recess into. There is no sign of glue or staples or any kind of fasteners so that is why I thought maybe to was a separate bottom. I will take a picture and post later.

I have a strange glass jar with some funny screws in it and I don't know where it came from.:-?:twisted::-D
 

poppop

Well-known member
2,316
39
48
Location
Brooklet, Ga
100_2796 (Small).JPG100_2797 (Small).JPG

Pictures of my drivers seat bottom. Winch input shaft installation finished and brake adjusted. Can someone confirm the bolt size of the bolts for the top plate. The parts book does not say. I thought it was half inch course thread as I used that size when I put the top angle on but it was tight. Went to chase the threads today and seemed OK but got a lot of metal shavings out of the hole when I finished.
 

poppop

Well-known member
2,316
39
48
Location
Brooklet, Ga
I just checked a site I found on winch rebuilds to try and confirm top plate bolt sizes and found out I have the input shaft installed incorrectly. I put a slight preload on the bearings which I thought was pretty standard on assemblies like this. Well the TM says it should have a slight endplay to make up for heat expansion so I will have to pull one end and install another gasket or two. I am becoming very familiar with the Braden LU4 winch.
 

Tuko

New member
85
1
0
Location
CT
Here's a top plate I made:


disregard the spacing measurement I think I added a 1/4"


heres the winch with the bolts in after helicoil:

 
Last edited:

poppop

Well-known member
2,316
39
48
Location
Brooklet, Ga
Looks good Tuco. My threads look bad at the begining of the holes but seem good a little deeper. I have a piece of diamond plate I will use if I make my own top plate. The angle that came with the winch has the correct spacing for the length. I thought I would take a piece of cardboard and emprint the holes with a hammer and use that for a template.
 

zout

In Memorial
In Memorial
7,744
154
63
Location
Columbus Georgia
Lloyd - them bottom platforms look like plywood - if it were me (sick individual) I would use those T nuts and only secure the boards using 4 of them.
Get the T nuts - find which holes you can enlarge to insert them - or if the holes are the proper size just insert them. The board can then screw on from the bottom side of the seat.

What will go on the board using 3M High Tac spray contact adhesive is the very stiff foam pad - the seat upholstery covering can than be wrapped around and then stapled to the bottom side of the boards (after you adhered the foam to the board).

Unless you see something first hand I do not see this will work (same thing the WC is going to get).
 

poppop

Well-known member
2,316
39
48
Location
Brooklet, Ga
Dave, I picked up the T nuts yesterday at Lowes, NAPA did not have them and said could not get them. Started taking the seat back apart this morning and the T nuts will not work. The adjusting rails have three studs welded to them that have to be secured to the plywood first. The center stud goes through a quarter inch plate on the metal seat back which gives the back more rigidity. I found a picture of the seat in one of my TM's and it shows the cushion sitting on the plywood bottom, so I assume the cushion has another piece of plywood in it. So I am going to cut another bottom and secure the cushion to it. I will have to mark the rail stud holes and drill them in the cushion bottom so it will sit over them. This will keep the cushion from sliding so I probably will not fasten it down. If I do then the T nuts will work for that.
 

poppop

Well-known member
2,316
39
48
Location
Brooklet, Ga
You can stop by anytime, but give me a call and be sure I am here. I am on the road a lot hauling produce around.
912-682-6299
 
Top
AdBlock Detected

We get it, advertisements are annoying!

Sure, ad-blocking software does a great job at blocking ads, but it also blocks useful features of our website like our supporting vendors. Their ads help keep Steel Soldiers going. Please consider disabling your ad blockers for the site. Thanks!

I've Disabled AdBlock
No Thanks