• Steel Soldiers now has a few new forums, read more about it at: New Munitions Forums!

  • Microsoft MSN, Live, Hotmail, Outlook email users may not be receiving emails. We are working to resolve this issue. Please add support@steelsoldiers.com to your trusted contacts.

Questions on painting a M109

3dAngus

Well-known member
4,719
101
63
Location
Perry, Ga.
OK, I know much of this has been covered. Search doesn't work for me very well but I will be researching threads. I was hoping for some shortcuts along the way. Questions as follows:

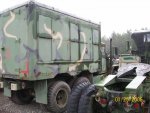
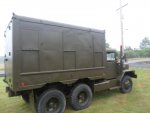
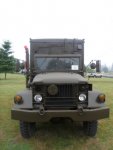
1. How much green paint should I buy for painting a complete M109A3, box, cab, inside cab and all.

2. Is there a good alternative for carc that would be an appropriate color?

3. I plan on washing and painting over, soda blasting all rust off first. Not planing on blasting the entire truck. I assume I would have to prime it. It is currently desert tan, and I want to paint over. Any special primer I should use?

4. How would I dilute the green paint of choice? Mineral spirits? What ratio?

I am new to painting with a gun. I do have a compressor and a paint gun, but is there anything special I should know about what gun to use?

5. I plan on painting over with Krylon camo paint for making it camo.

This would get me a good start if someone doesn't mind helping out with the quick reference plan. It seems to be a big job and want to get started right away when my EUC clears, so am planning on making my purchases in advance. Thanks for any assistance. You guys are great!
 

AaronW

New member
870
3
0
Location
Napavine,WA USA
I just had my 109 100% painted on the outside only. We used 4 gallons of paint cut with one gallon of Xylene. The painter used a "paint pot" with a gun. I'm not sure, but I do not think it was a HVLP gun. This thing really laid the paint down! For inside and out, I would err on the side of caution and have more paint on hand than I did. We took the truck down to bare metal, shot it with DP40 primer, then went to town with 24087 from RAPCO. If you just wash some areas, make sure to use a wax/grease remover.

Wsucougarx has a great thread going on a 383 replacement sourced from a big orange box store.
 

RealCavDog

New member
579
12
0
Location
Joplin, Missouri
Surprised that the paint and bodywork threads did not come up, there is even a recent one concerning outdoor latex house paint that I found extremly interesting, especially if you are a paint gun novice.

One fellow just posted a few days ago of how hew did the complete truck with Rapco rattle cans, but your 109 has so much more flat and broad surface area that way be a bit sketchy on the final look.

As for thinning, that will be based entirely on the paint type and manufacturer, as I KNOW several of the folks on here will be right on to give you options !

I myself am already commited to the water based Sherwin Williams CARC, Pricey, but talk about the perfect finish and hue that I REALLY wanted !
 

3dAngus

Well-known member
4,719
101
63
Location
Perry, Ga.
I just had my 109 100% painted on the outside only. We used 4 gallons of paint cut with one gallon of Xylene. The painter used a "paint pot" with a gun. I'm not sure, but I do not think it was a HVLP gun. This thing really laid the paint down! For inside and out, I would err on the side of caution and have more paint on hand than I did. We took the truck down to bare metal, shot it with DP40 primer, then went to town with 24087 from RAPCO. If you just wash some areas, make sure to use a wax/grease remover.

Wsucougarx has a great thread going on a 383 replacement sourced from a big orange box store.
Did you take the box down to metal also? How did you do that. What did it cost you to remove, then paint? I would rather have someone else do it if they had the right tools and it was affordable.
 

AaronW

New member
870
3
0
Location
Napavine,WA USA
My painter hired a gal who blasts/paints equipment for a living to do it. She used 2000 lbs of sand!!! Took her 12-14 hours. The trick here is that you need to move super slow on thin metal or it will warp. She did an awesome job. The truck looked kind of cool all bare steel.

Cleaning up all the sand then becomes job #1! You will not get it all. I've been driving the truck for a month now and I still have sand coming out of everywhere you can imagine.

I got a "good buddy" deal on the complete job. First, the sandblaster way underbid the job. Second, she stuck to her bid. Third, I helped on the job a little with prep and such. Fourth, I bought the paint. Total bill came in right at $1600 (more than I paid for the rig) I gave a generous tip!

-You want to avoid blasting the blackout covers.
-I removed the inner duals for better frame access.
- I was not looking for "show quality". I wanted my truck to reflect a "motorpool '63" look.

-**Camo hides a lot of flaws!**
 

Attachments

Last edited:

3dAngus

Well-known member
4,719
101
63
Location
Perry, Ga.
Very nice. Wish I could get a deal like that.
After research, I have decided to go with Rapco 383 green carc replacement. Not sure if I will be going with spray cans or gallons and mixing myself using a 80/20 mixture with xlene, but one or the other. Seems most people are happy with that. I am concerned about the sandblasting though. I don't have an area do do that in being in an old neighborhood. I need to be out of the farm somewhere to do that, and I sold the farm, unfortunately. Still researching. I appreciated the tips. It makes my research go much faster and as posts come in, it gives me more info to look for on google.

Your truck looks great!
 

3dAngus

Well-known member
4,719
101
63
Location
Perry, Ga.
It would be nice if you could hook up with MdMorgans to get some visual pointers seeing how they are close to you.

I can do that. I'll check with them. I recall now where MDMorgan wife said they did a M109. I didn't realize they painted though. I wonder if they sandblasted. Will PM them. Good pointer. Thanks.
 

maccus

Super Moderator
Super Moderator
Well here is how I usually do it, or have done it for the last few trucks I have painted. There are many classes of restoration in the MV hobby. I do what is called "Motor Pool Quality", Sort of like you would find in a well run military motor pool. Not like a brand new truck fresh from the factory.

I use RAPCO Gillespie paint only. Thinner depends a lot on where you live and how fast you want it to set up. Climate plays a big part is selecting a thinner, For my location I use Naptha at a ratio of 20% thinner and 80% Gillespie. Gillespie is very easy to use and one can get it in rattle cans later for spot painting. The price is also fair.

I used 4 gallons of paint for the last truck I painted. A M818/109 shop van. I do not believe in taking all the paint off if it is still on the truck and is adhering properly. Old paint properly sanded and cleaned is a very good primer. Rusty areas I take down to bare metal and then prime with Rustoleum primer. On my van paint job I only painted over what was there with the correct camo color I did not paint the whole truck green first and then add the brown and black. I plan to use the truck as it was intended to be used so it will get scratches etc. on it all the time from being in the woods/mountains etc.. A pole barn queen or show vehicle you might want to approach the prep/paint job differently.

Here is the pot HVLP type paint gun I have used for some time. Good enough for us occasional users. If you want to be able to paint in those upside down hard to get places you have to have a pot gun. And there are a lot of places like that on mil vehs..

http://www.harborfreight.com/professional-hvlp-spray-gun-kit-93305.html
 

Attachments

Last edited:

3dAngus

Well-known member
4,719
101
63
Location
Perry, Ga.
Link worked for me. Maccus, what was your preferred pressure setting for that gun?

BTW, is it safe to walk on the roof of these things to paint, or do you paint the roof from a ladder.
 
Last edited:

x-ray

New member
141
1
0
Location
Brockport, NY
I also did a Motor Pool (give or take) level of refurb from a well used Gov Liq M109 I got going this year.

I used:
  • Gillespie 24087 Semi Gloss OD from Rapco Parts, I purchased 4 gallons, used a little over 3 gallons - but had a bit of rustoleum primer under it.
  • I thinned using mineral spirits about 80% paint, 20% thinner
  • I used a $12 Harbor Frieght HVLP gun (set at about 45 PSI- It worked very well and Plan on using it again. Note you need compressed air to use.
  • I painted the inside an off-white - I used Behr premium+primer in one (just one gallon did it). Worked well and rolled it on like painting the kitchen wall. I had to cover the Brady Bunch 70s era wood paneling inside (Yuck!)
My prep for paint was to:
  • Remove all rust with angle grinder and cup brush or use needle scaler
  • Sand areas with finish sander.
  • Rinse / Wash off all dust
  • Prime with rustoleum rusty metal primer.
  • wet sand
  • mask off
  • paint
It took me several weeks working a few hours here and there to prep and a few hours to paint.

If resources permitted, sandplasting or soda blasting sounds like a great way to prep, but I'm happy how mine came out except darn semi-gloss shows every little ding/dent, and there were lots of those on the box. But looks good to me nonetheless.
 

maddawg308

Well-known member
Steel Soldiers Supporter
10,861
747
113
Location
Front Royal, VA
Do something unique instead of the standard paint jobs. Do like JWC did, have a M109 with gangsta graffiti painted on the sides. Or Opie with his baby-barf camo, a mixture of mustard yellow, flat OD green and grey (but mostly yellow).
 

Attachments

wsucougarx

Well-known member
6,951
65
48
Location
Washington State
Here are a couple updated pics taken on 9-11-11. She's pretty much complete as far as paint and stencilling is concerned. As Aaronw said, it is paint from The HD:wink: If you want the formula for the paint goto the link that ksM715 provided. I used 2.5 gallons of green (full exterior and cab interior) as the base coat uncut. Oh BTW, I also did my M109A3 as well. I don't have any updated pics handy to show you though.
I opted NOT to use Gillespie Paint because it is way too GLOSSY for a military finish...to me anyways. The Behr paint proved to have CARC-like texture and flatness. I did the "ROUGH CARC" test, by sliding my clenched fist knuckles across the Behr paint, yep it took some skin off....good to GO!!!!!
 

Attachments

Last edited:

treeguy

New member
605
3
0
Location
Fort One Bay - Cape Cod, MA
Nooooooo..... don't use Krylon for the camo! The different manufacturers will have a different sheen. Rustolium spray can flat black has a slight sheen while in the gallon can it does not. Why not use the brand of your flavor as described by the other guys? Gallons or spray cans, you can get either, Gilespe/Rapco has been mentioned, how about Avero from Alan Haage in NJ? He is a great guy and has ratios and instructions to help plus will answer any of your painting question. Avero has been fixed and doesn't turn pink like it used to I've been advised. Its like McDonalds and Burger King or Ace and True Value, same thing, just depends on who you like to go with.
 

135gmc

New member
307
0
0
Location
St Paul/MN
If you ever sandblast a vehicle, there are a few tricks that help--- Mask off areas you don't want to sandblast with either plywood or sheet metal - you can use duct tape to seal the edges and for small areas - sandblasting doesn't do much to duct tape. You want to use new sand-trying to scrape up some of your used sand doesn't work since the sand doesn't have sharp edges anymore. Try to get something like Black Beauty (foundry slag) if you can - it's nice and sharp. Stand back from the truck, at least a foot or so, with the nozzle. Blast the truck at a shallow nearly flat angle. That way, the "overspray" from the sandblaster will help clean downrange metal, and the shallow angle helps prevent warping the sheetmetal. If you ever sandblast with the nozzle at right angles to the metal, you will be able to see the sheet metal bulge out!!
You want to use a supplied-air blasting helmet as well. Also good leathyer gloves and coveralls. If you don't want to be picking sand out of your pockets for a few years, duct tape the pockets closed as well.

As soon as you finish sandblasting, blow the sand off and vacuum out any pockets full of sand. Spray a primer on immediately before the steel has a chance to rust - a self-etching primer works well, or an epoxy primer. An epoxy primer needs to have the color coat sprayed on within a few days - if you wait too long, you will need to spray another coat of epoxy primer on to bond the color coat to the original primer. If you don't do this, the color coat won't bond well, and can be pulled off with a piece of masking tape even years down the road.
 
Top