• Steel Soldiers now has a few new forums, read more about it at: New Munitions Forums!

  • Microsoft MSN, Live, Hotmail, Outlook email users may not be receiving emails. We are working to resolve this issue. Please add support@steelsoldiers.com to your trusted contacts.

rebuilding the alternator

2deuce

Well-known member
1,479
154
63
Location
portland, oregon
Since CUCV's wear out alternators twice as fast as your normal, regular, every day run of the mill vehicle that has one alt and one battery, I want to rebuild my own. I pulled one apart that had the gen 2 light flashing because of a bad bearing. The armature was starting to rub the field. Napa says they can get me the new bearing. So my question is how do you hold those brushes in place upon reassembly.

Thanks,
Greg
 

kassim503

New member
383
3
0
Location
Stony Brook, NY
There should be a hole that runs through the rear case somewhere below the brushes when they are fully compressed. Just stick an appropriate nail or drill bit into the hole to keep the brushes from shooting out
 

twright

Member
Steel Soldiers Supporter
472
0
16
Location
Rockmart Ga. 30153
Look at the TM it tells you how to do it I just rebiuld 4 of them just be careful when you press out the bearing you can brake the case. you can buy all of the parts for around 35.00 everything new in side you don't get the rotor or field wiring but everything else
AEC Retired Tony
 

Warthog

Moderator
Super Moderator
Steel Soldiers Supporter
13,774
232
63
Location
OKC, OK
Section 4-2 of the TM 9-2310-289-34 manual covers rebuilding and testing of the alternator.

Paragraph 14 tell you to use a "suitable retainer" to hold the brushes. Like above, use a paper clip, nail, drill bit, etc.
 

2deuce

Well-known member
1,479
154
63
Location
portland, oregon
Thanks guys I'll look for the hole. I got a new bearing from napa $15. I also need a new pulley. Does that come in the kit? Is there a kit part #? My bearing went bad because my pulley was worn out and I couldn't stop the squeeling belt until the belt was very tight/too tight. If I run into the squeeling belt problem again I'm going to take a close look at the pulley.

I have had 2 other alternators go bad prior to this one and both times the gen light in the dash would stay on longer and longer, meaning it would take a higher revs over time for the light to go out. Is this a good sign that your alt is on its way out? and before it does go out is there a remedy?

This last one went out because of the bearing failure, but it also was keeping the gen light on alot longer than the other alt, demanding more revs. I'm wondering if there is something I should look into before I put it back together that causes this, that would prolong its life. Thanks again
 

mark69k20

Member
42
0
6
Location
DE
Where do you buy the parts needed to rebuild the alternator???
Yes, please, if you guys found a good source of parts please post them up.

For those of you that have done this are any special tools required? Any part of a rebuild that would be a special skill? Thanks:grd:
 

doghead

4 Star General /Moderator
Staff member
Super Moderator
Steel Soldiers Supporter
26,246
1,179
113
Location
NY
Either buy your parts directly from a local re-builder or auto parts place, or online. There are choices to make, when it comes to the parts. While you have it apart, replace all the small internals, they are cheap. If you don't know what your doing, it might be a better choice to let a local shop do the work.

These alternators do not wear out twice as fast as others.

If you do a search, I posted info on rebuilding the alternators, some time ago.
 

jakwi

Member
68
0
6
Location
Colorado Springs
doghead I think what he meant is that since there are two alternators you'll be rebuilding one twice as often as in the same vehicle with only one alternanator, at least that's what I got out of it.

by the way 2 deuce, if your armature was rubbing, you might want to test it for a short before you buy any more parts. If it's shorted you'll need a new one and it would stink to get it all back together just to find out it still doesn't work. Testing the armature is covered in the tm as well, all you need is a multimeter.
 

jumpmasterjim

Member
117
1
16
Location
NY/NJ
I just rebuilt 4 as well . I bought the kits from a guy on ebay. He sent complete kits. Remember that these alternators have isolated grounds. And be real careful pressing bearings!! twright is right. I broke 2 cases.
 

Warren Lovell

Member
476
4
18
Location
SAN DIEGO, CA
Hey Jumpyjim, do you still have the invoice for the guy on ebay? Perhaps he has a website or can sell direct.

Broadway Electric in Lemon Grove San Diego wants $150 each to rebuild, so I'm thinking I would rather do it myself.

Any specialty tools required? how did you crack the cases? This would be nice to know and avoid.

Warren
 

Warthog

Moderator
Super Moderator
Steel Soldiers Supporter
13,774
232
63
Location
OKC, OK
The alternators are GM 27SI type 100.

I just paid $87.50 to have one rebuilt in OKC. That included all new internals. The only reason I didn't do it myself was that the Rotor Assembly was bad.

There has been many threads on this subject. Search 27Si and see what has been said.

I googled "27Si kit" and found many vendors with prices from $16 for a basic kit to $37 for a complete kit.

Heres an example
http://www.springhillautoelectric.com/index.php?act=viewProd&productId=13
 

Stonepicker1

Well-known member
2,446
86
48
Location
Coconut Creek, Florida
The alternators are GM 27SI type 100.

I just paid $87.50 to have one rebuilt in OKC. That included all new internals. The only reason I didn't do it myself was that the Rotor Assembly was bad.

There has been many threads on this subject. Search 27Si and see what has been said.

I googled "27Si kit" and found many vendors with prices from $16 for a basic kit to $37 for a complete kit.

Heres an example
High Output Alternators - Alternator & Starter Repair Kits - Alternator Parts - Delco 27Si Type100 Heavy Duty Rebuild Kit
Thanks for the info "Warthog" .. I just ordered 3 repair kits from spring hill auto. Something else to add to my growing "to do" list when I get out of this sand box over here.
 

twright

Member
Steel Soldiers Supporter
472
0
16
Location
Rockmart Ga. 30153
I also got my kits from spring hill auto out of Fla. I just did 4 ot them to test them I put them on My M1031 that I have at my shop to see how they worked . The parts store can't realy check them out because of the the isolated grounds it is not in there manual. I paided 27.50 plus shipping .they all worked great.
AEC Retired Tony
 

Warren Lovell

Member
476
4
18
Location
SAN DIEGO, CA
Well, I took alternators out and had the shop check them. They said both were fine and putting out 14.5 volts. So now I don't know what to do. I put in 2 new batteries, cleaned all connections, replaced relays under dash, checked fuses...and I STILL get 2 red gen lites when truck is running! Anyone know what to replace next???
:evil:
 

Warthog

Moderator
Super Moderator
Steel Soldiers Supporter
13,774
232
63
Location
OKC, OK
Not much help but the TM 9-2320-289-20 manual has these steps.

In the Electrical Troubleshooting section Table 2-4, Paragraph 6.

It talks about tracking the circuit from the alternator to the instrument panel.

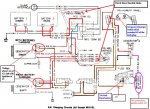
I will post the wiring diagrams with the wires color coded in the morning.
 

Attachments

2deuce

Well-known member
1,479
154
63
Location
portland, oregon
I may have been fortunate when I took the front bearing out since it took a pretty good rap before it came out. Once it was out, it occured to me how easily the case might break. Do you guys use a propane torch to warm it up or penetrating oil to aid in getting it out and do you use some antisieze when reinstalling the bearing? or would would you worry about spinning the bearing with antisieze in there?

My Napa doesn't carry the pulley, who is a good source? Is the pulley included in the rebuild kit?

Thanks,
Greg
 

kenny

Member
186
2
18
Location
San Antonio Texas
Not much help but the TM 9-2320-289-20 manual has these steps.

In the Electrical Troubleshooting section Table 2-4, Paragraph 6.

It talks about tracking the circuit from the alternator to the instrument panel.

I will post the wiring diagrams with the wires color coded in the morning.
That is a good post my GEN # 1 used to flash on and off when the head lights were on and the brakes pushed.
I turned the idle screw 1/4 turn and it went away
 

Warthog

Moderator
Super Moderator
Steel Soldiers Supporter
13,774
232
63
Location
OKC, OK
Well, I took alternators out and had the shop check them. They said both were fine and putting out 14.5 volts. So now I don't know what to do. I put in 2 new batteries, cleaned all connections, replaced relays under dash, checked fuses...and I STILL get 2 red gen lites when truck is running! Anyone know what to replace next???
:evil:

After further investigation......Dr Watson.......... I found a guide on the old SS site that covers an older version of the 27Si alternator. Not an exact match but the pricples are the same.

GM Service Bulletin 1G-266

http://old.steelsoldiers.com/index.php?module=pagesetter&type=file&func=get&tid=1&fid=file&pid=256

It appears that your circuit for the #2 plug is faulty. Without power from the battery thru the #2 plug, the circuitry opens and allows the the #1 circuit to close and the bulb to illuminate. (....basic terms...;);).)

So reading thru page 2 & 3, it points me to the plugs and wires on both alternators.

I would first remove the plug from the alternators and see if you have voltage at the red wire. If not check the two "orange" fusable links. This may be your problem. Then start tracing the wire back to the alternator.

Page #7 covers removing the bearings. They say to support the case with a collar or pipe to keep from cracking it.


Right click the thumbnail and choice "Open Link in New Window"
 

Attachments

Last edited:
Top