Dr Zoidberg MD
Member
- 114
- 6
- 18
- Location
- NH
So I just replaced the RH windshield of my HMMWV and figured I would document it for others to have the information down the road. I know a few folks have contacted auto windshield/glass replacement companies and struck out. Don't waste your money or time with those guys.
Is replacing the windshield as easy as it looks? Well, yes and no. I will tell you it took me two windshields, but if I had been a little more careful, the second windshield would not have been necessary. You can do it yourself from start to finish in about an hour and my cost for a windshield and new gasket was about $125. A step ladder is quite handy, too.
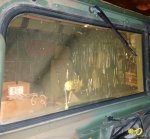
Well here's what my RH windshield looks like. Not pretty and probably not real safe especially at night. I put a clamp light behind so you can really see what I mean.

The first step was to remove the upper and center windshield retainers. A wrench or socket will accomplish this in just a few minutes. Only issue that I came across is that one of the screws on the retainers had the head snapped off. I see from another spot that this had been solved in the past by drilling a new hole and installing a new self-tapping screw. I will do that upon reinstall.
Once the retainers were gone, I gave the windshield a firm push from the inside and it moved with no resistence other than the wiper arm's spring. So while you may notice a lot of old red RTV around the edges, this dated back to a prior windshield and there was nothing sealing or holding it in place. This next part took me a few minutes to figure out. With the wiper arm still attached, there wasn't enough room to rock the top edge of the windshield forward to remove it. So before I started taking things apart, I figured I would try something. I turned the wipers on and then shut the truck off when they were at their extreme left position. At that point there is enough slack in the wiper linkage to push the wiper arm up so that the windshield will simply rock forward for you to lift out.

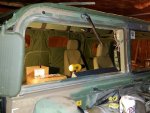
So here's what I was left with.


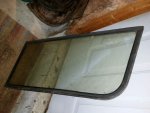
I ordered the new windshield from Kascar and here is how it arrived to me. Packed well, arrived safe and sound.

The gasket has been sitting in my garage a couple weeks and it was about 40 degrees in there when I was doing this. When I opened the bag, it was super stiff and nearly impossible to spread to get the glass in between it. So I threw the gasket up on my truck's dashboard and left the defroster on high to heat it up. After about 20 minutes, I went and got the gasket and it was extremely warm to say the least. This made it a lot easier to install. How ever you do it, make sure that the gasket is warm. Getting the gasket on the windshield is the most tedious part of the job. Before heating it, I had gotten a total of about 20" of the glass edge in the gasket in about 10 minutes. Once I heated it up, the entire windshield took me less than 10 minutes to get in the gasket. I did all of this over several layers of blanket to avoid damage to the edges when handling.
The next thing I did was clean out the windshield channel. A quick vac & wipe down as well as removed the old RTV. Once I lifted the new windshield into place, I started to rock it back and noticed the fit was extremely tight on the sides and top. At this point I put some tire bead lubricant around the edges. I gave it a firm, even push... nothing. I did this again a little harder and POP!
Windshield #1 in the dumpster. Dejected, I reinstalled my old windshield and promptly ordered another from Kascar. Windshield #2 arrived broken. Looked as if UPS had been throwing it down stairs over and over. Kascar was awesome. Handled the claim and had a new piece of glass to me 5 days later.
Same issue with this piece... extremely tight fit. This time I took a razor blade to the gasket and cut the 3 ribs that go around the edge off the sides and top. It was close, but still tight. I then cut the ribs off the bottom edge. Reapplied the bead seal lube, and it popped in snuggly. Reinstall the the retainers, done deal.

Is replacing the windshield as easy as it looks? Well, yes and no. I will tell you it took me two windshields, but if I had been a little more careful, the second windshield would not have been necessary. You can do it yourself from start to finish in about an hour and my cost for a windshield and new gasket was about $125. A step ladder is quite handy, too.
Well here's what my RH windshield looks like. Not pretty and probably not real safe especially at night. I put a clamp light behind so you can really see what I mean.

The first step was to remove the upper and center windshield retainers. A wrench or socket will accomplish this in just a few minutes. Only issue that I came across is that one of the screws on the retainers had the head snapped off. I see from another spot that this had been solved in the past by drilling a new hole and installing a new self-tapping screw. I will do that upon reinstall.
Once the retainers were gone, I gave the windshield a firm push from the inside and it moved with no resistence other than the wiper arm's spring. So while you may notice a lot of old red RTV around the edges, this dated back to a prior windshield and there was nothing sealing or holding it in place. This next part took me a few minutes to figure out. With the wiper arm still attached, there wasn't enough room to rock the top edge of the windshield forward to remove it. So before I started taking things apart, I figured I would try something. I turned the wipers on and then shut the truck off when they were at their extreme left position. At that point there is enough slack in the wiper linkage to push the wiper arm up so that the windshield will simply rock forward for you to lift out.

So here's what I was left with.


I ordered the new windshield from Kascar and here is how it arrived to me. Packed well, arrived safe and sound.

The gasket has been sitting in my garage a couple weeks and it was about 40 degrees in there when I was doing this. When I opened the bag, it was super stiff and nearly impossible to spread to get the glass in between it. So I threw the gasket up on my truck's dashboard and left the defroster on high to heat it up. After about 20 minutes, I went and got the gasket and it was extremely warm to say the least. This made it a lot easier to install. How ever you do it, make sure that the gasket is warm. Getting the gasket on the windshield is the most tedious part of the job. Before heating it, I had gotten a total of about 20" of the glass edge in the gasket in about 10 minutes. Once I heated it up, the entire windshield took me less than 10 minutes to get in the gasket. I did all of this over several layers of blanket to avoid damage to the edges when handling.
The next thing I did was clean out the windshield channel. A quick vac & wipe down as well as removed the old RTV. Once I lifted the new windshield into place, I started to rock it back and noticed the fit was extremely tight on the sides and top. At this point I put some tire bead lubricant around the edges. I gave it a firm, even push... nothing. I did this again a little harder and POP!
Windshield #1 in the dumpster. Dejected, I reinstalled my old windshield and promptly ordered another from Kascar. Windshield #2 arrived broken. Looked as if UPS had been throwing it down stairs over and over. Kascar was awesome. Handled the claim and had a new piece of glass to me 5 days later.
Same issue with this piece... extremely tight fit. This time I took a razor blade to the gasket and cut the 3 ribs that go around the edge off the sides and top. It was close, but still tight. I then cut the ribs off the bottom edge. Reapplied the bead seal lube, and it popped in snuggly. Reinstall the the retainers, done deal.

Last edited:

