• Steel Soldiers now has a few new forums, read more about it at: New Munitions Forums!

  • Microsoft MSN, Live, Hotmail, Outlook email users may not be receiving emails. We are working to resolve this issue. Please add support@steelsoldiers.com to your trusted contacts.

Replacing Voltage Regulator on 60a Alternator

SarahJ

Member
31
3
8
Location
Bristol, England
Hi Guys,

My next job is to replace the Voltage Regulator on the 60a Alternator on my 6.2l Humvee.

I've read how to remove the regulator in the TM 9-2320-280-20-2, Chapter 4-2-1, the chapter does call for the alternator to be removed. Can you actually remove the voltage regulator with the alternator still in place? Be grateful for any advice.

Regards,

Sarah
 

86humv

Well-known member
Steel Soldiers Supporter
1,700
501
113
Location
Texas
You can, but there are two regulators that look alike, but only one fits .
 

papakb

Well-known member
2,285
1,185
113
Location
San Jose, Ca
The Prestolite regulator looks like a bulls eye when you look at the heatsink from the back, the Leece-Neville heat sink looks like a sunburst. They are commonly found online for around $60 US. There are 6 screws that hold the regulator assembly to the back of the alternator and it will slip out with a little gentle prying. There is an O ring seal on it that gets sticky over time. When the assembly comes out note the position of the slip on connectors. You don't want to cross them or you'll end up doing this job again. The regulators are also available from Southern Automotive here: http://www.prestolite.com/pgs_buy/d..._id=111&dist_name=SOUTHERN+AUTO+ELECTRIC,+INC.

Whilst you have the back off of the alternator take a good look at the carbon brushes and brush holder. If they brushes are overly worn the output of the aternator can jump around. Give the entire regulator area a good blow out with air to remove and carbon brush dust thats built up over the years. It can cause leakage currents and shorts if left in place.
 

SarahJ

Member
31
3
8
Location
Bristol, England
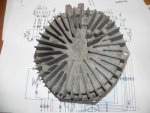
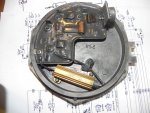
Thanks for the advice 'papakb'. It was a bit awkward but I manged to get the Voltage Regulator off. The cover has the sunburst pattern and inside are three spade connectors. Looks like there's a problem with the load resistor, it's coming apart!

Voltage regulator cover.jpg

Voltage regulator components.jpg

I should have taken the Alternator out, as the back of it is full of carbon dust. When I get the Alternator out I'll blow it out with an airline and I'll also replace the brushes as well.

Thanks again,

Sarah
 

DatGuyC

Member
537
22
18
Location
Essex, Maryland
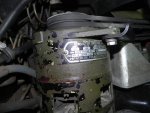
When I had to replace the voltage regulator on my 60amp alternator I found that you had to find out where the whole alternator was manufactured to get the right regulator. Mine had spade terminals like the one you have and was manufactured in Greece by Sielman. There should be a metal tag riveted to the body of the alternator that will tell you who manufactured it. If you look on ebay for part number 142960 you can find the spade terminal regulator and the description tells you how to make sure you have the right one. [FONT=Helvetica neue, Helvetica, Verdana, sans-serif][/FONT]
 

papakb

Well-known member
2,285
1,185
113
Location
San Jose, Ca
Sarah, Did you look at the Southern Automotive website? They will have everything you need to rework the alternator.
 

SarahJ

Member
31
3
8
Location
Bristol, England
I've got a kit of brushes, guides springs etc. from Southern Automotive, thanks for their details. I'll keep you posted when I can change the regulator and brushes.
 

SarahJ

Member
31
3
8
Location
Bristol, England
I should have finished my post sooner, but better late than ever :D

I took the Voltage Regulator off in situ, which proved to be a waste of effort. I used a camera to see what it was like inside the rear of the Alternator and it was just black with carbon dust. So removed the Alternator and took it home for a good examination.

The brushes were worn quite a bit, the brush holder was misaligned and the cable coming out of the Stator block was chewed up quite a bit. The photographs below shows the rear of the Alternator after vacuuming a lot of the loose carbon dust and the chewed up cable.
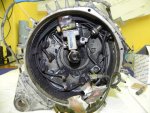
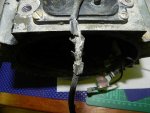
60A Alt Brush holder.jpgAlternator 11.jpg

The rest of the carbon dust was removed with a vacuum and a small paintbrush. I had to remove the silicone sealant so I could un-solder and replace the chewed cable. When the sealant had been removed I could see the sealant had reacted with the three Stator wires as in the next photograph. A special silicone sealant needs to be used which is non reactive/corrosive, normal sanitary sealant is not suitable.
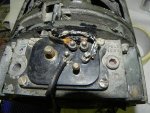
Alternator 14.jpg

I un-soldered the three Stator wires and used some adhesive lined heat shrink tubing to cover the individual Stator wires. then re-soldered them and the new cable. Then I used Dow Corning 744 RTV to encapsulate all four terminals. I struggled to get new brushes, but got hold of a Brush Kit, with that I fitted new brushes, springs and the brush holder (making sure it was correctly aligned). I made a little sanding former to profile the new brushes to the shape of the slip rings.

I connected the Voltage Regulator, fitted the Alternator to my Humvee and started her up. Whereas the voltmeter had always jumped around a little bit, before sporadically jumping into the red zone every now and then, it was now as solid as a rock in the green zone :D. Measured 27.8v across the battery with the engine running, a fraction low but I'll wait until I know the battery is fully charge and the brushes have bedded in fully before adjusting the voltage regulator.

Happy days!
 

papakb

Well-known member
2,285
1,185
113
Location
San Jose, Ca
Everything looks great Sarah! This job isn't as difficult as a lot of members think it is and it corrects about 80% of the questions you see posted here on SS. It's also a lot less expensive than a rebuilt generator!

Cheers
 

Over

Member
133
6
18
Location
Cave Creek AZ
I bought new the same regulator but when I pulled my old one off it had 3 spades not 4 like the picture. The 3 spades where the 2 by the adjustment and one by the load resistor. The extra one on my new cover is right below the 2 that are in line from the adjuster. I hooked up my 3 wires like the old one and ignored the 4th spade. Fired up the HMMWV and nothing?

Thanks for the advice 'papakb'. It was a bit awkward but I manged to get the Voltage Regulator off. The cover has the sunburst pattern and inside are three spade connectors. Looks like there's a problem with the load resistor, it's coming apart!

View attachment 716368

View attachment 716369

I should have taken the Alternator out, as the back of it is full of carbon dust. When I get the Alternator out I'll blow it out with an airline and I'll also replace the brushes as well.

Thanks again,

Sarah
 
Top
AdBlock Detected

We get it, advertisements are annoying!

Sure, ad-blocking software does a great job at blocking ads, but it also blocks useful features of our website like our supporting vendors. Their ads help keep Steel Soldiers going. Please consider disabling your ad blockers for the site. Thanks!

I've Disabled AdBlock
No Thanks