• Steel Soldiers now has a few new forums, read more about it at: New Munitions Forums!

  • Microsoft MSN, Live, Hotmail, Outlook email users may not be receiving emails. We are working to resolve this issue. Please add support@steelsoldiers.com to your trusted contacts.


"Rescued" M816 Wrecker

wcuhillbilly

Member
421
5
18
Location
Devils Tower, WY
LOL,,,, ROADTRIP!!!!!!!! Those little early 80s Yotas are some tough little SOBs,,,, couldn't afford a yota as a kid, so I had a Nissan,,,, which I soon learned stood for Not In Sufficient Service As Needed, I now own a Yota...

Keep up the good work Red, Im curious to find out how the wedgies do for you,, I really want to go S cam on the rears even if I cant swap the front to air. but the golden driveshaft debacle is hurting the mods budget right now..... and my buddy offered me his 10spd for freee. so Im sitting here with loads of good mods, just no time or money....
 

red

Active member
1,988
22
38
Location
Eagle Mountain/Utah
A 10 speed would be a nice upgrade, no holes between the gears to worry about when driving.

Picked up some of my extra air lines I have and a air dryer with antifreeze tank that will be plumbed in along with 1-2 more air tanks after the truck is back on it's wheels. It's getting crowded under the truck body haha.

IMG_20161203_184511040.jpg
 

red

Active member
1,988
22
38
Location
Eagle Mountain/Utah
Weather cooperated today so made some progress. The front axle needs seals and boots (which I haven't ordered yet) so it will have to come apart again in the spring.

Started off by wiring up the truck with 2 batteries. Helped another guy out with a m923a2 that had battery issues so for now the truck only has 2. While setting that up I was trying to decide just where to mount the air dryer and my 2 extra air tanks.

IMG_20161211_130844063_HDR.jpg IMG_20161211_133047456_HDR.jpg

Seems like a good location for the air dryer, back of the passenger wheel well and mimics the fuel filter from the driver side. Didn't like the air tank location so searched around for another spot and put the second battery box back into it's location.

IMG_20161211_132628042_HDR.jpg

Problem with m816 wreckers is all the PTO shafts everywhere underneath. Noticed this area under the rear winch sitting wide open and inviting for the 2 extra air tanks.

IMG_20161211_132709270.jpg

So with that figured out I started working on the passenger front axle. Removed the spindle and cut off the stud at the 11 o clock position so the airbrake backing plate could be installed. With that removed it was just reinstall the spindle and bolt on the plate. Then spend awhile installing the hub into the drum and pounding in the wheel studs.
 

Attachments

Another Ahab

Well-known member
17,836
4,185
113
Location
Alexandria, VA
Started off by wiring up the truck with 2 batteries. Helped another guy out with a m923a2 that had battery issues so for now the truck only has 2. While setting that up I was trying to decide just where to mount the air dryer and my 2 extra air tanks.
You got a WHOLE lot done in a day, Mr. red; very impressive.

Are you saying that you plan to run with more than the two batteries you're carrying now?
 
Last edited:

red

Active member
1,988
22
38
Location
Eagle Mountain/Utah
The truck had 2 when I bought it from Valence and was able to start in cold weather with just them, albeit there was not much crank time available. So when the deuce was parted out it's batteries were transferred to the m816 and it's had 4 not so new batteries all year.

The truck is parked too far away from power to use a block heater and it stays at/below freezing here for a few months. The truck is not started daily. So 4 batteries are a good idea and a bit of ether is needed. Would like it if the truck only required 2 batteries to reliably start in the cold, need to buy new batteries to do that haha.


Oh, and the airbrake drums are certainly heavier than the older hydraulic brake drums, either that or I've gotten weaker being lazy lately hahaha.
 
Last edited:

wcuhillbilly

Member
421
5
18
Location
Devils Tower, WY
Red,
I run 4 batterys in mine, I wish I had 8 some days.... I will see if I can dig up a pic of how I modded my battery box. basically I cut the middle wall out of both and welded them together, then removed the ribs in the bottom so the batteries sit on the floor,---with a wood 1x6 cushion.---- and fabbed a hold down... Now I run NG31s that I can find at any truck shop. without having to special order the Mil 6 volts.
 

red

Active member
1,988
22
38
Location
Eagle Mountain/Utah
Yea the wrecker will get it's other batteries back eventually, it's parked until the temps come up so not too worried about it at the moment.

Been discussing with Castle Bravo, local DOT, researching and have decided to make the air brake system as simple as possible while still being safe. That removes some of the valves and plumbing that the m939 series has which makes for fewer potential issues. Heres a air brake system diagram.

Three Axle Air Brake Diagram.jpg

List of valves/parts that the truck will be getting are:
Air Dryer
Total 4 tanks
Treadle valve (brake pedal)
QR1 (air valve for front axle)
R12 (service brake valve for rear axles)
R14 (emergency brake valve for rear axles)
SL5 (brake light switch)
PP1 (parking brake release)
Air lines

Already have the tanks, dryer, brake light switch, and the heavy duty air lines (DOT approved cloth covered steel braided). Ordered a brake pedal and the QR1 valve from Castle Bravo which arrived today and planning to use the stock brake light switch that's already on the wrecker.

IMG_20170106_173847325.jpg

Will be picking up the R12, R14, and PP1 valves from a local dealership along with the standard push lock air hose and fittings when the time comes.
 

wcuhillbilly

Member
421
5
18
Location
Devils Tower, WY
:popcorn::grd: caught up with a trucker buddy of mine the other day and looked over his inventory of dead Freightliners, We came to the conclusion that once the snow breaks I can go shopping for air brake parts,--- pedal, vavles and switches, an air seat or two and some 24.5 steel wheels.....
Looking to install the trailer dash valve at least for now so I can not rely solely on the Mico for small things as opening a gate. Really nice to pop the red button and have the trailer park, while opening a gate or dropping the trailer.... kinda tired of a dust bath every time I disconnect the lines on the trailer.
I am currently eyeballing the drum parking brake on the 816s T case pondering how to put a small air can-like our #9 clutch cans to use as a momentary parking brake on the T case.... being that is that lately Ive been spending a lot of time under there staring at the golden driveshaft's former location....
 

Another Ahab

Well-known member
17,836
4,185
113
Location
Alexandria, VA
I am currently eyeballing the drum parking brake on the 816s T case pondering how to put a small air can-like our #9 clutch cans to use as a momentary parking brake on the T case.... being that is that lately Ive been spending a lot of time under there staring at the golden driveshaft's former location....
Lying under trucks in meditative contemplation sounds like it's becoming a movement!

If I can find that post from another thread, I'll put the link here.
 

red

Active member
1,988
22
38
Location
Eagle Mountain/Utah
:popcorn::grd: caught up with a trucker buddy of mine the other day and looked over his inventory of dead Freightliners, We came to the conclusion that once the snow breaks I can go shopping for air brake parts,--- pedal, vavles and switches, an air seat or two and some 24.5 steel wheels.....
Looking to install the trailer dash valve at least for now so I can not rely solely on the Mico for small things as opening a gate. Really nice to pop the red button and have the trailer park, while opening a gate or dropping the trailer.... kinda tired of a dust bath every time I disconnect the lines on the trailer.
I am currently eyeballing the drum parking brake on the 816s T case pondering how to put a small air can-like our #9 clutch cans to use as a momentary parking brake on the T case.... being that is that lately Ive been spending a lot of time under there staring at the golden driveshaft's former location....
Haha lying under the truck and thinking things over, know how that feels hahaha. The air can would be a good option to go with before the switch to air brakes.

Speaking of trailers reminds me that my johnson bar has not been plumbed in yet. Mounted, just not plumbed haha.

Will probably be another month or 2 before any big progress is made. Last winter I was working on the wrecker often and this winter it's more of a "I'll wait till it's warmer" plan hahahaha.
 

Another Ahab

Well-known member
17,836
4,185
113
Location
Alexandria, VA
Been discussing with Castle Bravo, local DOT, researching and have decided to make the air brake system as simple as possible while still being safe. That removes some of the valves and plumbing that the m939 series has which makes for fewer potential issues. Heres a air brake system diagram.

View attachment 661195
Where did you get the diagram; generic, or did you draft it up?
 

Another Ahab

Well-known member
17,836
4,185
113
Location
Alexandria, VA
I am currently eyeballing the drum parking brake on the 816s T case pondering how to put a small air can-like our #9 clutch cans to use as a momentary parking brake on the T case.... being that is that lately Ive been spending a lot of time under there staring at the golden driveshaft's former location....
Lying under trucks in meditative contemplation sounds like it's becoming a movement!

If I can find that post from another thread, I'll put the link here.
Found it:


SouthJL

Member
Steel Soldiers Supporter
56
12
8
Location
Piedmont Triad, NC
Meditative Contemplation

Lying under trucks in meditative contemplation sounds like it's becoming a movement!

If I can find that post from another thread, I'll put the link here.
I don't claim to be the first, but I've done it at least twice.

And Red... thanks for all the pics. I've been reading through what you've done to the wrecker. Especially the tires.
 
Last edited:

red

Active member
1,988
22
38
Location
Eagle Mountain/Utah
I don't claim to be the first, but I've done it at least twice.

And Red... thanks for all the pics. I've been reading through what you've done to the wrecker. Especially the tires.
Thanks. The 395's work great on the wrecker and are only about 2" smaller diameter than the 14"s on yours. Cruises down the highway at 55mph, 2000rpm with the .78 overdrive and handles the weight of the truck well both on and offroad.


Weather is starting to hint at warming up so almost time to get back to working on projects again. I had been planning to focus mostly on the little toyota pickup this year but with how parts/equipment deals have been made for the wrecker during the winter it gets priority again. The list of parts are:
Air brakes
Locker
Dog bones
Heater
Box from M109
Miller Big 40 Diesel welder
Maybe a MEP 002a
12 and 24v alternators

Not all that stuff is going on the wrecker. After using the wrecker for the last year as my mobile tool box (among other things) I've realized that unless I add significantly more storage than has already been added, there's just not enough room for all my tools to be accessible and the wrecker equipment as well. So, the m103a2 trailer is going to become the mobile welder/shop/toolbox.

The box from the M109 needs work as expected and am planning to build it for expedition use later, as in maybe start the rebuild of it next year.

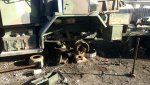
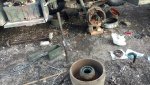
First on the list is the air brake conversion. Have an offroad trip planned for the end of march that I would like the wrecker to make. After the brakes are taken care of will install the replacement cable for the rear winch, then unbolt the rear suspension and roll both rear axles out. Install the locker in the middle axle, replace the worn out dog bones, and roll the setup back under the truck. Debating on moving the axles further towards the rear of the chassis which would help out with lift towing and affect a future idea with the wrecker. Should have that stuff done by the end of May, April if I focus on it.

Heater install and the dual alternators will wait until either the fall or until the stock alternator decides to quit, whichever happens first.

Once the suspension and axle work is done on the wrecker then it's time to focus on the m103a2. Service it first then install the welder, maybe a generator, vice, couple other things and figure out a tool box for it. Shouldn't take long to get this assembled.

Whats left of the m51a2 dump truck chassis is becoming a trailer after that. Cut it down to size for either a 12 or 14ft bed and set it up where different platforms can be swapped as wanted/needed. Similar to Soni's build on his FEMMT. Cargo bed, 5th wheel plate, m109 box are the current platforms. After the trailer chassis is setup I'll be on the lookout for a cargo bed.
 

red

Active member
1,988
22
38
Location
Eagle Mountain/Utah
Ordered up the PP8 (parking brake valve) and a new set of inner axle seals for the front axle. Figured since the front hubs and everything are apart and the old ones leak might as well fix them. Still need to order the R12 and a R14 valves for the brakes along with tubing and fittings.

IMG_20170213_184251721.jpg


Also realized a couple problems with the rear hubs. To use the m939 series brakes the hubs must be flipped back to their original orientation, and the drums secure to the hub using the wheel studs. This creates 2 problems with my wheels. 1. Wheels are thick aluminum, means that I need much longer wheel studs. 2. Wheels have to be rotated to mount with the offset facing outwards. These wheels do not have a bevel cut into their inside face for the lug nuts.
 

Valence

Well-known member
Steel Soldiers Supporter
2,135
612
113
Location
Davis County, UT
Also realized a couple problems with the rear hubs. To use the m939 series brakes the hubs must be flipped back to their original orientation, and the drums secure to the hub using the wheel studs. This creates 2 problems with my wheels. 1. Wheels are thick aluminum, means that I need much longer wheel studs. 2. Wheels have to be rotated to mount with the offset facing outwards. These wheels do not have a bevel cut into their inside face for the lug nuts.
Awe man, those dang aluminum wheels.
 

red

Active member
1,988
22
38
Location
Eagle Mountain/Utah
Good News Everyone! (who gets the reference? ;) )

Have to buy new wheel studs for both rear axles, about 1" longer. Then to figure out the best way to cut a bevel into the backside of each wheel. Being aluminum it is soft metal so could probably get away with cutting them using a regular drill
 
Top
AdBlock Detected

We get it, advertisements are annoying!

Sure, ad-blocking software does a great job at blocking ads, but it also blocks useful features of our website like our supporting vendors. Their ads help keep Steel Soldiers going. Please consider disabling your ad blockers for the site. Thanks!

I've Disabled AdBlock
No Thanks