• Steel Soldiers now has a few new forums, read more about it at: New Munitions Forums!

  • Microsoft MSN, Live, Hotmail, Outlook email users may not be receiving emails. We are working to resolve this issue. Please add support@steelsoldiers.com to your trusted contacts.


Small bridging project M1009

Elektroman99

Active member
147
128
43
Location
Siegburg, Germany
Hello dear Steel Solieders community,

let's perpetuate the little project of mine in this thread.


Introduction:
I bought an M1009 to tide me over. It is still 2/3 owned by the bank. The idea is, I'm still waiting for a "better" prepared Blazer K5 M1009, but whether I always put the money on the side or pay off the M1009, the difference is simple:
Money lies in the bank and loses value, the car stands dry and increases in value if I do not make a mistake.
Also I can get to know the car already and work a little to get it in a very good condition.


I'm opening this thread because I have a thousand questions and probably need to "query" different things here on the forum every now and then.


Here are 3 pictures of the original condition:


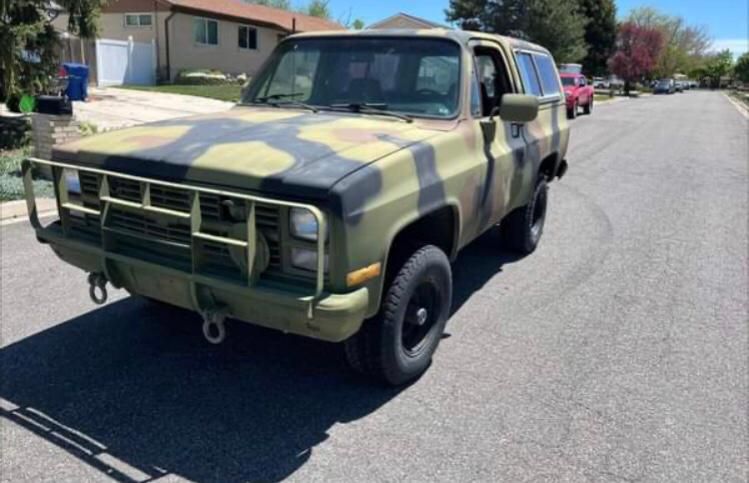
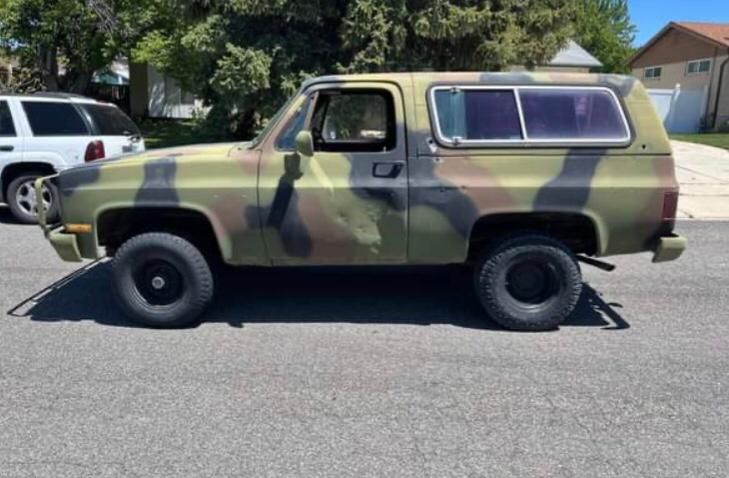
Maybe the previous owner from Florida will recognize him, but I don't think he is active here.
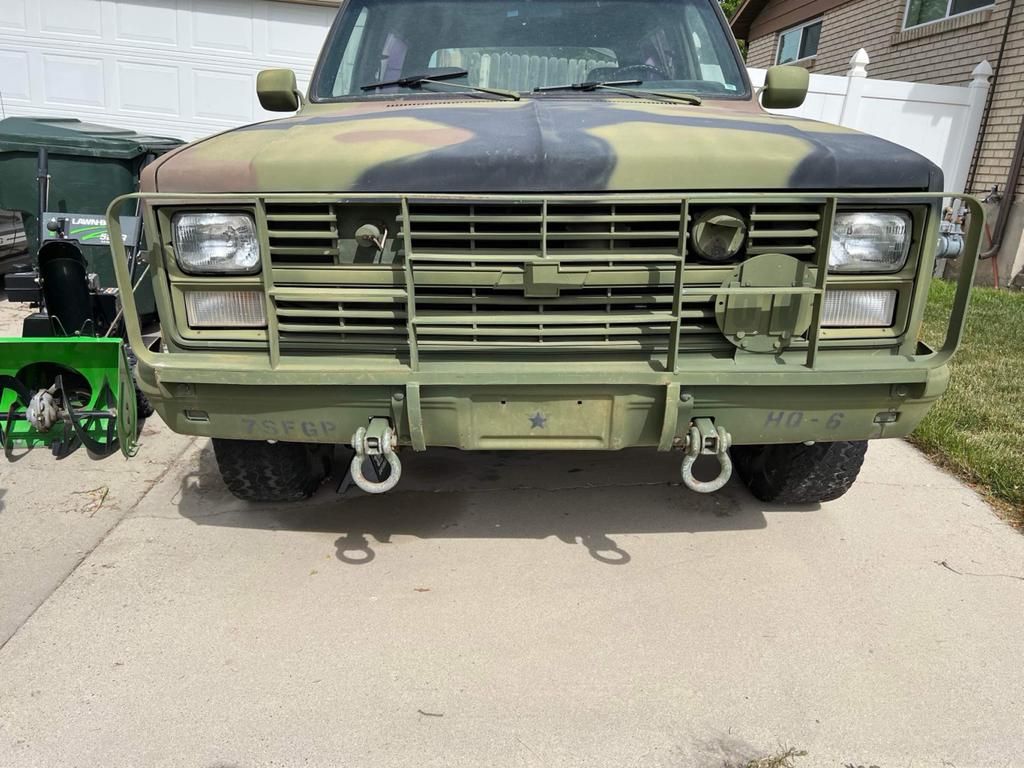
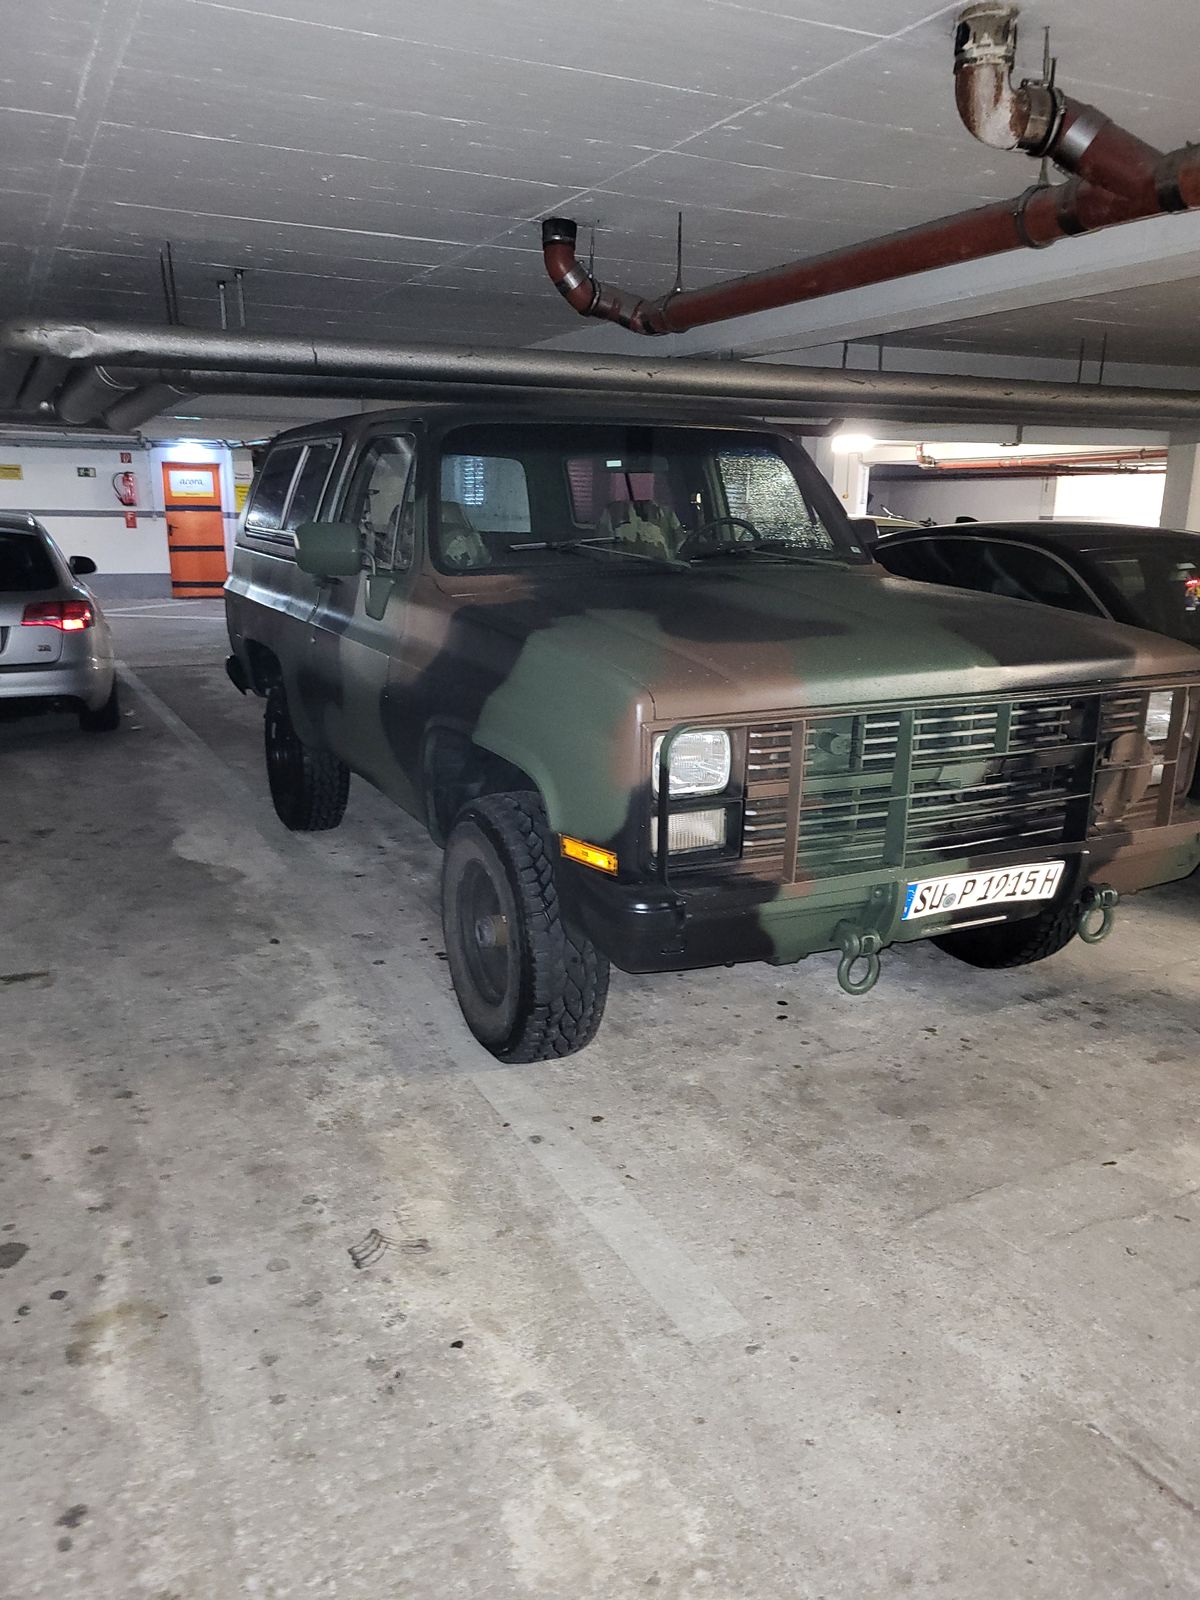

Was done:
  • Exterior paint complete
  • All oils changed (differential and gearbox)
  • Rubber seals renewed
  • Steering wheel "horn" button retrofitted
  • Spare wheel holder retrofitted
  • Euro trailer hitch retrofitted
  • Lighting converted to "Deutsch Straßenverkehrs Vorschrift" (German road traffic regulations)
  • Manual preheating put on the "camouflage light" switch
  • Operating system changed to 12 Volt
  • Cleaned underbody, used rust converter and applied wax for preservation


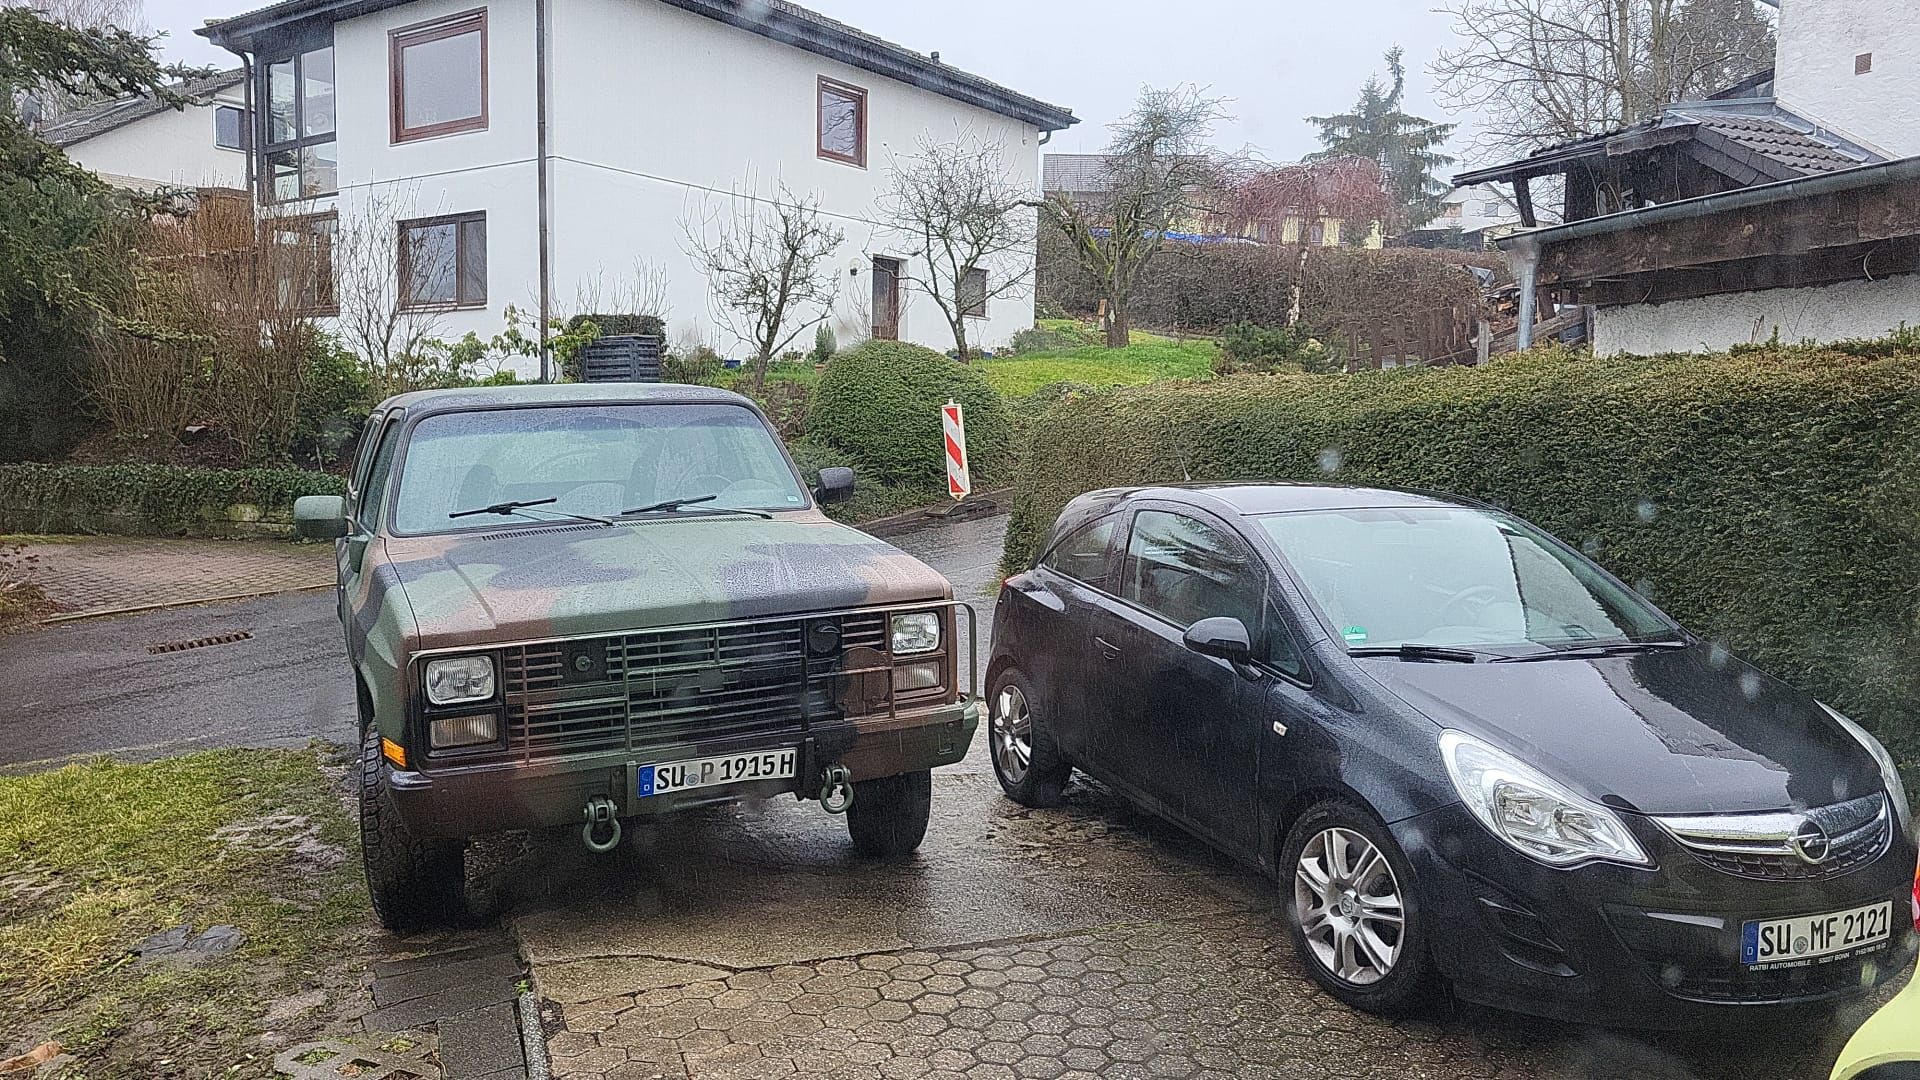
Here 2 pictures of the current condition:


Elektroman99

Active member
147
128
43
Location
Siegburg, Germany
There are some points that I need to adjust, because I do not feel "safe" when I drive.
When I turn on the light, I have no speedometer illumination, which is really "annoying" just in the twilight.
:cautious:

If necessary I would like to renew the 3 point belts, but am not yet clear about the installation effort. If I read it correctly, a 3 point belt costs 89 USD.

Voltmeter display does not work and I am wondering what displays are important in the cockpit? In my Volkswagen Golf IV I have temperature, RPM and the usual "warning lights". Here I have the M1009 military version standard and I wonder would temperature do anything? How much effort is it to install something like this?

Basically, though, I'm moved by the question, what data / information is important on the 6.2L Detroit Diesel V8 during "operation"?
 

WWRD99

Well-known member
Steel Soldiers Supporter
898
1,375
93
Location
York Pa
There are some points that I need to adjust, because I do not feel "safe" when I drive.
When I turn on the light, I have no speedometer illumination, which is really "annoying" just in the twilight.
:cautious:

If necessary I would like to renew the 3 point belts, but am not yet clear about the installation effort. If I read it correctly, a 3 point belt costs 89 USD.

Voltmeter display does not work and I am wondering what displays are important in the cockpit? In my Volkswagen Golf IV I have temperature, RPM and the usual "warning lights". Here I have the M1009 military version standard and I wonder would temperature do anything? How much effort is it to install something like this?

Basically, though, I'm moved by the question, what data / information is important on the 6.2L Detroit Diesel V8 during "operation"?
The voltmeter is meant for 24 volt so it may not work if you don't have 24 volt anymore. You can pop a regular 12 volt gage in there though if you would like to see volts. It should be pretty easy to install plus there is a bulb wired for the stock one so you can see the new one with the lights on. The speedo lights are turned on by twisting the light pull knob clockwise some. It is on a dimmer switch built into the headlight switch. Try that first...might just be turned off. If you go full clockwise it will hit a stop point then click, that is for a interior light under the dash. It may or may not be under there, usually mounted under the glove box if it's there. There really isn't much for warning lights but the oil low light should turn on when you go to start the truck, it's above the gen 2 light. The belts I used were Dayco brand numbers 15485, 15570 and 15455. Those should cross over into something over there if you can swap brands. As far as rpm you won't get that unless you hook up some kind of diesel pickup which these trucks don't have. I just realized when you said 3 point belts you meant seatbelts...sorry the numbers I gave you above are for the drive belts for the alt and power steering. Changing the seatbelts is pretty straight forward. The toughest part can be getting the lower bolts out of the body if they're rusted in tight. In US there are companies that rebuild the spring sets and replace the webbing, so you keep the original housing. Maybe search up something like that on your side!! Looks like a great 09.
 

Elektroman99

Active member
147
128
43
Location
Siegburg, Germany
Does anyone know where I can find - in which TM or PDF - information on:
Adjustment of the windshield wipers
and the "easier gearability" produce the rear window?

(The driver's wiper goes down too far and the rear window goes really really hard).
 

nyoffroad

Well-known member
911
631
93
Location
Rochester NY
Does anyone know where I can find - in which TM or PDF - information on:
Adjustment of the windshield wipers
and the "easier gearability" produce the rear window?

(The driver's wiper goes down too far and the rear window goes really really hard).
You can adjust the wiper by just popping it off the stud that comes up thru the cowl panel, easier said then done.
I have or had a tool for it but they are no longer made. You can remove it with a flathead screwdriver and a small piece of heavy cardboard or something like that. On the very bottom of the wiper arm you'll notice a small tab holding the arm onto the splined shaft. Use the card stock (or whatever) to 'cushion' and protect the paint and use the tip of the screwdriver to pry back and pop up the arm.
The back window has been talked about a lot here and boils down to opening the inner panel and cleaning and lubing the channels.
 

WWRD99

Well-known member
Steel Soldiers Supporter
898
1,375
93
Location
York Pa
You can adjust the wiper by just popping it off the stud that comes up thru the cowl panel, easier said then done.
I have or had a tool for it but they are no longer made. You can remove it with a flathead screwdriver and a small piece of heavy cardboard or something like that. On the very bottom of the wiper arm you'll notice a small tab holding the arm onto the splined shaft. Use the card stock (or whatever) to 'cushion' and protect the paint and use the tip of the screwdriver to pry back and pop up the arm.
The back window has been talked about a lot here and boils down to opening the inner panel and cleaning and lubing the channels.
I had one of those tools years ago and forgot that they had one...They have them on amazon for 6$!! I had no idea until I saw this post, I have way to many tools. I'll have it sunday.
 

Elektroman99

Active member
147
128
43
Location
Siegburg, Germany
Thanks for the many and quick responses.

OK, so rear window I have to clean the tailgate open and clean the side rails and check everything for "easy going", clean and oil. Had already thought of it that way.
I was kind of hoping if it is a "more common" issue after all, that there would be some tutorial or description PDF... funny.

The windshield wiper arm thing, good to know. Amazon offers a whole armada of "windshield wiper arm puller", the one shown in this tutorial, there is still, you have to Ihn but also look at Amzon again.
(
)
( Amazon.com: Dorman 49023 Scheibenwischerarm Werkzeug Universal Fit : Auto & Motorrad )
Many thanks to user @WWRD99 @cucvrus

OK, then I have my To Do's...
:)


Another question...
I found in the TM and in the PDF's how to "remove" or "swap" the headlight completely. But do I need to do this if I am only replacing the H4 bulb.

Please don't misunderstand, the Blazer is not directly in my garage at the house, so that I could apply "Try and Error" Prinzipe. It is parked in a dry and clean underground garage and therefore I want to answer as many questions as possible "before" working on the vehicle.
 

Elektroman99

Active member
147
128
43
Location
Siegburg, Germany
Wiper Adjusted and new wiper blades mounted

Unfortunately, I was not so "lucky" with the second To Do.
OK, I have checked the dimming function of the light on the Tacometer. Unfortunately, it is not the easy way, because the light did not go.

So I have to check the illumination of the tachometer and the cockpit....

Does anyone have a tip on how I could proceed systematically and in a logical order?
:unsure:
 

Elektroman99

Active member
147
128
43
Location
Siegburg, Germany
"Step by Step"
First, many thanks to the other answers regarding the "Lisle 65750 Windshield Tool". I wrote that you can find it with a little search on Amazon.
So the topic is, for me, clarified.

Engine compartment cleaning or also "engine wash".

Puhhh, who pulls here the Internet to the advice, comes from "devil stuff" to "once a year necessary" statements everything offered. Of course there are then still different versions, from the steam jet with preceding foam shower, to the cold cleaner with brush, over the special cleaning foam, the merely damp cloth and the "dry ice" cleaning.

Here in Germany, "car washing" - without a verifiable "oil separator" in the wastewater system is an administrative offense. Many garages do not offer car washing either and 75% of "self-service car washes" have "no engine washing" signs.
So you can see that there is some conflict here.

However, I wanted to start by subjecting the engine to such a "cleaning" process, but without disassembling the fenders or grille. That would certainly have been more "comprehensive" and "sustainable", but I did not have the opportunity to do so.

Only after some research I had then also really found a "self-service car wash", where engine washing is not forbidden.

In addition, the currently changeable weather in Germany. Wednesday and Thursday to Friday snow, weather app had predicted on Saturday spring-like sunshine without rain and on Sunday then again autumnal weather with possibly, snow.
Snow I wanted to avoid because of the salt on the roads ...


Then it went off...
  • Sealing the air filter, alternators, plugs and oil dipsticks.
  • Removal of the batteries
  • Coarse dirt with carefully applied steam cleaner
  • With "Koch Chemie Green Star Universal Cleaner 1000Ml" - with "GLORIA FoamMaster FM 10" and foam sprayer. All worked in with brush and carefully rinsed off with light water sprayer.
  • Cold cleaner, let it work for 3 min, rinsed off with steam jet.
  • Motor dried with microfiber cloth.
  • At the end treated with engine protection wax the engine compartment.
  • After the engine wash then a short and complete exterior wash


Then checked right high beam, was probably a contact problem and changed bulb on rear right taillight.
The question about changing the headlight bulb was settled after I removed the batteries. Sorry for the unnecessary question ...

Refueled and car "stored" again


I have noticed, one takes far too few pictures.
A real before / after picture I can not make.

But here once the comparison:
Pictures from the sale ad:


Pictures in the evening, after the conservation wax could already act a little.


One must say, however, as bad as on the sale ad, the engine did not look, he was at least 1x pre-cleaned.
 

Elektroman99

Active member
147
128
43
Location
Siegburg, Germany
OK...

Moving on...

Last weekend was again an "oldtimer" working day.

First of all for explanation:
The M1009 is about 20 - 24 min car ride away, dry and safe in an underground garage. it does not have a drop of oil underneath and nothing is running or leaking. But it has all the necessary operating fluids and is not "dry". But for this reason I work very irregularly, on weekends and only when the sun is shining - as far as possible...

First of all I cleaned the aluminum strips at the doors. I noticed that the previous owner had put a cable there and I wanted to remove it. I noticed that there was a lot of dirt between the aluminum strip and the rubber and I cleaned it completely on both sides.

After that I did the speedometer and the gauges. When you do this for the first time, you are a bit puzzled. After some time, I decided to take out the dashboard as well. It is the acrylic dashboard from BROTHERS Truck Parts.

After some time I finally had the speedometer in my hand.
Completely disassembled and cleaned it was then after some time. Since it was raining cats and dogs all day, I could tell that I had 5 to 4 leaks. Front window top right and left, side window left front and rear window right and left. So I would have to have the window rubbers replaced once in a while.
Then the right air duct was still screwed to the interior trim, it was on the right without screw connection. In addition, I vacuumed the interior trim (sheet metal skeleton) and the underlying completely.

Lighting speedometer checked, all lamps went. Voltmeter goes, also gets current, but does not strike out. I have to measure what is coming in.

Light switch I had not yet understood how I have to remove the, now I know that the small push button is the release for dne lever and that it is screwed from the inside to the retaining plate.

After reassembly and cleaning, light still does not work.
I will now check the corresponding fuse again and then replace the central GM light switch in case of need. At the moment, however, it is difficult, because Brothers Truck Parts do not ship to Europe and at www.hillbillywizard.com shipping at 70 USD are quite high.

Yesterday I ordered a few more bolts and clamp nuts so I can screw more in the cockpit. In the acrylic dashboard, the dash brackets on the top left and top right are torn out. There I have to tinker something.

In addition, I found that the 2WD / 4WD contact switch does not work. The light in the dashboard goes, but it does not show when switched to 4WD.
Little thing fixed, found 4 new things....

Blower control panel
Does anyone have a tip on where to get these silver handle pieces? (blower selector switch)


Fuel gauge
Is there a simple function test for the fuel gauge.... when I took over the car it was on 2/3 full and I fill up 40 L, now it is predominantly on full - which is correct - because I fill up between 8 - 10 liters on my driven routes, but it just doesn't move either.

Questions
Does anyone know a good source for the "CUCV service light switch"?
Or the clips for the dashboard?

...and again made far too few photos...
 

WWRD99

Well-known member
Steel Soldiers Supporter
898
1,375
93
Location
York Pa
Ok, your headlight switch...I can see in the picture it is turned all the way counter clockwise. It needs to go the other way to get the dash lights to work. Clockwise. I took a pic of mine in a cab I have out back. Can see the spring the bar should be touching to make those dash lights work. A simple ohm test will tell you if it's working. I wouldn't go running for a new switch yet. They rarely go bad! Look for volts on a pin by switching the blackout light switch on and off. That one pin has to have power for the lights to work at all...headlights included. If the headlights and markers do work, then test a wire on the switch while spinning the light pull switch...one pin should make the test light bright and dim when turning the pull switch. If you find that then your cluster has an issue...again...pull the cluster back, don't unplug it, and test the actual light bulb contacts for bright and dim...if you put led bulbs in for back lighting the gages then there is a chance they are in backwards and need flipped. Glad you're making progress!


Sent from my SM-S906U using Tapatalk
 

Elektroman99

Active member
147
128
43
Location
Siegburg, Germany
I have of course turned the switch lever "right" and "left" around several times. Thus - according to my understanding - tested the dimming function.
Headlights, marker lights go. Lamps (bulbs) in the display area (speedometer) go.

Does it make a difference in which final end orientation the switch is mounted on the inner panel?

I have also found the fuses assignment in the TM after a long search.

https://www.dropbox.com/s/1zdrbgaxcinkf72/Sicherungen Bild 1.JPG?dl=0
https://www.dropbox.com/s/pom2b26tcdfqbf9/Sicherungen Bild 2.JPG?dl=0
 

Elektroman99

Active member
147
128
43
Location
Siegburg, Germany
Hello together,

First of all, thank you for the answers you have given so far.
You may notice as a reader, how I am very slowly step by step. For someone who has disassembled the interior of his Blazer endless times, it is 12 screws and 4 handles.
For me it was 5 sweats, always a checking look if not what "breaks away" and just to get the speedometer module out, for gods sake.
😰😨😰

But now I have it in view and know how it should go....🙂

So, can anyone answer the other open questions....
Fuel gauge test
Blower control panel handles


For me still important points are:
- and to each one you could make a separate thread on -.
If someone could still tell me the best way to check the "parking brake test contact" and the switch that turns the 4WD light on / off. (Or post some pictures).

Is there any way to seal the seal leaks from the inside with some sort of "syringe", liquid sealant or something?
These are then the next construction sites.


Done are the questions:
Does anyone know a good source for the "CUCV service light switch"?✅
Or the clips for the dashboard?✅
 
Top
AdBlock Detected

We get it, advertisements are annoying!

Sure, ad-blocking software does a great job at blocking ads, but it also blocks useful features of our website like our supporting vendors. Their ads help keep Steel Soldiers going. Please consider disabling your ad blockers for the site. Thanks!

I've Disabled AdBlock
No Thanks