• Steel Soldiers now has a few new forums, read more about it at: New Munitions Forums!

  • Microsoft MSN, Live, Hotmail, Outlook email users may not be receiving emails. We are working to resolve this issue. Please add support@steelsoldiers.com to your trusted contacts.

So who has bumped the power on a 6CTA cummins

nevrenufhp

New member
200
16
0
Location
Sacramento
If i do the adjustment on the back of the pump with the sockets, should i leave the front screw turned out the 7 turns i have already done, or return it to original stock setting.
If you havent adjusted the screw on top, dont do it until you get the rear adjustment. Then, you will have a better idea of smoke control. If you already adjusted it, dont worry. Take it for a test drive after the rear adjustment, and see if you can live with the smoke. If it's too much, adjust in the screw on top.
 

74M35A2

Well-known member
4,145
332
83
Location
Livonia, MI
Can I be a total boner and ask for an all-in-one page on the MW pump adjustments? I see various mentions in various posts, and I'd like to bring it all together. For example, in order of recommended adjustments (for increasing power):

1. Governor springs: Tighten 3-4 clicks or install kit then check & lower idle speed. GSK source: PacBrake, application 5.9L (fits 8.3L)
2. Fuel screw on top - adjusts ?, suggest to tighten/loosen x turns.
3. Fuel screw on back under cover, adjusts ?, suggest to loosen x far.
4. The "real" fuel rack adjustment? Does ? Suggest to turn x far, needs special tooling for such.
5. AFC "star wheel", does ? Suggest to turn top to passenger side x turns.

Of course each is vehicle and user dependent, to be tuned to one's discretion. Thanks in advance if somebody can take 3 minutes and bring this all together. Then it become a matter of printing it out, walking over to the truck, and simply following it recipe style.
 

swbradley1

Modertator
Staff member
Super Moderator
Steel Soldiers Supporter
14,263
1,767
113
Location
Dayton, OH
Looks like you already did and it is in the thread where it is supposed to be.
 

nevrenufhp

New member
200
16
0
Location
Sacramento
Can I be a total boner and ask for an all-in-one page on the MW pump adjustments? I see various mentions in various posts, and I'd like to bring it all together. For example, in order of recommended adjustments (for increasing power):

1. Governor springs: Tighten 3-4 clicks or install kit then check & lower idle speed. GSK source: PacBrake, application 5.9L (fits 8.3L)
2. The "real" fuel rack adjustment. Suggest to turn CCW until you run out of threads on the small nut, needs special tooling for such.
3. Fuel screw on back under cover, adjusts CCW, suggest to loosen 1 turn.
4. Fuel screw on top - adjust CCW at least 3 full turns to start.
5. AFC "star wheel", does ? Suggest to turn top to passenger side x turns, if needed.

Of course each is vehicle and user dependent, to be tuned to one's discretion. Thanks in advance if somebody can take 3 minutes and bring this all together. Then it become a matter of printing it out, walking over to the truck, and simply following it recipe style.
I threw in my suggestions, and changed priority. Please test drive after every step so you can learn which adjustment is doing what.
 

k5ontherocks

New member
94
0
0
Location
INDIANA
I am yet to tear mine apart, have only been looking at pics and drawings. on the "real" fuel adjustment of the fuel rack, can 2 wrenches not be used? ive seen the special socket that was made.By looking at pics i guess i dont understand yet. As soon as i get my alternator replaced i will be doing the adjustments unless im delayed waiting on a special tool.
Thanks
 

74M35A2

Well-known member
4,145
332
83
Location
Livonia, MI
I'm confused about the exact same thing. I tried to ask about it, but was told "it's all in here". Sure, it is, but it is not clear. Another poster asked the same earlier in this posting, so now that is 3 people which want to follow and do this, but desire more clarity before they just start turning screws. I'll likely get told to FO on this posting also, but if somebody that understands each adjustment could take 30 seconds to describe each and what they do, as in all-in-one page, I'll send them 2 large pizzas delivered to their work this week. Will that help to get it done?
 

nevrenufhp

New member
200
16
0
Location
Sacramento
Ok..Lets see if I can clear it up.
The full fuel stud with 2 nuts:
On the very back of the pump there is 2 screws, which one is tamper proof(round head). The first hard part is getting that screw out. Vice grips or chisel works. Get those 2 screws out, and pull off the tin cover, and the screw with the jamb nut on it. That screw is the pre-boost fueling(I dont bother with that one). Once those are out of the way, you will have access to the full fuel nuts. With a flashlight you can see them in there, which are recessed in a round hole by about an inch. That's why wrenches wont fit, because of it being so recessed. Since Bosch didnt put big plungers in the MW pump, you can back out the nuts all the way. Loosen up the 10mm nut to the end of the threads, then hold that socket still. Back out the 14mm nut into the 10mm nut and snug them up together. You could possibly do it with no special tools, but it's the 14mm socket that's the hard part/ tight fit. You can simply make your own by drilling out the center of a 3/8 drive 14mm deep socket to fit a 1/4 drive 10 mm deep socket. A good grunt tight(German torque) is all it needs, no breaker bars. Then, put it back together and test drive.
I can edit in more if you want, like the links to the videos on gov spring tightening, and the low rpm/excess fuel screw(one on the top).
 

k5ontherocks

New member
94
0
0
Location
INDIANA
Ok..Lets see if I can clear it up.
The full fuel stud with 2 nuts:
On the very back of the pump there is 2 screws, which one is tamper proof(round head). The first hard part is getting that screw out. Vice grips or chisel works. Get those 2 screws out, and pull off the tin cover, and the screw with the jamb nut on it. That screw is the pre-boost fueling(I dont bother with that one). Once those are out of the way, you will have access to the full fuel nuts. With a flashlight you can see them in there, which are recessed in a round hole by about an inch. That's why wrenches wont fit, because of it being so recessed. Since Bosch didnt put big plungers in the MW pump, you can back out the nuts all the way. Loosen up the 10mm nut to the end of the threads, then hold that socket still. Back out the 14mm nut into the 10mm nut and snug them up together. You could possibly do it with no special tools, but it's the 14mm socket that's the hard part/ tight fit. You can simply make your own by drilling out the center of a 3/8 drive 14mm deep socket to fit a 1/4 drive 10 mm deep socket. A good grunt tight(German torque) is all it needs, no breaker bars. Then, put it back together and test drive.
I can edit in more if you want, like the links to the videos on gov spring tightening, and the low rpm/excess fuel screw(one on the top).
Thank you, That answered what i was wondering. I will look into making a tool, unless anyone knows of a rental program for one?

And then im correctly reading this that if you do the fuel fuel adjustment there is no need to do the pre-boost screw? ive seen mixed reviews of that one. (screw in vs screw out).

I am going to attempt this very soon. i will be taking some pics and recording each adjustment. ill do a test drive in between each adjustment to see the differences..

Thank you!
 

74M35A2

Well-known member
4,145
332
83
Location
Livonia, MI
It is helpful, thank you. Still curious about the difference between the "top screw" and the screw under the tin cover which has a jamb nut on it you said to ignore? How about the star wheel also?

Then, I think we covered them all. Thanks, and I will send pizza. PM me your work address if you wish and I'll take care of it this week.
 

74M35A2

Well-known member
4,145
332
83
Location
Livonia, MI
After watching one of your videos, it appears the rear screw/nut under the tin cover it a pre-load or travel limiter for the AFC, as to where the star wheel will change the spring rate of fueling as boost builds. Is this correct?

Then, only remaining question is the top screw. When you say that is for "starting fuel", does this mean fuel during actual cranking, or is this low RPM fueling, kind of like an idle mixture screw would do on a gasoline carb?

Sorry to be a pain in the arse. I want to understand what each does in order to do it correctly, as they likely have overlapping effect on one another, and therefore they all need to be understood to achieve the desired result, with gauges added of course (target 1250F pre-turbo as max sustained temp?).
 

nevrenufhp

New member
200
16
0
Location
Sacramento
Thank you, That answered what i was wondering. I will look into making a tool, unless anyone knows of a rental program for one?

And then im correctly reading this that if you do the fuel fuel adjustment there is no need to do the pre-boost screw? ive seen mixed reviews of that one. (screw in vs screw out).

I am going to attempt this very soon. i will be taking some pics and recording each adjustment. ill do a test drive in between each adjustment to see the differences..

Thank you!
You can adjust the pre-boost screw, I just dont worry about it. You can make up for it with the screw on top of the pump(low rpm excess fuel screw). I have the socket, and will mail it out, but MUST get it back, since it's the only one I have.

It is helpful, thank you. Still curious about the difference between the "top screw" and the screw under the tin cover which has a jamb nut on it you said to ignore? How about the star wheel also?

Then, I think we covered them all. Thanks, and I will send pizza. PM me your work address if you wish and I'll take care of it this week.
That one to ignore is the pre-boost adjustment. As said above, you can adjust it. For the trouble, you can get it to fuel harder with the screw on top. Adjust the star wheel very last, since it's a small part of the equation.

After watching one of your videos, it appears the rear screw/nut under the tin cover it a pre-load or travel limiter for the AFC, as to where the star wheel will change the spring rate of fueling as boost builds. Is this correct?

Then, only remaining question is the top screw. When you say that is for "starting fuel", does this mean fuel during actual cranking, or is this low RPM fueling, kind of like an idle mixture screw would do on a gasoline carb?

Sorry to be a pain in the arse. I want to understand what each does in order to do it correctly, as they likely have overlapping effect on one another, and therefore they all need to be understood to achieve the desired result, with gauges added of course (target 1250F pre-turbo as max sustained temp?).
Yes, the one just behind the tin cover is the pre load for the AFC. The screw on top can make up the difference for the low end fueling. On that note, the way that one works is it delivers extra fuel for a quick start. It only works up to a certain rpm, and under the right conditions. Adjusting that screw out gives even more low rpm fuel, and also extends the rpm that it delivers it. If you have the time, play with all the adjustments one at a time. You will eventually get it to your liking. Just start with the main fuel rate adjustment first. That alone will take you from 230-250hp to around 280hp. You can get EGT up really high (15-1600)for a few seconds, but sustained should be 1250....MAYBE 1350 as a top limit if you're feeling frisky.
 

Scott88M

New member
152
0
0
Location
East Greenwich, RI
So basically the big nut on top of the pump and maybe the governor Springs is a decent start for a novice wanting a little more umph? Knowing so little about tinkering with diesels this is all a little foreign but I appreciate all the patience and information you guys are giving.
 

Hoefler

Active member
1,096
20
38
Location
White Bear Lake,MN
JBL recovered an A2 for me from Sparta. He told me he "turned it up" for me, then drove 200 miles to my place and reported it pulled hard on hills unlike a typical A2. I have an A0 and an A2 Wrecker, so not much to compare how it felt. I found it starts in zero degree weather. It drives way different than my other trucks and feels like it pulls stronger on hills. Seems more throttle responsive. I likey.
JBL (Jeff) may share what he did with others if you ask.
Pete
 

k5ontherocks

New member
94
0
0
Location
INDIANA
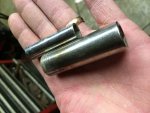
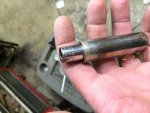
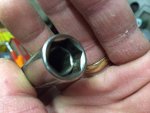
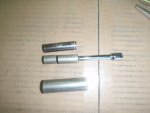
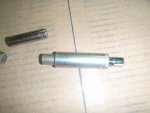
image.jpgimage.jpgimage.jpgI made my own tool last night. Found a 14mm 3/8 drive socket, and a 10mm 1/4 drive socket. Drilled out the 14 and the 10 slides right in. I will take an old 3/4 wrench and weld to 14mm socket for a handle.
 

Hawssie

New member
157
0
0
Location
Clayton, California
easy made tool

I did the back of the pump screw out adjustment today on my M936A2. It definitely helped, not night and day but at least now I can feel it accelerate. But since a typical M923a2 weighs
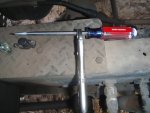
between 2/3 to 1/2 the weight of the wrecker, I am sure it would be felt much more with the lighter trucks. Now after doing it I can say it took a 10th of the time to do it then it did to read this post so those who are worried about the job let me tell you if your pump is the same as mine anyone with 2 craftsman sockets, 1/4 drive ratchet and extension and a pair of vise grips plus one large screwdriver can do this. Plus a 4 inch grinder w/ cutoff wheel or hacksaw to make the tool. All I did was take a 14mm deep 12 pt. 3/8 drive socket and a 1/4 drive 6pt. deep 10mm socket, cut down the 10mm about 2/3 its normal length, slide the 10mm into the 14mm and hook up the 1/4 drive extension through the back of the 14mm 3/8 drive, then attach a pair of vise grips and your done. The 2 cover screws on mine were both slotted with one having anti tamper wire running through it. The screws are on tight so use a large 5/16 screw driver in good shape(not one too small or with the tip beat up) and try it. If its still too tight like one of mine then just add the pair of vise grips your going to need anyway and attach them for leverage. The rest of the job has been described before.
 

Attachments

k5ontherocks

New member
94
0
0
Location
INDIANA
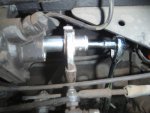
I made all the mods today and must say that on my M931A2 it is a most noticeable difference. I turned the rear full fuel adjustment all the way back, then the back screw in 1 turn. On the top adjustments I took the front top screw out 5 turns and the star wheel one full turn in towards the motor. I also tightened the gov springs 4 clicks. I did take some pics also if anyone wants to see anything. And all was as said above much simpler than I expected. Total time prob 1.5 hours including idle adjustment afterwards.
 

bjsmith

New member
272
1
0
Location
zachary,la
Tried to turn fuel up on my a2 today with no luck. Where everyone says you need 10mm inside 14mm mine doesn't have the 10mm nut inside it has this but the 14mm is in there. uploadfromtaptalk1394398968459.jpg
 
Top
AdBlock Detected

We get it, advertisements are annoying!

Sure, ad-blocking software does a great job at blocking ads, but it also blocks useful features of our website like our supporting vendors. Their ads help keep Steel Soldiers going. Please consider disabling your ad blockers for the site. Thanks!

I've Disabled AdBlock
No Thanks