Ok..Lets see if I can clear it up.
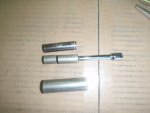
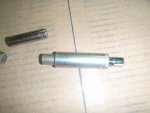
The full fuel stud with 2 nuts:
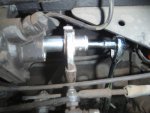
On the very back of the pump there is 2 screws, which one is tamper proof(round head). The first hard part is getting that screw out. Vice grips or chisel works. Get those 2 screws out, and pull off the tin cover, and the screw with the jamb nut on it. That screw is the pre-boost fueling(I dont bother with that one). Once those are out of the way, you will have access to the full fuel nuts. With a flashlight you can see them in there, which are recessed in a round hole by about an inch. That's why wrenches wont fit, because of it being so recessed. Since Bosch didnt put big plungers in the MW pump, you can back out the nuts all the way. Loosen up the 10mm nut to the end of the threads, then hold that socket still. Back out the 14mm nut into the 10mm nut and snug them up together. You could possibly do it with no special tools, but it's the 14mm socket that's the hard part/ tight fit. You can simply make your own by drilling out the center of a 3/8 drive 14mm deep socket to fit a 1/4 drive 10 mm deep socket. A good grunt tight(German torque) is all it needs, no breaker bars. Then, put it back together and test drive.
I can edit in more if you want, like the links to the videos on gov spring tightening, and the low rpm/excess fuel screw(one on the top).