• Steel Soldiers now has a few new forums, read more about it at: New Munitions Forums!

  • Microsoft MSN, Live, Hotmail, Outlook email users may not be receiving emails. We are working to resolve this issue. Please add support@steelsoldiers.com to your trusted contacts.


Stuck Fan Clutch

Autonomy_Lost

Well-known member
657
1,451
93
Location
Pennsylvania
Last 2 clutches I tried needed a little more than 90 PSI.

Edit: just re-read your post, the clutch should DIS-engage when you apply pressure. It should be engaged when pressure is released.
 

jmenende

Well-known member
447
364
63
Location
Puerto Rico
My fan clutch is also stuck on, and I've tried a lot of the troubleshooting steps, but no luck yet. So I figured I would rehash this thread rather than making a new one.

I already replaced the TDM and confirmed that I have 28v going to the cadillac valve.

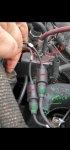
I also disconnected the hose going from the cadillac valve to the fan and injected around 110 PSI which DID cause the fan clutch to disengage.

There is also a bleeder valve on a tee thats on the output of the cadillac valve. I confirmed when the engine is running that fluid flows out of this bleeder valve when you open it.

At this point, the only thing I can think of is that the PSI is not sufficient to disengage the fan clutch. This could either be because the PSI is too low, or the fan clutch is requiring more than usual PSI because of corrosion, debris, etc. My next move is to measure the PSI coming from the cadillac valve and go from there.

Any thoughts?
My 2 cents. I had a similar issue not long ago where the fan clutch would not engage. All the electronics in the cooling systems tested great. In the end it was a bad hose from the cadillac valve to the fan clutch. They had swapped the hose and did not use a hydraulic replacement. This caused the hose to expand and absorb part of the 90 psi needed to open the clutch. Replaced the hose and all worked properly. Devil is in the details.
 

Mogman

Moderator
Staff member
Moderator
Steel Soldiers Supporter
5,952
8,296
113
Location
Papalote, TX
I think you are going to have to remove the fan before the clutch.
Not sure what 1/2" you are talking about please post us some pictures.
The 90PSI releases the clutch not engage it.
If you are talking about the nut in the center of the clutch that will not get it apart.
 

jmenende

Well-known member
447
364
63
Location
Puerto Rico
I think you are going to have to remove the fan before the clutch.
Not sure what 1/2" you are talking about please post us some pictures.
The 90PSI releases the clutch not engage it.
If you are talking about the nut in the center of the clutch that will not get it apart.
I am not trying to remove the clutch per se. The nut is where the line from the cadillac valve connects. I believe it has a washer with a detent in the slot as per the manual. If I remove the nut, the bulb can be pulled out exposing the piston and seals that usually leak. I removed the hose and fitting but I still do not have enough pitch to remove the fan.
 

Mogman

Moderator
Staff member
Moderator
Steel Soldiers Supporter
5,952
8,296
113
Location
Papalote, TX
I am not trying to remove the clutch per se. The nut is where the line from the cadillac valve connects. I believe it has a washer with a detent in the slot as per the manual. If I remove the nut, the bulb can be pulled out exposing the piston and seals that usually leak. I removed the hose and fitting but I still do not have enough pitch to remove the fan.
OK I think see, you do not have the clearance to remove the fan so you are trying to pull the front off of the clutch?
Sorry can't help you there.
 

jmenende

Well-known member
447
364
63
Location
Puerto Rico
OK I think see, you do not have the clearance to remove the fan so you are trying to pull the front off of the clutch?
Sorry can't help you there.
The alternative, I believe, is to remove the allen screws and take off the clutch. I tried to fit the allen wrench though the big holes but cant find the screws. They are 5/16 allen if I recall the other post i read. I have never removed one on a humvee but do happen to have another spare clutch in the bench that I studied.
 

Mogman

Moderator
Staff member
Moderator
Steel Soldiers Supporter
5,952
8,296
113
Location
Papalote, TX
The alternative, I believe, is to remove the allen screws and take off the clutch. I tried to fit the allen wrench though the big holes but cant find the screws. They are 5/16 allen if I recall the other post i read. I have never removed one on a humvee but do happen to have another spare clutch in the bench that I studied.
That is what putting the 90PSI is for so you can release the clutch and line up the cap screws behind the 4 holes.
 

jmenende

Well-known member
447
364
63
Location
Puerto Rico
Ok, I managed to align the holes and see the allen heads. Tried my best to get them lose by hand but would not budge. Im going to buy a small mechanics hammer drill and try again tommorow. Btw, are the screws left hand thread?
 

Autonomy_Lost

Well-known member
657
1,451
93
Location
Pennsylvania
Screws are regular RH threads (lefty loosy righty tighty). I used a combination of an impact gun and a hex bit on a ratchet wrench to get them loose.

If I recall correctly a regular hex bit was too short so I had to make one by cutting down an allen wrench and attaching it to a hex socket.

Also I remember that it was a major pain in the ass. 😆
 

jmenende

Well-known member
447
364
63
Location
Puerto Rico
Screws are regular RH threads (lefty loosy righty tighty). I used a combination of an impact gun and a hex bit on a ratchet wrench to get them loose.

If I recall correctly a regular hex bit was too short so I had to make one by cutting down an allen wrench and attaching it to a hex socket.

Also I remember that it was a major pain in the ass. 😆
Im on the 3rd day of playing with that clutch. I look like heroin addict with all the bruises in my arm.
 

papakb

Well-known member
2,288
1,186
113
Location
San Jose, Ca
There is a rebuild kit but I don't think it consists of much more than a new fiction insert. When I did mine I found that the roller bearing that allows the shaft to move forward and backward was starting to pit and that was the cause of the problems I had. When I put everything back together I scrapped all of the hose clamps in the systen and replaced them with Aeroquip fittings so that I'd never have any issues with fluid leaking. A lot of people replace the connection to the clutch with a quick disconnect but my concern was since this thing is constatntly vibrating it would cause leakage eventually so I decided against it besides, how many times do you think your going to do this job or change your belts?

After I reassembled everything I worried about how to bleed the system but what I found was it did the job all by itself and after a couple of minutes it was opearting normally all by itself. There is a bleeder you can install on the Cadillac valve but I found it wasn't necessary.
 
Top
AdBlock Detected

We get it, advertisements are annoying!

Sure, ad-blocking software does a great job at blocking ads, but it also blocks useful features of our website like our supporting vendors. Their ads help keep Steel Soldiers going. Please consider disabling your ad blockers for the site. Thanks!

I've Disabled AdBlock
No Thanks