• Steel Soldiers now has a few new forums, read more about it at: New Munitions Forums!

  • Microsoft MSN, Live, Hotmail, Outlook email users may not be receiving emails. We are working to resolve this issue. Please add support@steelsoldiers.com to your trusted contacts.

Third's Build Discussion

Third From Texas

Well-known member
2,791
6,567
113
Location
Corpus Christi Texas
Got the fridge enclosure and several other pieces sanded, filled, prepped and painted yesterday. All wood in the build will be primed/sealed with Kilz then a coat of semigloss exterior paint. The "exposed" areas will get a coat of high gloss Rustoleum white. Everything is glued and then secured with deck screws.

Today I'm off to fetch the materials to frame in the walls. Frames will be modules consisting of 2x2s each attached to the walls via rivnuts. The heavier items (kitchen counter, fridge, Chester drawers get bolted to the habitat's aluminum frame members). Going to try a couple different insulation ideas, but for now using two sheets of 3/4" Sika foamboard look to be the easiest and produce the highest R-factor.

Still up in the air on paneling. Two walls will likely be painted finishing plywood...with the kitchen being....something else. Got a week or two to decide.

The driver side wall consists of 1) the shower (already paneled in GlassTex). 2) the headboard at the bed is already going to be backed with finishing plywood. 3) the kitchen area needs something "splashproof" and perhaps a bit of heat resistance being near the stovetop. I've looked at stainless sheeting as a splashboard, various tiles (though I'm not really keen on tile holding up to off-road). But I'll come up with something.

The front wall (bed) is pretty simple for now. I'll frame out the three locations that protrude out the front (the a/c, the arctic heater that is getting deleted, and the worthless 120v intake fan). 1) At some point the a/c will change (they go bad down here pretty quickly so window units and mini-splits only last 3-4 years before the fins all rot away). I'd like to eventually go to a 24v minisplit, but I can't justify the constant replacement cost given the short life expectancy of a/c in the environment down here). But I'm keeping that location flexible for a/c solutions, 2) The heater location will likely house a replacement Chinese diesel heater. By all accounts on the vanlife sites/groups, they are quite dependable with a few cheap mods and they run near silent (opposed to the 90+ db of the OEM Hunter heater. 3) And I'm likely converting the space used by the intake fan into a place to launch drones while inside the hab (a sort of drone hangar). But that's a thread of it's own for later. I like the idea to be able to put up eyes in the sky if something cooks off one of my Claymore tripwires at night. :)

The passenger side wall is pretty much the easy one. End-to-end the same with the only cut outs being the windows and the small electric input pass thru.

I originally kinda wanted to retain the "industrial" look with exposed conduit drops and outlets. But with three more needing to be landed it would be a bit much, so it's growing on me that they'll all be behind the walls now. I've decided to leave the wire tray accessible. I like the idea of being able to add more runs for things that I didn't anticipate (and there will be many).
 

Third From Texas

Well-known member
2,791
6,567
113
Location
Corpus Christi Texas
So with regards to insulation.

I had assumed (incorrectly) that I wanted to avoid an "air gap" in the wall and fill it up with insulation. From what I'm reading now, that's not ideal for what I'm trying to achieve. In fact, several sources I'm seeing recommend a 1/2"-3/4" air gap when used with an aluminum-skinned foam board to achieve a radiant heat barrier. This is good news as a) I can't locate 1.5" Sika foamboard anywhere in the US and b) it allows me to use 1" Sika board opposed to doubling up two sheets of 3/4". So the insulation aspect of the cost just went down by $100.
 

chucky

Well-known member
Steel Soldiers Supporter
6,664
19,079
113
Location
TN .
Something else that will be addressed in the future is habitat "sway".

I don't know if it's the captured spring mounts or just the truck shocks but you can REALLY get the M1079 box a rockin' with a couple of strippers in there.

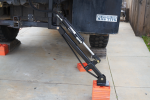
I'm thinking some simple stabilizer legs on each corner that rotate down, then pin to length. Not really leveling jacks, but sorta.

View attachment 876534

In a perfect world I'd even make it so I could drive out from under the hab if needed (I covet Neil's rig below, LOL). But the more I thought about it, once the truck was committed to camper I figured it best to fully do so. Too many disconnect issues crop up when I started putting it all onto paper. Doable, but not really worth pursuing given no more than I would ever use it.

View attachment 876532
You could do round or square tube built into the 2 rear corners of the habitat interior with a hole in the floor for drop legs that you could pin at pre drilled holes or a spot on the end of the leg that a trailer screw leg could attach to take the travel out the suspension . And a 2 fold tailgate would bridge from you rear door and the bulkhed on the trailer
 

chucky

Well-known member
Steel Soldiers Supporter
6,664
19,079
113
Location
TN .
So with regards to insulation.

I had assumed (incorrectly) that I wanted to avoid an "air gap" in the wall and fill it up with insulation. From what I'm reading now, that's not ideal for what I'm trying to achieve. In fact, several sources I'm seeing recommend a 1/2"-3/4" air gap when used with an aluminum-skinned foam board to achieve a radiant heat barrier. This is good news as a) I can't locate 1.5" Sika foamboard anywhere in the US and b) it allows me to use 1" Sika board opposed to doubling up two sheets of 3/4". So the insulation aspect of the cost just went down by $100.
BBBBBBBBBUT then you start the mold growing in the walls from sweating (hot outside cold inside) or vise versa ! Check out some of the folks useing different insulation in overseas containers up north makeing tiny homes there are some killer ideas
 

Third From Texas

Well-known member
2,791
6,567
113
Location
Corpus Christi Texas
BBBBBBBBBUT then you start the mold growing in the walls from sweating (hot outside cold inside) or vise versa ! Check out some of the folks useing different insulation in overseas containers up north makeing tiny homes there are some killer ideas
Buuuuut....

I didn't start with a bare skin of metal. I already have a 2" thick solid sandwich foam encased aluminum wall, so the vaper barrier is pre-existing. Glued to *that* will be 1" of Sika foamboard. Then a 1/2" air gap followed by a sheet of plywood.

Note that even that container job in the video still has an air gap once the plywood goes up.

Honestly, if I was going to have any condensation/mold issues I would have seen it in the past three years of using the habitat in the +90% humidity hell that is the South Texas coast.

:)
 
Last edited:

GENX

Active member
129
218
43
Location
TX
Something else that will be addressed in the future is habitat "sway".

I don't know if it's the captured spring mounts or just the truck shocks but you can REALLY get the M1079 box a rockin' with a couple of strippers in there.

I'm thinking some simple stabilizer legs on each corner that rotate down, then pin to length. Not really leveling jacks, but sorta.

View attachment 876534

In a perfect world I'd even make it so I could drive out from under the hab if needed (I covet Neil's rig below, LOL). But the more I thought about it, once the truck was committed to camper I figured it best to fully do so. Too many disconnect issues crop up when I started putting it all onto paper. Doable, but not really worth pursuing given no more than I would ever use it.

View attachment 876532
I seem to change my mind every month. I was going to do a slide out patio from under... then nixed it. Was going to make the Hab removable, then like you I thought nah.... probably more trouble than it's worth. I was going to do a box from RVGlobetrekkers, then considered getting a gov Shelter.. Etc. Etc. I think in the end the best thing to do is strike a balance of must have features, commit and get out there and enjoy it. I was going to buy a 6x6 and build the biggest Hab I could. But settled on a M1078 that can park at Wallie World's and maneuver down tighter trails. I really want a lower center of gravity and collapsible habitat that would go through trees easier. But not sure if it's worth the height reduction.

I love guys that document the process because we all get to go along for the journey... I don't exactly know what direction I will take in the end but I have a few years to figure it out before I retire and then settle on the decisions made.

As far as the stabilization. I agree. I guess Bill Caid's rocked pretty good when he played with his other toy so here was his solution:

1660952834519.png


I am going to attempt to address this with using the kneeling hydraulic circuit up font and the hydraulic Moto Carrier in the back.
 

Third From Texas

Well-known member
2,791
6,567
113
Location
Corpus Christi Texas
I seem to change my mind every month. I was going to do a slide out patio from under... then nixed it. Was going to make the Hab removable, then like you I thought nah.... probably more trouble than it's worth. I was going to do a box from RVGlobetrekkers, then considered getting a gov Shelter.. Etc. Etc. I think in the end the best thing to do is strike a balance of must have features, commit and get out there and enjoy it. I was going to buy a 6x6 and build the biggest Hab I could. But settled on a M1078 that can park at Wallie World's and maneuver down tighter trails. I really want a lower center of gravity and collapsible habitat that would go through trees easier. But not sure if it's worth the height reduction.

I love guys that document the process because we all get to go along for the journey... I don't exactly know what direction I will take in the end but I have a few years to figure it out before I retire and then settle on the decisions made.

As far as the stabilization. I agree. I guess Bill Caid's rocked pretty good when he played with his other toy so here was his solution:

View attachment 876564


I am going to attempt to address this with using the kneeling hydraulic circuit up font and the hydraulic Moto Carrier in the back.
Yeah, I need to look long and hard as to exactly where mine is flexing/rocking. If it's the suspension, then there's one solution. If it's the hab rocking on the frame, there's another. And if it's both then I'll approach it another way.

Something like you posted secures the frame but not the hab bouncing on it's captured springs. I think the only way to isolate the hab would be to brace it directly to ground.
 

GENX

Active member
129
218
43
Location
TX
Yeah, I need to look long and hard as to exactly where mine is flexing/rocking. If it's the suspension, then there's one solution. If it's the hab rocking on the frame, there's another. And if it's both then I'll approach it another way.

Something like you posted secures the frame but not the hab bouncing on it's captured springs. I think the only way to isolate the hab would be to brace it directly to ground.
Ah gotcha. I would think if it's the Hab rocking on it's mounting, then stiffer springs would suffice. If that's what you are getting at. How is your mounted, direct or does it have some sorta tortion cradle?
 

Rhino 5/4

Well-known member
518
1,902
93
Location
Waco, Tx
Ah gotcha. I would think if it's the Hab rocking on it's mounting, then stiffer springs would suffice. If that's what you are getting at. How is your mounted, direct or does it have some sorta tortion cradle?
If it's the habitat, would it be as simple as putting a boomer on each corner and "locking" it down to the frame while playing with the other toys?
 

Third From Texas

Well-known member
2,791
6,567
113
Location
Corpus Christi Texas
If it's the habitat, would it be as simple as putting a boomer on each corner and "locking" it down to the frame while playing with the other toys?
Yeah, that tracks my thinking. But I don't think it's only flexing at the captured spring point.

I suspect that it's flexing at both the capture point and the rear shocks. I need to do a simple camera test to see (but some times the toys get spooked when they see a camera come out, though). There seems to be more sway on the forward end of the hab, but there is also some felt at the aft end.

I'm thinking some simple drop legs between the hab frame and ground will resolve it in any case. It's might only require them in the front to steady things. Again, not lifting/leveling jacks as much as simple stabilizer jacks.
 

chucky

Well-known member
Steel Soldiers Supporter
6,664
19,079
113
Location
TN .
Does your 1079 have the back bumper on them i couldnt find a picture but if so find a lug that just fits in the ends of the bumper and weld one to each screw jack so you can just slide them out and throw them some where when not in use
 

Third From Texas

Well-known member
2,791
6,567
113
Location
Corpus Christi Texas
Does your 1079 have the back bumper on them i couldnt find a picture but if so find a lug that just fits in the ends of the bumper and weld one to each screw jack so you can just slide them out and throw them some where when not in use
For the most part, it's the same as the M1078.

20190906_180830.jpg

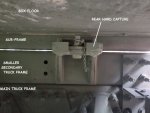
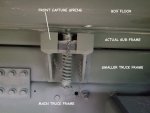
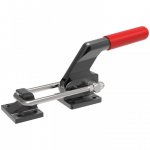
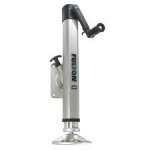
And that would address any shock flex, but not the captured springs. But I'd still have to compress/capture the hab springs or off-weight the hab to relieve those flex points. Shouldn't require anything fancy (don't technically have to be mountable to work). Something like this would secure the hab in either scenario (flexing at the shock s or at the captured springs or both). It only has to stabilize, not bear any real load.

41dhvYSlSoL._AC_SL1000_.jpg


As I said, I really need to see where all it's flexing before I can address it.
 

chucky

Well-known member
Steel Soldiers Supporter
6,664
19,079
113
Location
TN .
For the most part, it's the same as the M1078.

View attachment 876619

And that would address any shock flex, but not the captured springs. But I'd still have to compress/capture the hab springs or off-weight the hab to relieve those flex points. Shouldn't require anything fancy (don't technically have to be mountable to work). Something like this would secure the hab in either scenario (flexing at the shock s or at the captured springs or both). It only has to stabilize, not bear any real load.

View attachment 876620


As I said, I really need to see where all it's flexing before I can address it.
On your capture springs what if you used a battery impact and you tighten the nut on those 2 capture bolts and run them down till the spring is compressed so no travel just when you wanted it all rock solid
 
Top
AdBlock Detected

We get it, advertisements are annoying!

Sure, ad-blocking software does a great job at blocking ads, but it also blocks useful features of our website like our supporting vendors. Their ads help keep Steel Soldiers going. Please consider disabling your ad blockers for the site. Thanks!

I've Disabled AdBlock
No Thanks