• Steel Soldiers now has a few new forums, read more about it at: New Munitions Forums!

  • Microsoft MSN, Live, Hotmail, Outlook email users may not be receiving emails. We are working to resolve this issue. Please add support@steelsoldiers.com to your trusted contacts.

Wandering Neurons' wandering steering

wandering neurons

Active member
248
112
43
Location
Fallon, NV
Update on the wandering steering this afternoon:
1. Engine running, truck on all four tires on hard packed earth (parking spot for Goliath) - steering wheel would turn about 1.5-2.0 turns and stop turning. Tire would turn from straight ahead to maybe 10 degrees left turn. That's all. Had this happen once before when arriving home with Goliath. Maybe 1/8 turn of free play in wheel while testing this. But NOT FULL STEERING lock-to-lock.
2. Engine running, truck front axle on "trestles" (heavy duty jack stands), tires and wheels off the ground - steering worked normally, still about 1/8 of play, but full lock-to-lock left and right. While moving steering wheel and watching tire, the tire did not move smoothly, but was more like the second hand on a watch: small hesitation or notchiness between movements.

Additional notes:
Left front brake is hanging for certain. Right spins freely, off the ground, left will not spin. The rear shoe on the left side is contacting the drum.
Additionally, the left front brake shoes are installed with "Adjuster" down/forward, not up toward the air chamber/self adjuster. Sigh. Front wheel and tire is now off the truck. Will attempt to adjust the shoe, pull the drum, and use the -20-3 to do R&R of pads.

Also noticed something on the rear. After second test with engine running, I chocked the tires before shutting down the engine. I did not set the parking brake. Noticed noise from the left rear wheel well. Both left rear tire air brake chambers are making noise - one is doing a continual hiss, the other more of a steady popping noise at the same time the other is hissing. IIRC, these are not repairable items due to the parking brake springs inside.
Is is possible for them to be leaking as such?

More this weekend after I mess with the front brake. I'm not suspecting that of causing the wandering though, I'm still leaning towards a damaged steering box.
 

Suprman

Well-known member
Supporting Vendor
6,845
660
113
Location
Stratford/Connecticut
With brakes released there is air being sent to the rear chambers to keep them released. If the diaphragm is leaking it can be fixed by a heavy truck shop. I personally don't open brake chambers.
 

wandering neurons

Active member
248
112
43
Location
Fallon, NV
More notes from today:
1. Army mechanics aren't very studious. The left front brake was dragging as noted previously. Why? Both shoes were installed upside down, with the marking for "Adjuster" up against the fixed stop. Had to flip both shoes. Additionally, one of the two retraction springs was installed backwards, where the curve was inward, which left a rub mark on the hub. Not dangerous, but annoying to see such carelessness. Not something I'd be caught doing when I was in the USAF working on airplanes!
2. I like working on air brakes! No fluids other than some grease, parts are big and readily marked. Built tough.
3. The steering gear box is HEAVY. About 130 lbs according to the manuals. But it's removed, waiting for the replacement from Suprman.
4. Yes, the steering box can be removed from the truck without pulling the radiator. It's a little painful, and you've got have a good variety of sockets and extensions. Here goes:
a. Jack the front of the truck to get both tires off the ground, and safely support on jack stands. Use strong ones!
b. Raise the cab.
c. Remove the left front wheel/tire assembly. This will give you more room in the wheel well to crawl around.
d. Turn the steering full right. This will move the sector arm and drag link to the rear. If you don't do this, the drag link cannot be removed from the sector arm, the front spring perch is in the way.
e. Remove the cotter pin, castellated nut, and carefully remove the drag link end from the sector arm. I used the old 2.5 lb sledge hammer to the tip of the sector arm, with the castellated nut loose on the pivot. Pops joints fairly quickly.
f. Park the drag link on the leaf spring. Should rest there nicely.
g. Remove the pressure and return lines from the steering box and park them out of the way. Catch the fluid that runs out, don't be a slob. I undid the first clamp back from the steering box and draped the lines across the harmonic balancer, where the cab won't crush them.
h. Remove the pinch bolt from the steering wheel shaft and disconnect the clamp from the steering box. Park the shaft out of the way. Check it is secure before lowering the cab later!
i. There are six bolts holding the steering box to the frame. The nuts on the outside of the frame up against the bracket are 15/16" (or metric something). The bolts through the inside of the frame are 21mm. You'll need both a 6 point shallow 3/8 drive 21mm socket and a 21 mm open/box end wrench for the bolts. You'll need a 15/16" combination wrench for the nuts, and something to add leverage on top of that. Add a variety of extensions for the 21mm socket.
j. I was able to use the socket with and without extensions or the combo wrench to hold the bolts from spinning. There's a lot of electrical and air lines in there and it's tucked inside the frame beside the radiator, so you'll have to be creative. The nuts on the outside are easy with the combo wrench once they're broken loose.
k. Some of the bolts can be removed once the nuts are off, some cannot be pulled out, there's stuff in the way. Push them out of the way so the box does not drag across them when removing it.
l. I built a trestle using a couple of saw horses and blocks to support the box as I pulled the last nut off the steering box bracket. The box slowly settled on the trestle, and I was able to lift the box off the trestle onto the ground. If you have a bad back, don't have the upper body strength, whatever, don't do this by yourself, it's HEAVY!
m. With the box on the ground, I was able to cycle the sector arm, spinning the steering shaft, and pump out another few pints of fluid from the pressure port. Again, don't be messy.
Pictures to follow...
 

wandering neurons

Active member
248
112
43
Location
Fallon, NV
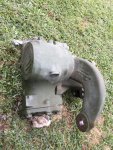
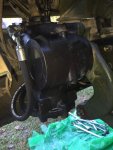
Steering box on the ground. Ugh, heavy!
IMG_3125.jpg

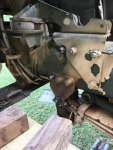
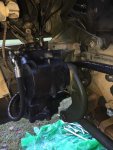
Empty spot where the steering box goes. Note that some bolts are still sticking out a little, they couldn't be removed, too much junk behind them.
IMG_3127.jpg

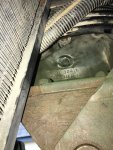
Looking up from behind the front the front bumper, in front of the radiator. There's six bolts on this side, along with a few frame bolt heads thrown in for confusion.
IMG_3131.jpg

More to come another day!
 

wandering neurons

Active member
248
112
43
Location
Fallon, NV
Coming back together

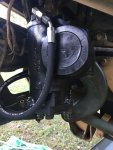
And success. Gear box is installed and left front tire is reinstalled. Steering seems smoother with little to no slop, but there's no load on the front tires yet.

As mentioned, it IS possible to remove and install the steering box without removing the radiator, you just have to be patient and imaginative with sockets and box/open wrenches.

IMG_3168.jpg


IMG_3171.jpg

Front end is still in the air - need to check the fluid in the front hubs, drop to the ground, and torque the lug nuts and CTIS bolt. Then the real test. More to follow...

And thanks to Suprman - quick shipment, well packed, and good price. Didn't use the power steering pump yet but it's ready if needed.
 

Attachments

wandering neurons

Active member
248
112
43
Location
Fallon, NV
And the wrap-up on this saga: Took Goliath for a drive this afternoon. So much improvement it's unbelievable. I'm comfortable at 50mph where before 40mph was spooky, what with the sawing back and forth and wandering across lanes. There's a little wander, more like inertia from the giant tires. But such an improvement, I'm not spooked about driving the truck.
I only installed the gear box and new pressure line, did not install the pump assembly. It'll stay on the shelf for now, or sold to a good home. Suprman, thanks for the deal on parts. All, thanks for the words of encouragement.
Now, to replace the regulating valve on the wet tank. It's leaking from the seam where it comes apart. That, and some rear brake diaphragms that I've gotten from NAPA.
Finally, getting it titled, insured, and registered!
 

Suprman

Well-known member
Supporting Vendor
6,845
660
113
Location
Stratford/Connecticut
It should roll smooth at 50. Measure the front tire toe. You can use a tape measure. Tires straight. Should be the same distance between the front of the front wheels and the back of the front wheels. Being a bit off you may not feel it on street but will on highway.
 

wandering neurons

Active member
248
112
43
Location
Fallon, NV
It should roll smooth at 50. Measure the front tire toe. You can use a tape measure. Tires straight. Should be the same distance between the front of the front wheels and the back of the front wheels. Being a bit off you may not feel it on street but will on highway.
Thanks for the tip. I've got the toe in dialed in pretty close, used my dad's old folding wooden carpenter ruler. But will check it again. Also, the outer edges of my front tires are worn funny, the toe in was over 3" initially. Not sure that would make a difference, but may swap front/rear tires.
 

wandering neurons

Active member
248
112
43
Location
Fallon, NV
Latest update: Finally got the time, gumption, and 3/4" air impact gun, to start tearing the upper and lower king pin plates loose in the front axle, both left and right sides. Got the tie rod removed. Right side: pulled the bolts on the lower plate, no change, but didn't pull the plate off yet. Started pulling the bolts from the upper plate, got three off, no change. Started loosening the fourth bolt and the steering knuckle started flopping around. Popped a second bolt in to hold things together, steering knuckle moved left-right with almost no friction! By this point it was too dark to continue.

Ah-ha moment! There's supposed to be shims between the upper plate and the steering knuckle, based on measurements between the two pieces. I'm guessing that some knuckle-head assembled the front axle without measuring that clearance and setting the proper shims, causing the upper and lower plates to pinch the axle pivot points.

Sometime this weekend, weather and time permitting, I'll do the measurement called for in TM --365-34-2, Chapter 12.

Stay tuned, I may have this thing licked!
 

wandering neurons

Active member
248
112
43
Location
Fallon, NV
Confirmed! Pulled left and right upper plates, pulled shim packs. Looks like the basic three shims were installed on each side, about 0.018". Without the shims, based on -365-34-2, I'm measuring nearly 1/8" of clearance with the upper plates snugged to the point of barely binding. About 0.115-0.120", without a proper micrometer.

So, I'm thinking of four washers of correct thickness between the knuckle and the upper plate as shims, and a bead of RTV to seal the surfaces from dust. I can't find the shims, and I need a whole bunch. Or get a piece of plate steel and machine it to spec...
 
Top