• Steel Soldiers now has a few new forums, read more about it at: New Munitions Forums!

  • Microsoft MSN, Live, Hotmail, Outlook email users may not be receiving emails. We are working to resolve this issue. Please add support@steelsoldiers.com to your trusted contacts.

Was looking for a shop in or near Milwaukee to work on M1008; then did it all myself!

ezgn

Well-known member
650
1,039
93
Location
Lake Elsinore Ca.
Ah yeah that’s a really nice solution. The ken Moore tool referenced in the TM to install the seal looks to be like some kinda tapping tool so that’s what I was envisioning in my mind, but yeah that could be designed for a motor out of a truck or something. I may have to rig something up like you did. Why couldn’t you post that earlier man?!? 😂. Thanks for the pic
Chevymikes invention is a great idea, I like. The set up you have made up will work just fine. I really like the design you came up with also. You have created some extra bulk with both of those attachments. You might have some issues with room to swing a hammer. Get under there put everything in place and see if you have a comfortable amount of room to work. Since you have an installer coming, Chevymikes set up may be the better way to go.
 
Last edited:

retro_life

Well-known member
243
629
93
Location
Los Angeles, California
Chevymikes invention is a great idea, I like. The set up you have made up will work just fine. I really like the design you came up with also. You have created some extra bulk with both of those attachments. You might have some issues with room to swing a hammer. Get under there put everything in place and see if you have a comfortable amount of room to work. Since you have an installer coming, Chevymikes set up may be the better way to go.
i could probably also drill a hole through the white end cap and thread the installer bolt through it. I will take a look at that shortly.

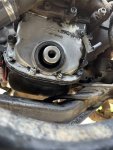
right now I just got the area cleaned and I’m ready to remove the old seal. What’s the best way to do that?

thanks

77F82CD2-553B-48AC-808D-CA6DBB792492.jpeg
 

ezgn

Well-known member
650
1,039
93
Location
Lake Elsinore Ca.
i could probably also drill a hole through the white end cap and thread the installer bolt through it. I will take a look at that shortly.

right now I just got the area cleaned and I’m ready to remove the old seal. What’s the best way to do that?

thanks

View attachment 840228
I assume you have a seal puller? Place the seal puller on the backside of the seal lay the other part of the puller on wherever you can next to the snout resting on the opposite end of the seal, and give it a good pull. Your a strong man, it will take some pulling but it will pop out. you might need to try different spots but the seal is lightweight metal and trust me you will be able to muscle it out without much trouble. Don't stress, take your time, and it will come out.
 
Last edited:

retro_life

Well-known member
243
629
93
Location
Los Angeles, California
I assume you have a seal puller? Place the seal puller on the backside of the seal lay the other part fr the puller on wherever you can next to the snout resting on the opposite end of the seal, and give it a good pull. Your a strong man, it will take some pulling but it will pop out. you might need to try differnt spots but the seal is lightweight metal and trust me you will be able to muscle it out without much trouble. Don't stress, take your time, and it will come out.
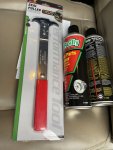
Negative, no seal puller. Everything ive been reading just says “pry the seal” so I figured I’d cross that bridge when I get there. Didn’t realize there was a special tool required. I will go pick up a seal puller from the store now. Can you show me a picture of the type I’m looking for? Thanks a lot man

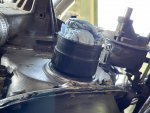
The rubber coupler seems to work wonders for capping off the hole while you still have the old seal installed.
5A4D58DA-C7F4-4F06-82AF-80640527CECE.jpeg
 
Last edited:

Mullaney

Well-known member
Steel Soldiers Supporter
Supporting Vendor
7,716
19,766
113
Location
Charlotte NC

retro_life

Well-known member
243
629
93
Location
Los Angeles, California
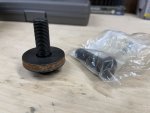
I’ve got a new crank bolt for the balancer, but I was wondering if I’m good to reuse the washer?
E1DDB616-4BD5-47D5-9BAB-53746A1B6DA4.jpeg
The new balancer is arriving tomorrow so I’ll probably just wait to do everything then.
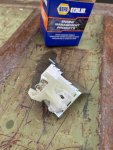
Today I’m planning on taking the time to fix my headlight adjusters and my high beam/reverse light switch.
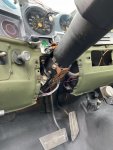
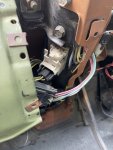
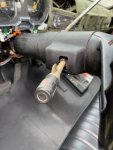
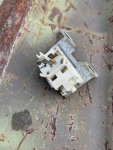
DEE37F3C-E2F2-44DC-9DC6-BB3DA4C9E8F6.jpegCCE6CC33-9D99-4B9B-9275-B40352BC748C.jpeg18B12034-D801-4F79-968C-0727B5616C15.jpeg
Is that white plug what I’m supposed to be trying to adjust for the reverse lights? And how do I gain access to the high beam switch ? Sorry I’m just not clear on what I’m supposed to do.
thanks 🙏
 

ezgn

Well-known member
650
1,039
93
Location
Lake Elsinore Ca.
I’ve got a new crank bolt for the balancer, but I was wondering if I’m good to reuse the washer?
View attachment 840284
The new balancer is arriving tomorrow so I’ll probably just wait to do everything then.
Today I’m planning on taking the time to fix my headlight adjusters and my high beam/reverse light switch.
View attachment 840285View attachment 840286View attachment 840287
Is that white plug what I’m supposed to be trying to adjust for the reverse lights? And how do I gain access to the high beam switch ? Sorry I’m just not clear on what I’m supposed to do.
thanks 🙏
I re-used mine?
 

ezgn

Well-known member
650
1,039
93
Location
Lake Elsinore Ca.
Yep, I reused both the washer and bolt. Added a little locktite to the bolt before installing.
The threads on my bolt when removed looked brand new. I don't think they are stretch to yield bolts, I could have easily re used the bolt. I purchased a new bolt prior to removal, but I would have had confidence re using the old bolt. I never even thought about not using the washer.
 

cucvrus

Well-known member
11,473
10,434
113
Location
Jonestown Pennsylvania
I’ve got a new crank bolt for the balancer, but I was wondering if I’m good to reuse the washer?
View attachment 840284
The new balancer is arriving tomorrow so I’ll probably just wait to do everything then.
Today I’m planning on taking the time to fix my headlight adjusters and my high beam/reverse light switch.
View attachment 840285View attachment 840286View attachment 840287
Is that white plug what I’m supposed to be trying to adjust for the reverse lights? And how do I gain access to the high beam switch ? Sorry I’m just not clear on what I’m supposed to do.
thanks 🙏
Hey looking at the gear selector. I would brush a little grease down in the metal area where the orange needle slides and on the pivot point where the cable travels on the edge of the cluster housing. Wheel bearing grease or white lithium. But some grease. And take your time on the dimmer switch. it is tight and awkward but you can do it I am sure. Get another turn lever for your smart stalk. get the Black one. Good Luck.
 

Mullaney

Well-known member
Steel Soldiers Supporter
Supporting Vendor
7,716
19,766
113
Location
Charlotte NC
The threads on my bolt when removed looked brand new. I don't think they are stretch to yield bolts, I could have easily re used the bolt. I purchased a new bolt prior to removal, but I would have had confidence re using the old bolt. I never even thought about not using the washer.
.
I'm old, but back in the day of hotrodding cars - I don't remember ever replacing that bolt and washer on a Chevy (gas) engine.

LOTS of other things gave up through the years of trying to go fast in a straight line. Never once did I ever lose a harmonic balancer. Never had that bolt even get loose... I do remember using a torque wrench though. That seemed pretty important at the time...
 

retro_life

Well-known member
243
629
93
Location
Los Angeles, California
Hey looking at the gear selector. I would brush a little grease down in the metal area where the orange needle slides and on the pivot point where the cable travels on the edge of the cluster housing. Wheel bearing grease or white lithium. But some grease. And take your time on the dimmer switch. it is tight and awkward but you can do it I am sure. Get another turn lever for your smart stalk. get the Black one. Good Luck.
I will grease the gear selector for sure. I have some Lucas white lithium I’ll put on it. As far as the headlight switch goes, what size are those god forsaken nuts? I’m trying all my small wrenches on them and can’t seem to get any of them to grab.
Thanks man
 

retro_life

Well-known member
243
629
93
Location
Los Angeles, California
Alright I got her in, installation was a lot easier than getting it out for me. For future reference there’s two fasteners holding the switch on. The one closest to the steering wheel is a 5/16 screw, and in the rear is a 3/8 nut. It was really hard to figure it out in that awkward position, but once you got the sizes sorted out it isn’t too bad.
 

cucvrus

Well-known member
11,473
10,434
113
Location
Jonestown Pennsylvania
I was going to tell you that but glad you figured it out for yourself. I know the horrors of finding the correct little fasteners when you get a CUCV that someone else tried changing that switch and had no clue. Not even a hint. I bought steering columns from any GM car of the era just for the correct fasteners. I lie. I removed the columns from vehicles that were at the crusher pile. Many times with a big yank of the loader fork thru the steering wheel. BAM. The column was out and all the little screws were still in place on the column housing. The wiring and steering column. Well they didn't make out so good. Many CUCV switches I removed were made by Singer sewing machine company. Does yours say Singer on it?
 
Top