• Steel Soldiers now has a few new forums, read more about it at: New Munitions Forums!

  • Microsoft MSN, Live, Hotmail, Outlook email users may not be receiving emails. We are working to resolve this issue. Please add support@steelsoldiers.com to your trusted contacts.

What did you do to your deuce this week?

rustystud

Well-known member
9,254
2,941
113
Location
Woodinville, Washington
I fainally succeeded in installing the air compressor belt for my M35A@I used the recommended belt length which I bought from White Owl, but I am convinced it could be just a little longer. I had to install it over the air comprerssor pulley first, where I opened the air compressor pully all the way, and then was able to install the bely over the crankshaft pully drive. the problem is in tightening the air compressor pully the belt get stuck in place instead of widening to accomodate the comprssor pully change of diameter. I used transmission oil to libe the pully surface, but this will work against me in maintaining belt tension. we shall see.
removed
 
Last edited:

tobyS

Well-known member
4,832
833
113
Location
IN
I fainally succeeded in installing the air compressor belt for my M35A@I used the recommended belt length which I bought from White Owl, but I am convinced it could be just a little longer. I had to install it over the air comprerssor pulley first, where I opened the air compressor pully all the way, and then was able to install the bely over the crankshaft pully drive. the problem is in tightening the air compressor pully the belt get stuck in place instead of widening to accomodate the comprssor pully change of diameter. I used transmission oil to libe the pully surface, but this will work against me in maintaining belt tension. we shall see.
I've never heard of changing the air compressor pully when changing the belt. I have an A3 so can't go look at the A2, but I'm imagining a pulley that can vary the speed of the compressor, making the belt run closer or further away from the center. That doesn't seem like something that you change to get a new belt on. You may be right, the belt is too small.
 

Floridianson

Well-known member
Steel Soldiers Supporter
7,409
2,501
113
Location
Interlachen Fl.
I fainally succeeded in installing the air compressor belt for my M35A@I used the recommended belt length which I bought from White Owl, but I am convinced it could be just a little longer. I had to install it over the air comprerssor pulley first, where I opened the air compressor pully all the way, and then was able to install the bely over the crankshaft pully drive. the problem is in tightening the air compressor pully the belt get stuck in place instead of widening to accomodate the comprssor pully change of diameter. I used transmission oil to libe the pully surface, but this will work against me in maintaining belt tension. we shall see.
Last time I changed a compressor belt was in 2006. Very simple after you get the belt on leave the two bolts loose on the outside pully. Start the engine and the outside pully will spin up and tighten the belt. If it needs to be tighter rev the motor up some. When it is tight shut down the motor and tighten the two clamp bolts and go have fun.
 

Menaces Nemesis

"Little Black Truck" Conservator
Steel Soldiers Supporter
333
262
63
Location
Denver, Colorado
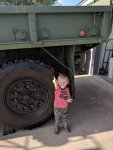
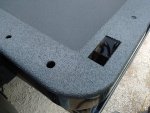
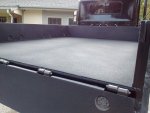
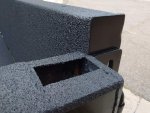
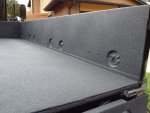
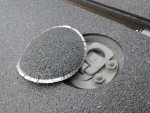
I sprayed in a U-Pol Raptor Bedliner...
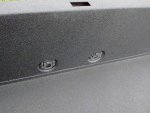
IMG_20181007_104630411.jpgIMG_20181007_104103341.jpgIMG_20181007_105152481.jpgIMG_20181007_105319211.jpgIMG_20181007_104433861.jpgIMG_20181007_103947280_HDR.jpgIMG_20181007_132616299.jpgIMG_20181007_114125489.jpg
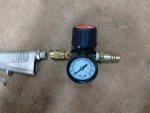
I used a black 8-bottle kit with included spray gun from amazon ($177), a $15 can of Acid-Etch primer (my bed didn't have much rust), and a $5 in-line regulator from harbor freight (links below). I used my little 15 gal. portable compressor (4.8 CFM @90 psi). Little compressor kept up like a trooper, but I don't think I'd want to use anything smaller. I used just 40 psi at the gun to get a more grippy texture (more psi=finer texture). I used all 8 bottles to get 3 good coats on my 9' bed and tailgate.

A few tips for anyone interested in spraying Raptor Liner;

Prep is everything... The entire area to be sprayed was washed down with naphtha, and wiped dry before masking and sanding, and washed/wiped again before applying the liner. Wear a good respirator, remember it's CARC we're sanding here. I used a 4" angle grinder with a flap-disc for the deep paint gouges and rusty spots, a 5" DA with 100 grit discs to scuff up the big areas, and 100 grit paper to get into the tight spots and up to the mask lines. I masked the tie-down ports with 1/8" insulation foam that I cut into 4" circles, and popped them into the ports. Everything else I masked with automotive mask tape, paper, and plastic drop cloths.

Have a couple quarts of lacquer thinner, a few cans of brake cleaner, a metal or polyethylene basin, brushes, rags, and a catch can at the ready so you can clean the gun in between bottles. Otherwise the product can build up and restrict the spray gun siphon and nozzle tubes.

Per U-Pol's website, you'll want to keep the freshly applied liner from getting wet for 72 hours after application... plan accordingly.

The way this stuff sticks to bare skin is no joke... wear good nitrile gloves, and if you get any on your hide, get it off before it sets up (otherwise it may be a part of you for many days or even weeks... no, I'm not kidding)

Raptor liner; https://www.amazon.com/U-POL-Raptor-Urethane-Spray-Liters/dp/B01CKE7E9S/ref=sr_1_5?s=automotive&ie=UTF8&qid=1538936337&sr=1-5&keywords=raptor+liner

Acid Etch primer for any bare metal; https://www.amazon.com/U-Pol-Produc...8&qid=1538939974&sr=8-3&keywords=u-pol+acid#8

Regulator w/gauge; https://www.harborfreight.com/150-psi-air-compressor-regulator-kit-with-dial-gauge-68223.html

Plastic drop cloths; https://www.homedepot.com/p/HDX-9-ft-x-12-ft-0-7-mil-Drop-Cloth-6-Pack-DCHD-07-6/204711647
 
Last edited:

Floridianson

Well-known member
Steel Soldiers Supporter
7,409
2,501
113
Location
Interlachen Fl.
I was going to use something under my trailer but painted the wood instead. How many square feet do you feel that bed liner kit would do?
 

fpchief

Well-known member
1,041
220
63
Location
South Alabama
I sprayed in a U-Pol Raptor Bedliner...
View attachment 744111View attachment 744112View attachment 744113View attachment 744114View attachment 744115View attachment 744116View attachment 744117
I used a black 8-bottle kit with included spray gun from amazon ($177), and a $5 in-line regulator from harbor freight (links below). I used my little 15 gal. portable compressor (4.8 CFM @90 psi). Little compressor kept up like a trooper, but I don't think I'd want to use anything smaller. I used just 40 psi at the gun to get a more grippy texture (more psi=finer texture). I used all 8 bottles to get 3 good coats on my 9' bed and tailgate.

A few tips;

Prep is everything... The entire area to be sprayed was washed down with naphtha, and wiped dry before masking and sanding, and washed/wiped again before applying the liner. Wear a good respirator, remember it's CARC we're sanding here. I used a 4" angle grinder with a flap-disc for the deep paint gouges and rusty spots, a 5" DA with 100 grit discs to scuff up the big areas, and 150 grit paper to get into the little spots and up to the mask lines. I masked the tie-down ports with 1/8" insulation foam that I cut into 4" circles, and popped them into the ports. Everything else I masked with automotive mask tape, paper, and plastic drop cloths.

Have a couple quarts of lacquer thinner, a metal or polyethylene basin, brushes, and a catch can at the ready so you can clean the gun in between bottles. Otherwise the product will build up and restrict the spray gun pick-up and nozzle tubes.

Per U-Pol's website, you'll want to keep the freshly applied liner from getting wet for 72 hours after application... plan accordingly.

The way this stuff sticks to bare skin is no joke... wear good nitrile gloves, and if you get any on your hide, get it off before it sets up (otherwise it may be a part of you for many days or even weeks... no, I'm not kidding!)

Raptor liner; https://www.amazon.com/U-POL-Raptor-Urethane-Spray-Liters/dp/B01CKE7E9S/ref=sr_1_5?s=automotive&ie=UTF8&qid=1538936337&sr=1-5&keywords=raptor+liner

Regulator; https://www.harborfreight.com/150-psi-air-compressor-regulator-kit-with-dial-gauge-68223.html

Plastic drop cloths; https://www.homedepot.com/p/HDX-9-ft-x-12-ft-0-7-mil-Drop-Cloth-6-Pack-DCHD-07-6/204711647
Your truck looks like it just came off the assembly line....very nice.
 

cattlerepairman

Well-known member
Steel Soldiers Supporter
3,248
3,325
113
Location
NORTH (Canada)
I swapped out the driver door for a NOS one. What a pain in the arse that was (doing it alone). Stripped 4 of the 8 hinge bolt heads. Door is not adjustable, other than by gently "persuading" and I am still not happy how it sits. Also, the hinges have hinge PINS, not BOLTS and the pin is so short that there is no way to attach the west coast mirror arms. I had preemptively bought hinge bolts based on the info someone posted here (3/16 bolts)...WRONG!! They are 1/4-20 3 inch bolts.
So..off to the fastener place I go (of course it is a long weekend up here!) on Tuesday. I will replace the star screw door hinge fasteners with hex. The star screws strip out so easily, it is ridiculous.

Any tips for adjusting the door?

Hitting the hinge bolt with a BFH moves the hinges to line up the mounting holes. I also used a 2x6 underneath the 90 degree opened door hammered into place so it would lift the door up. I swapped the new striker for the old one. All of that helped but I find the rear edge of the door is still too low, causing the window to hit the outside of the weatherstripping and making the door hard to close.

TM9-2320-361-24-2 has no advice on this.
 
Last edited:

fpchief

Well-known member
1,041
220
63
Location
South Alabama
I swapped out the driver door for a NOS one. What a pain in the arse that was (doing it alone). Stripped 4 of the 8 hinge bolt heads. Door is not adjustable, other than by gently "persuading" and I am still not happy how it sits. Also, the hinges have hinge PINS, not BOLTS and the pin is so short that there is no way to attach the west coast mirror arms. I had preemptively bought hinge bolts based on the info someone posted here (3/16 bolts)...WRONG!! They are 1/4-20 3 inch bolts.
So..off to the fastener place I go (of course it is a long weekend up here!) on Tuesday.

Any tips for adjusting the door?
does your door hit on the rocker panel (or whatever it is called) on the bottom of the cab? Mine does, have to lift it some to shut correctly. Interested in hearing about any adjustments.
 

rustystud

Well-known member
9,254
2,941
113
Location
Woodinville, Washington
I swapped out the driver door for a NOS one. What a pain in the arse that was (doing it alone). Stripped 4 of the 8 hinge bolt heads. Door is not adjustable, other than by gently "persuading" and I am still not happy how it sits. Also, the hinges have hinge PINS, not BOLTS and the pin is so short that there is no way to attach the west coast mirror arms. I had preemptively bought hinge bolts based on the info someone posted here (3/16 bolts)...WRONG!! They are 1/4-20 3 inch bolts.
So..off to the fastener place I go (of course it is a long weekend up here!) on Tuesday. I will replace the star screw door hinge fasteners with hex. The star screws strip out so easily, it is ridiculous.

Any tips for adjusting the door?

Hitting the hinge bolt with a BFH moves the hinges to line up the mounting holes. I also used a 2x6 underneath the 90 degree opened door hammered into place so it would lift the door up. I swapped the new striker for the old one. All of that helped but I find the rear edge of the door is still too low, causing the window to hit the outside of the weatherstripping and making the door hard to close.

TM9-2320-361-24-2 has no advice on this.
deleted
 
Last edited:

Floridianson

Well-known member
Steel Soldiers Supporter
7,409
2,501
113
Location
Interlachen Fl.
Cattlerepairman I had a door that did the same thing bottom back bottom to low. I took some very thin washers and put them under the bottom hinge plate between the hinge plate and cab. Then I install the bolts and you might need a helper this time. You might get away with just loosen the bolts and slip something very very thin under the center of the cab hinge plate and then tighten. It does not take much of a spacer all most paper thin and results may very.
 
Last edited:

russojap

Member
172
0
16
Location
Knoxville TN
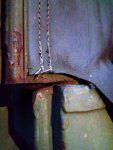
My drivers door has been sticking and making a terrible noise since I've had the truck, so yesterday decided to finally find where the problem was. I was sure It was at the bottom where they had welded on some new metal but it was only the convertible top sitting too low and the back top of the door was catching on the metal where the weather strip goes. I can't believe how simple the problem was, all I had to do was lift up on the top and the door closed great, but I'll have to figure a way to keep the top from going too far down again. Maybe a piece of cardboard would work.

Now that I think about it, it's probably really the door that's too high, but it was a lot easier to just raise the top a little.

IMG_20181009_192119.jpg

IMG_20181009_211608.jpg
 
Last edited:

Mrmag1

Head of Stuff N' Things
Steel Soldiers Supporter
602
13
18
Location
Hereford Arizona
IMG_20181008_130639.jpg
So I got the troop seats and all put together....

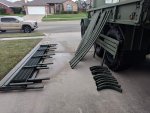
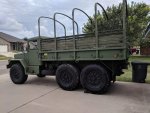
Now call me crazy but I think my stick ups shouldn't be this tall. I think these go to a Canadian MLVW, so anyone know of any MLVW cargo covers hanging around d for sale?
 

USAFSS-ColdWarrior

Chaplain
Super Moderator
Steel Soldiers Supporter
18,538
5,820
113
Location
San Angelo, Tom Green County, Texas USA
I could yes, however if I could get my hands on that tall Canadian cover that would be ideal. I mean I'm a tall guy so....
I can relate.
At 5'8" the standard bows are right at the "Whack-Your-Head" height. I keep bows installed without a cover just for the "looks" of a military vehicle. Hence, a head-whacker all the time.

I'm sure the designers had a reason to keep the trucks height to a certain specification... Maybe common bridge or overhead obstacles in anticipated theaters of operation where those things are lower than in the US??? Hmmmm.
 

Wolfgang the Gray

Active member
Steel Soldiers Supporter
323
69
28
Location
New River, AZ
View attachment 744222
So I got the troop seats and all put together....

Now call me crazy but I think my stick ups shouldn't be this tall. I think these go to a Canadian MLVW, so anyone know of any MLVW cargo covers hanging around d for sale?
At least you can walk your bed without walking like the Hunchback of Notre Dame. My back kills me after having to work with my top on as the bows are great for sitting, but not for standing. The big issue I would think for you would finding a top that big to cover those. Best of luck though.
 
Top