- 318
- 36
- 28
- Location
- New River, AZ
Beautiful pictures. What were you doing at the airfield?They let me park my deuce next to the B25J that was in town last week
Steel Soldiers now has a few new forums, read more about it at: New Munitions Forums!

Beautiful pictures. What were you doing at the airfield?They let me park my deuce next to the B25J that was in town last week
Better than brand new! Seems to help a bit with engine heat through the floor.I like that. It looks nice and clean.
You diagnose the leak as brake fluid. That makes it a "must fix now" item. Chances are, it is the wheel cylinders leaking. Chances are, it is either because they are really old and in need of overhaul or the new ones without cup expanders were installed at some point. In any case, I wouldWell, it looks like I have my first wrenching project to do on my Deuce. My pre-start check on my first post-retrieval trip revealed a small fluid leak on the front left wheel. Then yesterday I notice the spot was bigger & the brake fluid level in the reservoir was a bit lower. Not wanting to ignore this & being a bit paranoid about the often discussed total brake failure, I want to fix this before it gets any worse.
For a newby wrencher armed only with enthusiasm & the TM, how would you all rate this task, on a scale of "Easy Breezy" to "You better have some who knows what their doing perform this while you watch & ask questions"?View attachment 637513View attachment 637514
And don't forget YouTube for instruction videos.You diagnose the leak as brake fluid. That makes it a "must fix now" item. Chances are, it is the wheel cylinders leaking. Chances are, it is either because they are really old and in need of overhaul or the new ones without cup expanders were installed at some point. In any case, I would
- pull both front wheels and brake drums and check the brake condition...no use doing brake work and leaving worn shoes in
- at the very least check brake condition on the rear wheels
- obtain 6 correct wheel cylinders with cup expanders
- obtain brake shoes and hardware as needed
- obtain new flex brake hoses (if not recently changed)
- read the threads on wheel cylinder/brake replacement
- replace stuff as needed
If you are a diligent wrencher that can follow instructions, you can do it.
Scale of 1 to 10 for a complete newb wrencher- about a 6 or 7. I would certainly have some one handy when putting it together, but taking it apart isn't all that bad.Well, it looks like I have my first wrenching project to do on my Deuce. My pre-start check on my first post-retrieval trip revealed a small fluid leak on the front left wheel. Then yesterday I notice the spot was bigger & the brake fluid level in the reservoir was a bit lower. Not wanting to ignore this & being a bit paranoid about the often discussed total brake failure, I want to fix this before it gets any worse.
For a newby wrencher armed only with enthusiasm & the TM, how would you all rate this task, on a scale of "Easy Breezy" to "You better have some who knows what their doing perform this while you watch & ask questions"?View attachment 637513View attachment 637514
Also take a good look at your bearing races for wear. Also read and follow the TM. Just myScale of 1 to 10 for a complete newb wrencher- about a 6 or 7. I would certainly have some one handy when putting it together, but taking it apart isn't all that bad.
You'll want/need a 1-1/2" socket for the lugs and either a good breaker bar, or a good air impact. You'll need a 3-1/2"?? Socket for the wheel bearing nuts(I'm just going to assume that even though the truck looks great, you'll never actually get the drum off the hub without removing the hub anyways. And a good set of brake spring pliers (large ones can commonly be found at flea markets)
I would have on hand a set of front bearing seals, a new lock washer for the bearing nuts, and either a rebuild kit or new wheel cylinder handy(for a newb I would just get the wheel cylinder. Oh and grease for the bearings.
Sent from my iPhone using Tapatalk
I have to replace the tranny in my A3 and have the seats out so it makes sense to do it prior to seats going back in. And there may be a floor modification for a tranny PTO, but I'm not ready to cut and alter yet.Better than brand new! Seems to help a bit with engine heat through the floor.
A turbo is a spark arrestor.Where did you get the spark arrested? I wanted to take my Deuce into the mountains & I'd sure like to make sure it isn't a fire hazard to the beautiful pines.
But not US Forest Service approved.A turbo is a spark arrestor.
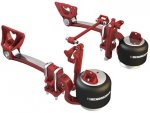
Please give some more info on the rear when you can. I'm considering bobbing my A3 deuce and would like to see your geometry. Is there a panhard link?
I notice you call it a Plyduece instead of a Deuce-mouth!

My dad calls it the Douche-mouth.......Not funny!! Hahah. Yes, it needs a track bar/panhandle bar/insert name here. This is the basic idea. I build the trailing arms out of 2"x4" 1/4" wall. The front pivot bushings are For SD front leaf spring bushings.
View attachment 637628
I've had goo luck with this design from my rock crawling days. I won't have a problem of being too low for a jack when the air bag fails! I have this same style "swing arm" suspension on my 97 F350. It's been great for the past 8 years with only minor airline/fitting problems.Oh I hate that suspension system !!!!! We had it on one of our bus fleets and it was a pain in the A$$ !!!!! Also if you lost an air-bag the bus was only off the ground by 2" !!! Try getting a jack under that !!! We had to develop a "air-bag" jack that would go under the rear bumper. Needless to say due to the poor suspension system and other problems we got rid of that fleet of busses !
Forgot to mention that the main bar likes to break !!! A lot !!!
I suppose for something that doesn't get used a lot it will be OK, but our buses are driven daily and hard. We also had some Ford F500 chassis buses that used this suspension. It too was a bad idea ! Constant breakages. For any truck that must be used and used hard I would never use this suspension system !I've had goo luck with this design from my rock crawling days. I won't have a problem of being too low for a jack when the air bag fails! I have this same style "swing arm" suspension on my 97 F350. It's been great for the past 8 years with only minor airline/fitting problems.
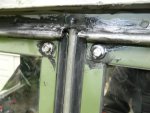
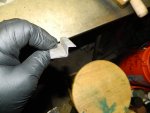
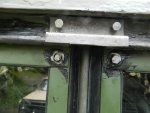
I got my front windshields back in. I had to replace both of them due to rusted out frames ! I was washing my windows a few weeks ago getting ready for a little trip when I noticed that when I pushed on the glass they moved in the frames, a lot ! So I took them apart and found the rust. That was $400.00 I wasn't planning on spending ! I still need to make a plate that goes between the two windows upper hinges. I found there is a sizeable gap there. Originally there was some rubber foam there, but that is not a good idea in my opinion since driving down the road the rain can just "push-in" there. I plan on making a metal "shield" and install the foam to the back along with sealer.
I'll post pictures of my "fix" later.


That stinks, but at least you caught it before it gave you a nasty surprise somewhere inconvenient.Over the past few weeks:
Upgraded tail lights (had the old style small ones)
1 new wheel cylinder
Rebuilt master cylinder
got 2 new blackout shades for the 109 box
added the humvee 12v/24v power distribution box
discovered the radiaotor is leaking....
