• Steel Soldiers now has a few new forums, read more about it at: New Munitions Forums!

  • Microsoft MSN, Live, Hotmail, Outlook email users may not be receiving emails. We are working to resolve this issue. Please add support@steelsoldiers.com to your trusted contacts.

What did you do to your deuce this week?

rustystud

Well-known member
9,280
2,988
113
Location
Woodinville, Washington
Yes they are behind / above the front axle when you are going forward. That's ok if you never have to back up when off road. I know you are building a bullet proof off road truck but trust me if it can go wrong off road it will. I would have never believed in my M816 that I could hit a soft wet hole and sink the front end up to the windshield. The motor stayed running trying to get the truck out and the road draft tube was in thick sandy /muddy water. The pressure built up in the crank case and blew out the oil dip stick. Engine filled with sandy water and when I took the oil filter apart it had sand on both sides of the element. I have plenty of stories of everything goes wrong when off road. This is why I got the 915A2 and 373 trailer and stay on the road plus selling everything else.
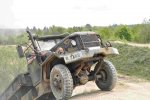
Oh trust me, I have some hairy off-road adventures to tell !!! I was off-roading well before it became a fad. I still have this old photo of me standing on the roof of my truck. There was this "small" water hole (about 12ft in diameter) I just had to drive through. I didn't know it was 6 feet deep !!! That took some doing to get my poor old truck out of it !
 

59apache

Chipmaker
1,299
29
48
Location
Bavaria / Germany
The fuel tanks are a totally different story. They hang out there with no armor and are the lowest spot on the truck short of the differential bottom housing. I would never install a drain valve there. I have installed "Allen" socket brass drain plugs on both tanks instead of the steel ones which rust horribly ! But they can not get knocked off.
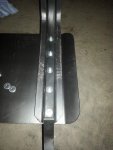
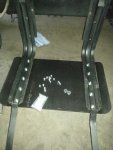
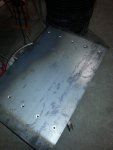
Now they have armor :)
IMG-20170410-WA0003.jpg20170410_081802.jpg20170410_081746.jpg20170405_214352.jpg
Grade 8 bolts&nuts, thick washers, plate made of S700MC 1.8974 (ASTM A514 ?)
Main goal was to prevent the sear tank support from bending...
 

gimpyrobb

dumpsterlandingfromorbit!
27,786
755
113
Location
Cincy Ohio
Now they have armor :)
View attachment 726182View attachment 726183View attachment 726184View attachment 726185
Grade 8 bolts&nuts, thick washers, plate made of S700MC 1.8974 (ASTM A514 ?)
Main goal was to prevent the sear tank support from bending...
I always love seeing your creations, so don't take this the wrong way!
You'll need more than that to protect the fuel tanks. I've seen the "L" brackets with diagonal supports get bent while off-roading.

I have thought about putting a fuel tank in the space under the bed between the frame rails to protect it.
 

rustystud

Well-known member
9,280
2,988
113
Location
Woodinville, Washington
I always love seeing your creations, so don't take this the wrong way!
You'll need more than that to protect the fuel tanks. I've seen the "L" brackets with diagonal supports get bent while off-roading.

I have thought about putting a fuel tank in the space under the bed between the frame rails to protect it.
I too have thought that would make a great place for a fuel tank ! It also would spread out the "load" of the fuel over a greater area. The problem or one of the problems would be access to it if for any reason it needed changing or repair. You would be forced to remove the bed to get in there. For example to repair the fuel pump. Of course having the tank so high you could get away with an "external" fuel pump mounted on the frame rails. Then there is the whole "flex" issue associated with a long tank mounted to the frame. Springs could help here, just like the bed has I guess. If I ever decided to do this I would have the tank made out of stainless steel. All our bus tanks are now made out of stainless steel to avoid rust contamination getting to the injection pumps.
 

rustystud

Well-known member
9,280
2,988
113
Location
Woodinville, Washington

Aussie Bloke

Well-known member
725
373
63
Location
Lost, out bush in OZ
G'day everyone,.....


Ok,..

Its official, I'm stumped,....

Got the lower hose off at the radiator but for the life of me I can't get to the upper clamp at the water pump.

I resigned myself to having to remove the generator to get to it but the bolt at the front bottom I can't get to because my hands are to big.

So this is frustrating me beyond belief, I'm just gonna bite the bullet and pay somebody to remove the generator for me and put it back.

Such a simple job and its got me beat.

I spend most of my time fixing things for everyone else yet this has me stopped.

I can't believe this has happened to me,...


:(


Aussie.
 

59apache

Chipmaker
1,299
29
48
Location
Bavaria / Germany
I don't get it wrong. My rear L bracket was bend, because it "catches the edge".
DSC_2606web.jpg
My thought was the skidplate slide over the ground.
The best option IMO ist to remove the batteries and toolbox and use steptanks.
But i wan't go this way. I like the stock look, the easy access to the tanks and batteries.
And the 100 gal. :)
A single long and low profile tank this big would be very long. With the need of a sump or external sump tank to provide fuel on steep inclines.

I've thought this options and decided to make the best from what i have :)
 
Last edited:
Another new Duce owner.....cleaned, painted, and cleaned and painted some more. Also completed outfitting the pioneer rack, mounted air fill extenders to the interior rims which will make tire maintenance so much easier. Stripped down and painted the gladhands and purchased air hose and tools for road side work. Lubed almost all the points on the undercarriage....glad I got a creeper, but need to order some tiny hands next to complete the task.
 

DavidWymore

Well-known member
1,598
164
63
Location
El Centro, CA
Another new Duce owner.....cleaned, painted, and cleaned and painted some more. Also completed outfitting the pioneer rack, mounted air fill extenders to the interior rims which will make tire maintenance so much easier. Stripped down and painted the gladhands and purchased air hose and tools for road side work. Lubed almost all the points on the undercarriage....glad I got a creeper, but need to order some tiny hands next to complete the task.
What kind of extenders? I’m looking for some that work with then inner valve core removed for airing down for sand.
 

DavidWymore

Well-known member
1,598
164
63
Location
El Centro, CA
I can only find them with a valve in the back end that corresponds to the valve core in the existing stem. I want them without for faster airing down.


You can find these "extenders" at any "Truck" supply store. The best are made from solid brass and screw into the tire fill tube.
Some come with little mounting plates which can be helpful.
 

cattlerepairman

Well-known member
Steel Soldiers Supporter
3,256
3,355
113
Location
NORTH (Canada)
IMG_20180430_084101.jpg

A good morning! "Queen Lola" is out of storage and back on the road for the spring and summer. She started up on the first pressing of the button and ran like a champ. Nice!
 

wiersema07

Member
90
3
8
Location
Illinois
C53B2664-4B3F-4224-B0BD-9B948F96F48C.jpg318DCF14-533C-4D47-BB95-2EED0DBB033B.jpgB28290CD-121C-443C-8E81-EAAD8482FA0A.jpg6A8F8457-1994-4025-B09A-1C52CCDCF85C.jpg85203942-D8BE-49A9-9A77-5815D334E5AB.jpgF1D7B4D7-F01F-4B0B-A357-4C6FBF9DDD00.jpgI’ve owned mine about 3 weeks now. 1970 Kaiser Jeep with winch but was later added in its life as an electric. Since I’ve owned it I’ve re painted the whole truck and blacked the wheels. Changed the transmission oil. Changed the 3 fuel filters. Changed air filter. Re painted the interior to match exterior. Switched the air horn to semi Grover air horns. Replaced the 9.00 wheels they were weather rotted pretty bad and put like new 11.00 radials on it. Had decals made for it. I believe that’s it.
 

Menaces Nemesis

"Little Black Truck" Conservator
Steel Soldiers Supporter
333
262
63
Location
Denver, Colorado
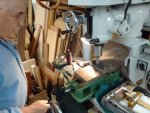
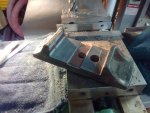
Did the "Caster Modification" to the front leaf spring perches (with the help of a friend with a milling machine... Thanks Roger!) The little "bite" in the vertical portion of the perch shown, happened when Roger let me try running his mill for a bit... oops! With the hydraulic power steering, dual steering stabilizer, and now this caster mod, the truck steers and tracks like an absolute dream riding on 46" tires!
Leaf spring seat Camber mod.jpgIMG_20180513_104101551.jpgIMG_20180513_130353626.jpg
 
Last edited:

cattlerepairman

Well-known member
Steel Soldiers Supporter
3,256
3,355
113
Location
NORTH (Canada)
View attachment 727250I’ve owned mine about 3 weeks now. 1970 Kaiser Jeep with winch but was later added in its life as an electric. Since I’ve owned it I’ve re painted the whole truck and blacked the wheels. Changed the transmission oil. Changed the 3 fuel filters. Changed air filter. Re painted the interior to match exterior. Switched the air horn to semi Grover air horns. Replaced the 9.00 wheels they were weather rotted pretty bad and put like new 11.00 radials on it. Had decals made for it. I believe that’s it.
Tell me more about that interesting looking winch! it looks quite massive. How is it hooked up? Any performance specs on it?
 
Top
AdBlock Detected

We get it, advertisements are annoying!

Sure, ad-blocking software does a great job at blocking ads, but it also blocks useful features of our website like our supporting vendors. Their ads help keep Steel Soldiers going. Please consider disabling your ad blockers for the site. Thanks!

I've Disabled AdBlock
No Thanks