• Steel Soldiers now has a few new forums, read more about it at: New Munitions Forums!

  • Microsoft MSN, Live, Hotmail, Outlook email users may not be receiving emails. We are working to resolve this issue. Please add support@steelsoldiers.com to your trusted contacts.

What did you do to your deuce this week?

Dipstick

Well-known member
1,101
1,267
113
Location
Effort PA
Haven't really had the time to sit down and update, but as soon as I finished replacing the front brake lines in the middle of last month:

I modified my tool rack to fit a mid-sized chainsaw. Basically just cut the brackets out of the center of it so I could fit an appropriately sized piece of OSB in the bottom of it. I then drilled holes further down the sides so I could mount it flat. (Didn't take pics due to the simplicity of the project.)
I also removed the bent rear fenders so I could hammer them flat.
Once those two minor things were done, I did a complete fluid check and greased EVERYTHING.
We've been out in the woods doing firewood shenanigans every other weekend since. Happy to report that the locker functions flawlessly. Locks in when you engage the transfer case and unlocks shortly after disengaging the case. The only thing that some folks might not enjoy is the loud groan that the locker makes when its unlocked in a turn. It only does it when turning left (in my case at least.) The off-road shop I bought it from told me that it was going to be loud, and not to be concerned when I drove it the first time. Unfortunately the main roads got salted a few days ago so my plans of driving the truck to their shop so they could hear it will have to be delayed for now.

There is plenty of wood to stack in the meantime at least.
(My shop is a cluster right now, I know. It's annoying but temporary.)
Great to see that your getting real use out of your Deuce! Your winch may come in very handy in the woods. I like your equipment plate on the back too.
I'm envious of the size of your shop. My garage is nowhere near big enough for my Brutus. I hear what you say about the "Truck Destroyer, Granular" they put on the roads. It tore my truck up over the last few years. I will avoid driving him after they put down Truck Destroyer and cinders this year.
 

ldmack3

Well-known member
Steel Soldiers Supporter
849
1,740
93
Location
N. Central Idaho
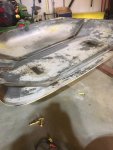
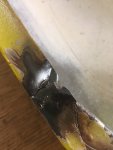
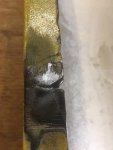
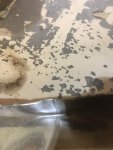
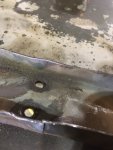
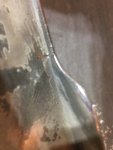
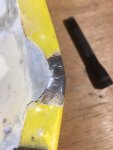
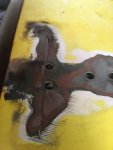
Pulled the hood off of Burt. Cracks and rust. Also the hood has warped/sprung so one of the cross member supports does not come close to the hood. I'd like to fasten it down to make it less flexible helping to reduce the cracking, but if I bolt it in the middle it will dimple the hood. Any ideas? Looking for a way to reduce the flexing when opening if any.
On the bottom side I sanded off much of the rust, welded the cracks and primed the raw metal areas. Next will flip and check the top side.
 

Attachments

davidb56

Well-known member
1,020
1,237
113
Location
Bonners Ferry Idaho
fish plate the areas (front the inside)where it breaks. You may have to either spot weld or small plug welds on the fish plate, unless you are able to get the weld on the inside. run the weld parallel long ways, not across the repair. Add a piece of flat bar on the channel bracing and skip weld it in to stiffen up the braces, as they are twisting from fatigue.
 

Mullaney

Well-known member
Steel Soldiers Supporter
Supporting Vendor
7,716
19,766
113
Location
Charlotte NC
Pulled the hood off of Burt. Cracks and rust. Also the hood has warped/sprung so one of the cross member supports does not come close to the hood. I'd like to fasten it down to make it less flexible helping to reduce the cracking, but if I bolt it in the middle it will dimple the hood. Any ideas? Looking for a way to reduce the flexing when opening if any.
On the bottom side I sanded off much of the rust, welded the cracks and primed the raw metal areas. Next will flip and check the top side.
You mentioned welding, so sheet metal and you must work well together... WHAT IF you removed the braces that are there, reformed them to touch the center of the hood? I am just thinking out loud - but wonder if over the years - if the hood supports have "spread" left to right?

That big heavy hood has most likely been "drop closed" hundreds of times. I could be that measuring and pulling the hood back to its original width, then reattaching the ribs could solve it...

That requires skills that I don't have but maybe you do?

.
 
Last edited:

ldmack3

Well-known member
Steel Soldiers Supporter
849
1,740
93
Location
N. Central Idaho
fish plate the areas (front the inside)where it breaks. You may have to either spot weld or small plug welds on the fish plate, unless you are able to get the weld on the inside. run the weld parallel long ways, not across the repair. Add a piece of flat bar on the channel bracing and skip weld it in to stiffen up the braces, as they are twisting from fatigue.
I'm a beginner welder as its been 40 years since I did much welding. So fish plate, plug and skip welds are not in my vocab..yet. But they will be soon! If you look at the cross brace close to my thumb you'll see where it is distorted. I think to reform it I would have to cut out some on the sides in order for it to take the adjustment needed.


Edit:

Got it. Was planning on doing a fish plate just did not know that term. What are your thoughts on pulling the braces, cutting the 2 sides to take out some material to reform and them welding back along with bracing?
 
Last edited:

ldmack3

Well-known member
Steel Soldiers Supporter
849
1,740
93
Location
N. Central Idaho
You mentioned welding, so sheet metal and you must work well together... WHAT IF you removed the braces that are there, reformed them to touch the center of the hood? I am just thinking out loud - but wonder if over the years - if the hood supports have "spread" left to right?

That big heavy hood has most likely been "drop closed" hundreds of times. I could be that measuring and pulling the hood back to its original width, then reattaching the ribs could solve it...

That required skills that I don't have but maybe you do?

.
I was thinking of cutting the s[pot welds to remove it, then Cut out some of the sides of the channel so it will collapse, so to speak, to match the curve of the hood. I have nothing to gage how much the hood has spread. I considered measuring side to side and comparing to the hood, but don't recall the hood hanging over on the sides. Good excuse to buy a portable spot welder!
 

davidb56

Well-known member
1,020
1,237
113
Location
Bonners Ferry Idaho
I was thinking of cutting the s[pot welds to remove it, then Cut out some of the sides of the channel so it will collapse, so to speak, to match the curve of the hood. I have nothing to gage how much the hood has spread. I considered measuring side to side and comparing to the hood, but don't recall the hood hanging over on the sides. Good excuse to buy a portable spot welder!
use a 1/8 inch cutoff wheel one it in a half dozen places, when you weld them back up, it will pull/shrink the channel in a arc. then form a length of 1/8 to 3/16th flat bar that fits in the channel, bending it to shape like the hood, tack it ( half inch welds) in a dozen places.
 

Dipstick

Well-known member
1,101
1,267
113
Location
Effort PA
Pulled the hood off of Burt. Cracks and rust. Also the hood has warped/sprung so one of the cross member supports does not come close to the hood. I'd like to fasten it down to make it less flexible helping to reduce the cracking, but if I bolt it in the middle it will dimple the hood. Any ideas? Looking for a way to reduce the flexing when opening if any.
On the bottom side I sanded off much of the rust, welded the cracks and primed the raw metal areas. Next will flip and check the top side.
This may sound dumb, but I'd try cleaning the metal under the brace, squirting some construction adhesive under it and then setting some cinder blocks on top of the brace to hold it down while it cures. If it works, it works. If not you can go the shrinking welding route. Another way would be to drill the hood and brace for steel pop rivets. Dimple the rivets on the outside of the hood with a punch and then cover the dimples with body filler. You could also use a few round head machine screws through the hood and brace. Unless your trying to win MV of the year, nobodies going to notice a few painted round heads on the hood of a Deuce. I'm not a good welder myself, so I sometimes figure out ways to do things without welding. The cracks are another matter. They are quite common on the sheet metal of older vehicles. I'm going to try to mig some of the cracks in my trucks, but it's really easy to blow holes in sheet metal with a gasless mig if you're not good at it even with the welder turned way down.
 

ldmack3

Well-known member
Steel Soldiers Supporter
849
1,740
93
Location
N. Central Idaho
Thanks for the idea on the adhesive dipstick.
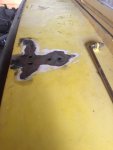
I've since determined that the brace is supposed to be straight across most of the hood and that it should slightly clear the hood in the middle. I wouldn't mind a few screws showing on the hood but I was concerned about the hood losing it nice curved shape. So I'm in the process of plug welding some 3/4" angle the length of the brace to return it to its original shape. Then reattaching the brace to the hood with some additional angle at the attach points. I had what seemed like a lot of cracking in the brace from flexing while opening/closing and am still stying to figure out how to stop the flexing. Cross corner bracing won't work as it won't clear the engine.

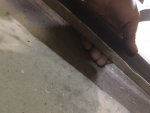
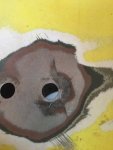
In the meantime I found where the LH hinge was attached had cracks radiating out from the bolt holes on the cab side. Fortunately I already had the instrument panel out for work so I could easily access the back side. I cut out a 5x7 piece and getting set up to weld in a new piece of 16 ga steel. Since that area is curved also, working out how to reinforce that area without angle. More pics when completed.

Always open to ideas as this is my first deuce. Thanks to davidb56 for getting me headed in the right direction to begin with.
 

Attachments

Wolfgang the Gray

Active member
Steel Soldiers Supporter
323
69
28
Location
New River, AZ
G'day everyone,....


Aussie.
G'day mate! Towards the end of your video where the cable keeps jumping to the left, is it maybe twisted (like a garden hose) so it is trying to curl up? Maybe lock the drum & twist the rest of the free cable to fix that? Also, concerning your cable lube, did you just pour motor oil on it as it was rolled out or did you dip it?

I haven't had my winch cable out since I got my Deuce in 2016 so I've been wanting to pull it out & lube it up. I was going to pull the cable out & put a weight on it (my Jeep) and keep the Deuce still with my wife in the cab running the winch (with a winch blanket) & me helping the winch rewind nice & orderly while wearing heavy cloves to ensure I don't get any metal splinters in my hands.
 

davidb56

Well-known member
1,020
1,237
113
Location
Bonners Ferry Idaho
Started mine up, pulled it out of the garage so I could check & air the tires (too tight in the garage to get down to air the tires). My Husky compressor gave out early this year so I use the onboard. That also charges the batteries. Checked fluid levels & put it back to bed.
FYI. I wrote a review at HD website, and Husky (actually Sanborn manufactured) replied, asked for pics, explanation and serial #s, then sent me another motor/compressor to me free of charge. It arrived yesterday. Squeaky wheel gets the grease......
 

Dipstick

Well-known member
1,101
1,267
113
Location
Effort PA
Thanks for the idea on the adhesive dipstick.
I've since determined that the brace is supposed to be straight across most of the hood and that it should slightly clear the hood in the middle. I wouldn't mind a few screws showing on the hood but I was concerned about the hood losing it nice curved shape. So I'm in the process of plug welding some 3/4" angle the length of the brace to return it to its original shape. Then reattaching the brace to the hood with some additional angle at the attach points. I had what seemed like a lot of cracking in the brace from flexing while opening/closing and am still stying to figure out how to stop the flexing. Cross corner bracing won't work as it won't clear the engine.

In the meantime I found where the LH hinge was attached had cracks radiating out from the bolt holes on the cab side. Fortunately I already had the instrument panel out for work so I could easily access the back side. I cut out a 5x7 piece and getting set up to weld in a new piece of 16 ga steel. Since that area is curved also, working out how to reinforce that area without angle. More pics when completed.

Always open to ideas as this is my first deuce. Thanks to davidb56 for getting me headed in the right direction to begin with.
I wish I were as good a welder as you are. I should have realized the brace is not fastened to the hood in the middle. I hear you about the nice curve. Whenever I stand or sit on the hood of my Deuce to work on the wipers, the hood dimples in (I only weigh 150 lbs.). I usually just open the hood afterwards and with one push of the hand it goes right back into shape. A lot of old-timers used to braze metal. I may try that on my cracks. I'd just get some brazing rod, flux, and use my map gas torch. Good luck on your repairs and thanks for the pics!
 

davidb56

Well-known member
1,020
1,237
113
Location
Bonners Ferry Idaho
Up here it's wasps. They're everywhere and they seem to really like my Deuce. There were many times this summer when I was working with a dozen wasps a foot or less away. I tried some different brands of sprays and nothing worked. They keep coming back. I haven't gotten stung yet, but it's inevitable I guess.
They ae bad here too. They make their nests in the cab often, and always on the bed frames. I was using Spectricide" but recently it seems like the producers have watered it down and I have to water board them with it, then smash them. So now I use cheap brake clean.
 

Wolfgang the Gray

Active member
Steel Soldiers Supporter
323
69
28
Location
New River, AZ
I...HATE...LEAVES...!!!

On the grass I mulch them with the little tractor, but around the house I have to rake the b@stards. And usually the wind picks up when I rake. Go figure. At least I am down to filling some 20 lawn bags, from 70 or so at the last go around. Things are improving.
I use a shop vac for leaves in my yard (rock yards in AZ) because I can neither mulch or rake & leaf blowers just swirl them around the yard as the wind counters my efforts like a fencing opponent.
 

Wolfgang the Gray

Active member
Steel Soldiers Supporter
323
69
28
Location
New River, AZ
FYI. I wrote a review at HD website, and Husky (actually Sanborn manufactured) replied, asked for pics, explanation and serial #s, then sent me another motor/compressor to me free of charge. It arrived yesterday. Squeaky wheel gets the grease......
How old is your compressor? I got mine in 2005 so it was 14-years old when it gave up the ghost. From what I have read, that is a long life for a compressor. It is actually easier to just run the Deuce compressor than move the compressor out from its storage spot (no where near the power outlet). Thanks for the info though & glad you got your compressor working again! :cool:
 

davidb56

Well-known member
1,020
1,237
113
Location
Bonners Ferry Idaho
How old is your compressor? I got mine in 2005 so it was 14-years old when it gave up the ghost. From what I have read, that is a long life for a compressor. It is actually easier to just run the Deuce compressor than move the compressor out from its storage spot (no where near the power outlet). Thanks for the info though & glad you got your compressor working again! :cool:
Its about 3 years old. It will be my back up one now, since I got a gas powered one that I got in the bed of the deuce to operate my log lift for extra heavy green Hemlock firewood rounds, and another electric one since.
 
Top