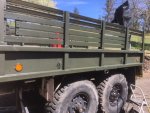
ldmack3, in your picture four right behind the rear spring mount is the boxed in area, that from the outside of my Deuce, looks worse than yours. I see bondoed mesh on mine. I can hardly wait to see what's behind it. Not. Again, thanks for all the info and pics. It's invaluable to me.
-
Steel Soldiers now has a few new forums, read more about it at: New Munitions Forums!

What did you do to your deuce this week?
- Thread starter Seth_O
- Start date

More options
Who Replied?ldmack3
Well-known member
- 849
- 1,740
- 93
- Location
- N. Central Idaho
ldmack3, in your picture four right behind the rear spring mount is the boxed in area, that from the outside of my Deuce, looks worse than yours. I see bondoed mesh on mine. I can hardly wait to see what's behind it. Not. Again, thanks for all the info and pics. It's invaluable to me.
Attachments
-
 68.1 KB Views: 16
williamh
Well-known member
- 512
- 709
- 93
- Location
- SanDiego Ca.
Spent a whole lotta time breaking down some split rims and mounted some G177’s on a set of M135 rims for my fav M35A2
Attachments
-
 142.8 KB Views: 30


I finished the battery support today. I could put it in Brutus tomorrow ( the frame brackets are already drilled ), but I want to clean up and paint the brackets and under the cab first. On the rear of the frame is my adjustable battery box retainer. I used all stainless bolts with locknuts and fender washers to prevent pull-through when pulling out the heavy battery box. I think the box will slide much easier than it would with the stock support, because of the middle flat I added. It's the best welding I've ever done, which really boosts my welding confidence. I can't wait to put the batteries in and get Brutus running!
Sparkyz911
Active member
- 65
- 61
- 33
- Location
- Central IL USA
Also battery related....replaced the group 31 batteries that were in my deuce when I bought it in 2016. Interstate econo powers. Probably would have made it one more year had I ran the truck more over the winter. 12.5v on bat 1, 11.25 on bat 2, and that's after charging overnight. Put o'Reilly super start brand 31s in.
Thanks! It's good to know there are other batteries out there that will work just in case NAPA stops carrying 6TLs some day.Also battery related....replaced the group 31 batteries that were in my deuce when I bought it in 2016. Interstate econo powers. Probably would have made it one more year had I ran the truck more over the winter. 12.5v on bat 1, 11.25 on bat 2, and that's after charging overnight. Put o'Reilly super start brand 31s in.
Sparkyz911
Active member
- 65
- 61
- 33
- Location
- Central IL USA
With 3 cores I was still out 275.....Be sure to get the red label ones not the blue label marine ones. I've read that econo powers are like 40-50 each but couldn't source them in my AO.
Good price! Napa 6TLs are $450 for two with cores.With 3 cores I was still out 275.....Be sure to get the red label ones not the blue label marine ones. I've read that econo powers are like 40-50 each but couldn't source them in my AO.
- 6,738
- 14,432
- 113
- Location
- Hawthorne, NV.
Dipstick, Interstate Batteries also carries the 6TL Batteries.
ldmack3
Well-known member
- 849
- 1,740
- 93
- Location
- N. Central Idaho
I have Red Top 31 Optimas in mine. Warranty is out this year and when I do replace them I'll go with 34s.
What is the feeling on Optimas?
What is the feeling on Optimas?
- 6,738
- 14,432
- 113
- Location
- Hawthorne, NV.
Those that I know that have them, like them.I have Red Top 31 Optimas in mine. Warranty is out this year and when I do replace them I'll go with 34s.
What is the feeling on Optimas?
- 8,221
- 20,769
- 113
- Location
- Charlotte NC
.Those that I know that have them, like them.
Agreed. I personally haven't heard any grumbles about Optima batteries!
ldmack3
Well-known member
- 849
- 1,740
- 93
- Location
- N. Central Idaho
Per your request. In process of going 34052 Green.Good price! Napa 6TLs are $450 for two with cores.
Attachments
-
 115.9 KB Views: 21
fleetmech
Well-known member
- 205
- 405
- 63
- Location
- Connecticut
Ive had some trouble with Optima, ever since they got bought out a number of years ago. We had put them in a couple of backup generators with long storage times and tight enclosures but they failed in less that 2 years, so we junked them and went back to off the shelf Napa's. The old optimas were great, those things lasted forever.
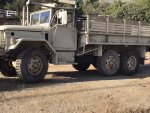
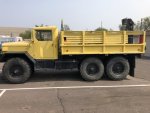
I like it! I don't know what 34052 green looks like. Brutus is O.D. green. It's easy paint to get. My truck had a black frame originally. The body may have been painted desert tan. I'm not sure. It's interesting that you fuel tank is on the driver's side. That's where my spare tire is. My tank and batteries are on the passenger side.Per your request. In process of going 34052 Green.
Thank you for the picture!
ldmack3
Well-known member
- 849
- 1,740
- 93
- Location
- N. Central Idaho
Mine was desert tan, then yellow. That's a 2nd tank. Spare is in the back and it has a crane to unload/load it.
Sorry 24052
24052 USMC Semi-Gloss One Gallon – Quarter Ton & Military – Paint Gallons (quartertonparts.com)
Better shipping price at Rapco. I bought 4 gallons and 12 spray cans.
Sorry 24052
24052 USMC Semi-Gloss One Gallon – Quarter Ton & Military – Paint Gallons (quartertonparts.com)
Better shipping price at Rapco. I bought 4 gallons and 12 spray cans.
Attachments
-
 131 KB Views: 24
You're doing the paint already? Gee, I didn't think you were done with the rockers yet. The Marine paint scheme looks sharp. I find the Rapco spray paint to be non-adhering, soft, rough and porous. I don't think it hinders rust at all. So I'm experimenting with a new combination. First I use Ace Rust Stop gray primer, which seems to bond well to bare metal and dries in 30 minutes. Secondly, I use Rapco O.D. green for color. Then finally, I hit it with Rustoleum clear matte finish, which is supposed to function as a sealer. It seems to force the Rapco paint (which takes forever to dry) to dry. We'll see over time how this paint method holds up to the rain and salt up here. I use all rattle cans. I guess you're using your compressor and a sprayer. A better way to do it.Mine was desert tan, then yellow. That's a 2nd tank. Spare is in the back and it has a crane to unload/load it.
Sorry 24052
24052 USMC Semi-Gloss One Gallon – Quarter Ton & Military – Paint Gallons (quartertonparts.com)
Better shipping price at Rapco. I bought 4 gallons and 12 spray cans.
ldmack3
Well-known member
- 849
- 1,740
- 93
- Location
- N. Central Idaho
I use the spray for small parts and for touch up. Since I've got time, I'm letting the paint dray a long time. I use Rustoleum on the bare metal and scuff/sand the existing if its solid. Someone painted a lot in black and that comes off with the pressure washer. I've communicated with the Gillespie Coatings rep and he said it's imperative to let the primer dry completely or it will take a while. I'm painting all that I can. Haven't touched the cab and fenders. Did the bumper and winch with a brush mostly. I like the idea of the clear coat but I've got enough projects!
- 282
- 508
- 93
- Location
- Indianapolis, Indiana
When I took my deuce on its first trip out of hibernation this year, I was rewarded with brakes locking up on my way back home. So after inspecting things, I found out that my master cylinder had rusty sludge in it and likely that had plugged up the compensating port in the master cylinder, causing my issues. So, this week I just finished up replacing the master cylinder with a new one (the old one had rust in the bore that wouldn't have honed out) and putting a rebuild kit in the air pack for good measure.
It's probably worth checking in that reservoir once in a while even if you have a remote reservoir like I do. I drained and refilled the entire brake system in this truck in late 2019 when I last repacked wheel bearings and checked wheel cylinders but this stuff must have been in there the whole time. I guess it's the fun of having an older truck!


I got lucky and the air pack was in good shape inside other than a little sludge that had worked its way down from the master cylinder. All the bores were in great shape and the rebuild was easy. I got the rebuild kit from Big Mike's, and it had everything but the o-ring that goes between the two halves of the air piston. The gasket on the back of the air cylinder was a little wider than the original and needed some trimming around the 6 studs, but those are minor complaints.
Today's test drive was much less eventful!

It's probably worth checking in that reservoir once in a while even if you have a remote reservoir like I do. I drained and refilled the entire brake system in this truck in late 2019 when I last repacked wheel bearings and checked wheel cylinders but this stuff must have been in there the whole time. I guess it's the fun of having an older truck!
I got lucky and the air pack was in good shape inside other than a little sludge that had worked its way down from the master cylinder. All the bores were in great shape and the rebuild was easy. I got the rebuild kit from Big Mike's, and it had everything but the o-ring that goes between the two halves of the air piston. The gasket on the back of the air cylinder was a little wider than the original and needed some trimming around the 6 studs, but those are minor complaints.
Today's test drive was much less eventful!
Don't you just love surprises! Great job on your repair and thank you for the pictures. I wonder what caused the sludge? Moisture? Are you using Dot 3 or Dot 5 brake fluid? Nice Deuce.When I took my deuce on its first trip out of hibernation this year, I was rewarded with brakes locking up on my way back home. So after inspecting things, I found out that my master cylinder had rusty sludge in it and likely that had plugged up the compensating port in the master cylinder, causing my issues. So, this week I just finished up replacing the master cylinder with a new one (the old one had rust in the bore that wouldn't have honed out) and putting a rebuild kit in the air pack for good measure.
It's probably worth checking in that reservoir once in a while even if you have a remote reservoir like I do. I drained and refilled the entire brake system in this truck in late 2019 when I last repacked wheel bearings and checked wheel cylinders but this stuff must have been in there the whole time. I guess it's the fun of having an older truck!
View attachment 832432
View attachment 832433
View attachment 832434
I got lucky and the air pack was in good shape inside other than a little sludge that had worked its way down from the master cylinder. All the bores were in great shape and the rebuild was easy. I got the rebuild kit from Big Mike's, and it had everything but the o-ring that goes between the two halves of the air piston. The gasket on the back of the air cylinder was a little wider than the original and needed some trimming around the 6 studs, but those are minor complaints.
Today's test drive was much less eventful!
View attachment 832435
- 114,251members
- 167,169threads
- 2,353,433posts
- 5,675online users