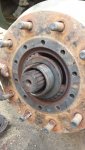
Replaced the o-rings on my power steering pump reservoir. It was just a weep, but I don't like leaks. Found an old chunk of hose in the oil pickup. I replaced the hose with a new one to be on the safe side.
View attachment 613564View attachment 613565View attachment 613566View attachment 613567
Cleaned everything up and installed a new o-ring and filter kit.
While I had the pump off I pulled the compressor unloader. I'm glad I did, It was gunked up. The unloader piston was sticking. This is what was causing my intermittent over pressure. I had about 1/8" of cooked carbon. I forgot to take pics. Sorry. I went ahead an installed a new rebuild kit with new gaskets and o-rings.
All back together, and it worked like a charm.
For those who want to check the unloader. On the 8.3l you can just take off the from air inlet (two bolts and a hose clamp)
you can look right into the chamber and see if it has carbon build up. You could even go one step further, and disconnect the air line at the top.(one from the governor) Then you could apply a little compressed air to the fitting and see if the valve goes up and down.
To pull the top of the head, you do not need to drain the coolant. It is in four parts. Starting from bottom to top. Compressor, coolant chamber, unloader chamber, and then the unloader. (Not the technical terms

) but you get the idea.
You will loosen the two bolts on the round unloader.(this helps get clearance for the spring) Then remove the 4 bolts holding the top chambers together. The bolts in the back are hard to grab. Although there is room to pull them up and out behind the IP. More then likely the top chamber will pop right up leaving the coolant chamber on the compressor. The spring in the middle of the unloader piston will need to be pushed up a little to clear the chamber. I would look at the TM so you can get an idea how the parts look.