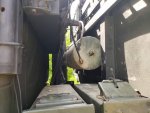
Started the long job of changing out the spring brake diaphragms. Not a fun day

. Started at Napa and of course they don't have size 16. But Whetford's down the street had them. Bought four of them and a brand new American caging bolt and nut. Off to the truck (an hour away in the mountains).
I started with the drivers side one at the far back as it had easy access and I wanted to learn my skills with a minimum of wriggling out from under the truck for another tool, bottle of water etc. First issue. the brand new caging bolt while looking exactly like the ones in the cans would not engage the hole in the spring plate. I wasn't going to do anything with it unless the caging bolt went in just like all the ones you see in the videos or for that matter like all of mine did when I initially caged the spring brakes.
I inspected the ones from the cans and there is no corrosion on them, the tangs look great. So I caged the first one and gently started removing the clamp. Voila! No surprises and no shrapnel. Pulled the diaphragm out for inspection - tons of tiny cracks and dry. This part was good as it pretty well confirms where the air was going when the hand brakes is released.
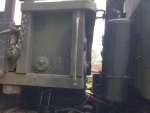
No matter what I did, I couldn't get the chamber and the diaphragm to all line up on the piggyback housing. I used small amounts of soap and water to wet the ouster edges, no go. Rggggg. My biggest concern here was the chance of getting careless with the spring chamber, so I stopped.
Then I got the bright idea to take the piggyback chamber off of the service brake. That went smoothly. One i did that the next battle was with the spring loaded plunger that goes between the two chambers. It was what was causing me all the grief trying to line everything up. So I took the piggyback body and depressed that plunger against its spring fully and locked it there with an improvised tool. Now it was cake to put the chamber and spring back onto the piggyback body! Even the clamp went on with no fuss.
But that was the end of the success. There was no way that the old service brake diaphragm was going back in. 1) it had cracks too so what would be the point? 2) it had deformed over the years to where it just was not going to go back together.
So that was it for the day. I learned some things...
1) the service brake diaphragms are NOT #12 as documented here, they are #10, at least on my truck.
2) Now I have developed my technique, I believe the rest will go much better, once I get the right parts.
3) The parts are dirt cheap, diaphragms less than four bucks each. Saves some serious coin not having to replace the four piggybacks.
4) While you are doing this job, do all of the diaphragms!
5) It would be very easy to get careless handling the spring chamber, don't!

") . Im spoiled by my daily drivers, so I would like bi-level automatic control (why not?). Perhaps if V/A doesn't support 24V systems a change to a dual output alternator is in order. I do have the under-seat option as the batteries have been relocated to the toolbox already. But I would really prefer an integrated heat/defrost/air automated solution.
. Im spoiled by my daily drivers, so I would like bi-level automatic control (why not?). Perhaps if V/A doesn't support 24V systems a change to a dual output alternator is in order. I do have the under-seat option as the batteries have been relocated to the toolbox already. But I would really prefer an integrated heat/defrost/air automated solution.