• Steel Soldiers now has a few new forums, read more about it at: New Munitions Forums!

  • Microsoft MSN, Live, Hotmail, Outlook email users may not be receiving emails. We are working to resolve this issue. Please add support@steelsoldiers.com to your trusted contacts.

What have you done to your CUCV today/lately - Part 2

Mainsail

Well-known member
Steel Soldiers Supporter
1,502
1,677
113
Location
Puget Sound, WA
I've spent almost the entire sunny summer building a shed in the backyard (note to self: a PLAN makes the process easier and faster) so today I decided to play hooky from chores and take the wife out to the mountains.

I had two guns that needed shooting and/or sighting-in, so we drove up to the Olys to get that done. It's a beautiful drive, steep and rutted in places but wonderful nevertheless. I heard a SOTA call when I was down on Highway 101 from someone at the top of Mt Zion so I gave him his contact and let him know I would be passing the trailhead in an hour or less.

Got some shooting in and the M1009 was as trouble free as always. I put a Vortex Venom red-dot on my Volqs/TacSol Ruger MK4; so that needed sighting-in, and finally got to shoot my new (to me) police trade-in Colt HBAR AR-15A2.
 

Attachments

Bighorn

New member
445
8
0
Location
N/A
Replaced rear u-joint M1009.
The GM factory u-joints in the M1009 are 3R and glued into the end yokes and slip yoke.
After inspecting my driveshafts by blocking the wheels and putting the truck in neutral with the parking brake released, I found play in the rear u-joint of the rear driveshaft.
It is actually quite common for rear u-joints to go first since they get the worst of the moisture.
I pulled the driveshaft.
View attachment 700942

By moving the front slip yoke, I can tell it still moves freely and there is no play.
The rear u-joint was rough and removal of the caps showed a dried up rusty mess.
View attachment 700943

Not to fear; the moment has been prepared for.
I had a brand new Spicer 5-795 3R replacement u-joint in hand.
I'm crazy like that.
View attachment 700945

When I worked in a driveline service shop we had big arbor presses and those factory glued 3R ujoints would pop out with a pull of the handle and a loud bang.
Well now I am a mechanic on a mountaintop sans arbor press.

Here is what you do.
Carefully heat JUST THE CAP of the old u-joint with a plumbers torch.
DO NOT heat the yoke or tubing.
Have the cross set in between the jaws of a vice and keep a hammer ready.
You are going to need to be very careful doing this so as not to strike the tubing, just the yoke right below the u-joint.

View attachment 700949
When you see the glue just starting to bubble out between the cap and end yoke (notice right hand side of cap in picture),
quickly put the torch down and accurately strike the ear of the cast end yoke just below the u-joint cap...
View attachment 700950

Repeat for the other side.

View attachment 700952
View attachment 700953
Yep, that chaps had it.
View attachment 700954
Now you debur the inside of the end yoke; just take the minimum out to clean it up for the c-clip.

View attachment 700955
ready for a 3R inside clip u-joint.
Now the new caps are going to have to be tapped in with a hammer or alternately pressed in using sockets and a vice but my peewee vice couldn't open wide enough so hammer time!

Carefully place a cap into the end yoke hole and insert the cross and hold it up into the cap with one hand while you tap the cap into place.
Just enough to seat the c-clip.
View attachment 700956

Now turn the shaft over and you will need to "float" the cross between the installed cap and the remaining cap so that when you hit the cap you don't drop the needle bearings inside either cap.

View attachment 700957

Now tap that baby home and insert the last clip.
The last step is to tap either ear of the end yoke lightly to "center" the u-joint.
When you are done the u-joint will move freely in the end yoke.

Some problems you may have and their solutions;
If one or more u-joint caps spins in the end yoke and has no press you can; Heat the metal around the eye of the end yoke to cherry red and let it cool naturally.
This will shrink the eye slightly and restore the press fit.
It is however, a stop gap measure and almost certainly decreases the durability of the end yoke.. but we did it all the time at the driveline shop for customers on a budget and not a single one of those shafts ever came back broken.

If you are removing the slip yoke from the drive shaft to change the u-joint MARK THE ORIENTATION OF THE YOKE AND SHAFT BEFORE YOU BEGIN!
If the factory balance was still good, there is no reason you cannot replace all the u-joints in a shaft and still have a reasonable balance.
It doesn't always work this way.
If you use sub standard "GMB" or el cheapo brand u-joints you will very likely need to have the whole driveshaft rebalanced.

Well, that's about it.

View attachment 700958
I will replace the front u-joint when I rebuild the transfer case next week.

Post Script:
GM used these glued in u-joint caps in the 80's.
BE WARNED, THERE BE DRAGONS!
I know this is a military vehicle specific website, but I must warn you who would work on driveshafts of the danger of GM products elsewhere.
CADILLAC.
There were some Cadillac driveshafts featuring double Cardan headed driveshafts that were UN-MACHINED for replacement 3R u-joints. BMW did it too.
But the long and short is; IF YOU DON'T SEE A FLAT FOR THE C-CLIP OF YOUR REPLACEMENT U-JOINT TO SIT.. it is because it ain't there.
ALL CUCV M1009 and K5 Blazer driveshafts are machined to accept replacement u-joints.
Only some Cadillacs are not.
It is terrifying to see the un-machined.. rough cast surface..
GOD have mercy upon your beautiful 80's Cady driving soul if your driveshaft gives up the ghost in Meeteetsee Wyoming.
Your only option is to find two H-yokes from a Chevy vehicle that are machined to accept c-clip u-joints..
Nearly impossible.
I just don't want some far future Cadillac enthusiast to tear his driveshaft apart and discover this after the fact.
Carry on Happily.
Don't be scared Humans.
 
Last edited:

DREDnot

Well-known member
723
443
63
Location
Phoenix, AZ
Finally a nice day. Less than triple digits.
Got a lot done.
New belts.
New hoses.
New thermostat.
New fan clutch.
New fuel filter.
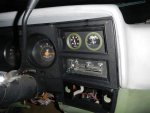
Re-mounted the PO installed mechanical temperature gauge from under the dash to a new plate in the dash with the Gen gauge.
Cleaned the idiot light plasticos.
Fixed the geeking turn signal/brake light.
Final adjustment to the shift vacuum switch.

Now I can safely drive across town to my buddy's shop to use his lift to do the motor mounts next week.

I am concerned, however, that the gen gauge continues to read even though the ignition is turned off.:???:
I don't remember if it was like that before I took the dash apart. Hope it doesn't kill the batteries.

DSCN2084.jpg
 
Last edited:

Bighorn

New member
445
8
0
Location
N/A
If the key is off and you pull the final ground wire (the one to the frame, body, etc, set your multi meter to 50 volts.
You should read 0 or very nearly that when you touch the battery wire disconnected from it's termial and the other lead to ground.
The other test is called a voltage drop test.
Connect your volt meter positive lead to the main positive lead in your system (aka going to starter bendix BIG WIRE)
Connect negative terminal to ground of batteries that has a wire connecting to frame, body etc.
Set meter to 50 volts (because your system is 24 volts and most meters are 12 volt, 50 volt, 200 volt dc etc.)
KEY IS OFF.
Now it gets interesting, Nothing should happen if your loosen the positive or negative battery terminal connections and lift them off while keeping the meter on the battery terminal.
Doesn't matter which.
If you see a voltage drop, you have a draw somewhere.
Find it.
 

DREDnot

Well-known member
723
443
63
Location
Phoenix, AZ
It seems that adding the mechanical temp gauge to the same plate that the GEN gauge is in grounds the plate with the capillary tube to the engine block causing the GEN gauge to come alive. When I remove the temp gauge from touching the plate, the GEN gauge turns off. I wonder if that means that there is an internal fault in the GEN gauge? It works properly, otherwise. I may just have to insulate the GEN gauge's body from grounding to the mounting plate.
 

computer54

Member
317
1
18
Location
Nashville,TN
It seems that adding the mechanical temp gauge to the same plate that the GEN gauge is in grounds the plate with the capillary tube to the engine block causing the GEN gauge to come alive. When I remove the temp gauge from touching the plate, the GEN gauge turns off. I wonder if that means that there is an internal fault in the GEN gauge? It works properly, otherwise. I may just have to insulate the GEN gauge's body from grounding to the mounting plate.
That is what you have to do because it's grounding out buy the gauge case.
 

joshuak

Active member
747
214
43
Location
Slower shore, DE
Surface rust had developed on my inner fenders and had been bothering me for a while, so I did something about it. I did I find some rot, buts its not there anymore.

IMG_2441.jpg IMG_2444.jpg IMG_2449.jpg IMG_2458.jpg IMG_2460.jpg

Also removed and cleaned the coolant overflow bottle.

IMG_2443.jpgIMG_2452.jpg
 

Hillwalker

New member
6
2
0
Location
Schoharie/NY
Wow, what a weekend. I feel like I got run over repeatedly by my truck. BUT, it was well worth the pain!

I finally got around to finishing up my 4 inch lift. I did a shackle flip in the rear and a set of new SkyJacker springs in the front. I also did a new greasable shackle in front, steering box brace, swaybar quick disconnect, DRZ front differential cover, 4 new tough country shocks, leaf wedges to correct the pinion angle, and new body bushings.

What a difference! I had already done a custom turbo install. This was like icing on the cake.

It drives up a tree stump pretty well. Glad I did the lift this way. Drives very smooth and has lots of travel. Time for the dirt and mud testing! (My favorite part)stumpedd.jpg
 

cucvrus

Well-known member
11,473
10,434
113
Location
Jonestown Pennsylvania
Flex.jpghard stuff.jpgnot broke yet.jpgstress.jpgTerminus.jpgCome on down to Rausch Creek and run the course with us. October 21, 2017 we are having a little get together for some 4 wheeling and hill climbing. Some real nice flex holes and rocks to climb over.
 

cucvrus

Well-known member
11,473
10,434
113
Location
Jonestown Pennsylvania
Ahhh
Nothing like a day 4 wheeling to break down and/or tear something up!!
Hasn't happened yet. I think I have 4 trips to Rausch Creek, Many more to the power lines, And a trip to trucks gone wild. outside of routine maintenance and fixing the standard issues associated with 34 year old vehicle. Like the Ever-ready bunny still going. Life is a highway I want to ride it all night long. Terminus M1009 was being used for what it was made for. And if it were not for me it would be a Toyota or a refrigerator. 2 vehicle rows away from the crusher when I found it. Had it not been for the snow plow it would be gone.
 
Top
AdBlock Detected

We get it, advertisements are annoying!

Sure, ad-blocking software does a great job at blocking ads, but it also blocks useful features of our website like our supporting vendors. Their ads help keep Steel Soldiers going. Please consider disabling your ad blockers for the site. Thanks!

I've Disabled AdBlock
No Thanks