Elohim1
New member
- 108
- 0
- 0
- Location
- Oxford, Ohio
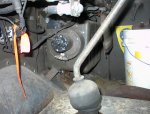
Where do you install the hoses on the block ? Looks like one goes just behind the top radiator hose, was wandering where the other went ?
Thanks
Chris
Thanks
Chris
Steel Soldiers now has a few new forums, read more about it at: New Munitions Forums!


I've submitted the heater page as I saved it this spring to be reconstituted or put in the Technical Article section. Now if I could only get off of my butt and put the stupid thing into my truck.hey all, so the heater is finally installed and fully operational! Hooray! Got a little messy and I hit a few bumps I wasn't expecting last night getting those petcocks on. I decided to take the suggestions of the ever helpful Joe Young and compile them, with a few amendments of steps I found helpful or necessary (my writing is in red):
1. Of course the heater is only 90% correct, it's designed for the gassers
with an inner fender. (you are responsible for a heater assembly mount, refer to the TM or my pics of the custom one in this thread)
2. Buy 5/8" heater hose, it's cheap. (you'll need about 4', and use the long hose that came with the kit)
3. DO NOT use the gas engine thermostat supplied. (you won't need to mess with your thermostat at all)
4. You will need a 3/4"x1/2" bushing. (you will also need a 1/2">3/8" bushing to adapt the petcock to the 3/4" bushing, then to the water pump, or find a 3/4">3/8" bushing to eliminate the middle one. These are NPT thread)
5. Install one petcock on the manifold, behind the thermostat housing. (sideways, facing toward the sky)
You might have to drain some coolant (I actually drained 2 gallons out of the thermostat housing area before I realized it would not stop flowing. So, work fast by removing the plug and immediately putting the petcock/bushing combo in the hole to stop the flow, same goes for the water pump plug) and heat the area (don't go crazy) (I had to heat both plugs to remove them, they were frozen in there)
around a plug in order to get the plug out. (You will also need to unbolt the alternator adjuster bolt, pull it in, remove the two belts, then pry it ALL THE WAY out so you can get the bushing/petcock in the water pump hole. Do this before you undo the plug or you're gonna have a BIG mess on your hands. You will also need the alternator out of the way to unscrew the petcock to allow fluid to reach the core. DON'T FORGET TO UNSCREW BOTH OF THEM!)
6. Install other petcock in the 3/4" hole above alternator (on water pump
housing)
7. Locate the cable assembly under and to the left of the instrument panel (I actually found that since the defroster cable was SO short, and the gear shift hit the knobs when in reverse, 2nd, and 5th, I had to mount it to the right of the shifter under the gauge cluster)
8. I usually mount the switch to the left of the steering column and mount the
circuit breaker behind the dash, just above it (tight fit)
9. Mount the deflector high enough above the trans tunnel so you don't have
to drill through several layers. (I reused one previous hole with a nut welded to it, and drilled three new ones)
10. Place the heater mounting plates so the heater duct intake will sit about
13" from the firewall.
11. Mount the heater as close (within 1/2") of the injector lines as you can.
This will help stop the side panel from bulging out when you close it.
12. Mount the resistor on the firewall, under the hood.
13. remove the glove box and instrument panel to access the defroster
duct connections.
14. There's one heater mounting leg I have to cut so that I can lower the
heater about 1/2" - 3/4", making room for softer curves of the h.w. hoses. (it interferes with the blower housing if not cut)
15. DO NOT just empty bags of nuts and bolts out of their bags. You will
find 1/4" nuts mixed in with 1/8" screws in the bags. Take out ONLY the
part number called for, leave the rest and the label in the bag.
16. Run the "hot" wire from the circuit breaker to the center post on the
switch. (the hot wire comes off the horn circuit- it splices in-line with supplied wiring to the horn circuit breaker on the firewall in the engine compartment, then leads into the "y" connector, then to the heater circuit breaker, to the switch. Run the blower power wire to the top or bottom post on the switch. Run the resistor wires, one to the top post of the switch, the other to the bottom.)
17. When you screw the adapter to the heater, be careful, the screws
strip out the soft metal easily.
18. Even though the duct clamps are way too long for the duct from heater
to firewall, use them anyway. Cut them down after you are finishing up.
19. Wire tie the hoses to the engine's front lifting loop.
I think that you'll be able to hop the rest of the obstacles o.k.
thanks to Joe Young for the helpful tips, made it SO much easier!


")
We get it, advertisements are annoying!
Sure, ad-blocking software does a great job at blocking ads, but it also blocks useful features of our website like our supporting vendors. Their ads help keep Steel Soldiers going. Please consider disabling your ad blockers for the site. Thanks!