• Steel Soldiers now has a few new forums, read more about it at: New Munitions Forums!

  • Microsoft MSN, Live, Hotmail, Outlook email users may not be receiving emails. We are working to resolve this issue. Please add support@steelsoldiers.com to your trusted contacts.

Work on the baby HEMTT grinds to a start.

Stalwart

Well-known member
1,739
33
48
Location
Redmond, WA
There is no doubt about it, Leonard is a crafty bugger :wink: I have quite a bit of his handy work here, on and yet to be added to the HEMTT. All his metal work I've seen to date looks like factory, production stuff. Yes, he's that good!:-D
 

M813rc

Well-known member
Steel Soldiers Supporter
4,067
2,744
113
Location
Near Austin, Texas
Bjorn,
However, if the crease is too aesthetically offensive to overlook, I can always call them "pre-crumple safety creases"-- like the newer car bodies have.
We could insist that the creases are there in case of a head-on collision so that an impact to the black out light isn't transmitted to the vehicle's interior-- thereby causing grievious bodily injury to the occupants.
It is nice to know that you take both aesthetics and well thought out safety engineering into account on even minor parts. The thought of a non-crumpling B/O light mount hurtling toward the unfortunate denizens of your vehicle is too horrifying to contemplate! :p

It is nice to see things previously discussed as concepts now taking tangible form on the vehicle. It all looks 'right'. Once again, I bow respectfully in your general direction.

Cheers
 

Seatyger

Member
138
0
16
Location
Ontario
I cant keep away from this thread.......your killing me with this project LOL. My boys have started reading through Steel Soldiers and repeatedly remind me how you're working on your truck outside in your driveway!!

I tell them I'm holding out for a heated shop this winter.......(They in turn, have started putting paperbags over their heads and mumble...'Oh Father, were so ashamed'...)

Appreciate your time and effort in detailing this project.

Jim
 

Jones

Well-known member
2,237
83
48
Location
Sacramento, California
Thanks Jim,
Glad I can inspire.
I often think my only purpose in life is to serve as an example to others.

As for your boys... at least yours don't make you walk backwards whenever you go somewhere. (That's so they can claim they were just passing you in the hall, not that you were together).
 

maddawg308

Well-known member
Steel Soldiers Supporter
10,854
729
113
Location
Front Royal, VA
Hey Jones, any more updates on the baby HEMTT? I know you're nearing the end of the battle, we just are excited to see any updates on your ride....
 

Jones

Well-known member
2,237
83
48
Location
Sacramento, California
Hello Mike,

I'm all but completely healed from my set-to with a sheet of 1/2" steel plate and back in the saddle.

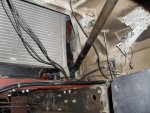
Ordered Morse cables for the throttle, shift and t-case controls. Wiring harnesses are complete but need to be installed and connected to lights, engine controls and etc.

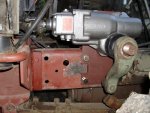
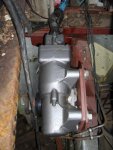
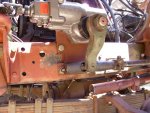
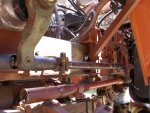
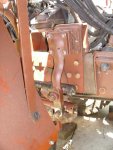
Ended up having a custom steering box built. Expensive but it gets rid of the Rube Goldberg linkage of aux. pitman arm, extra drag links and a 1:1 reversing gearbox just to get the rotation right.
It's basically an early Mack COE box but with reverse worm and sector inside; with a hydraulic valve body on it to tell the assist ram on the pass. side what to do.
The steering shaft comes in from the front, not the rear, on the baby HEMTT and while it turns the correct direction; if you try to flip a conventional steering box, it reverses the action from that of the steering wheel... turn the steering wheel to the left and the baby HEMTT would have headed to the right.
Although driving it like that would have been a safety nightmare, the theft deterrant value could have been immeasurable.

Crane is still in need of new lines and limit switches but that won't keep the baby HEMTT off the road.

Once the truck is running and road-worthy, it goes to the paint shop for a new coat of CARC 383 green. Haven't decided yet on the black shadow patches and the earth-tone.
All one color instead of the dalmation-look; a combination of primer red and old camo should make a world of difference.

I want the baby HEMTT to make Tower Park next year inder it's own power.
 

Stretch44875

Super Jr. Moderator
Super Moderator
Steel Soldiers Supporter
2,958
28
48
Location
Tiro, Ohio
It's been a long journey, bet you are excited to see the end in sight. Heck, I'm excited and it's not my truck.
 

Stalwart

Well-known member
1,739
33
48
Location
Redmond, WA
During our visit to the Jones family, I had my wife play "Japanese Tourist". She took tons of photos of both "Baby" and Leonard's children. His attention to detail is AMAZING. The front engine mount does as I recall triple duty, mounting engine, radiator and rear cab mount. It looks to be a totaly factory engineered part. The LED back/surface lighting of the switch panel is clean and tidy. Hopefull our plans to bring our HEMTT to Tower Park next year will give him the incentive to get it on the road. Two HEMTT's at tower park would be cool. From the rear it looks like the real/big HEMTT, as you walk around however and see his attention to detail you could see Oshkosh actually building this truck. It is really that good!
 

Jones

Well-known member
2,237
83
48
Location
Sacramento, California
Thanks for the good words, Sean.

Got the mounting bracket pieces for the new, correct steering box fabbed out and ready to be welded together.
The steering box will end up back by the transmission and controlled by a steering shaft that runs along the frame through pillow blocks. Same idea Oshkosh uses for the rear (fifth axle) steering box on the PLS's.

Mounting brackets for the Morse cables that control trans, t-case and throttle are waiting for a coat of paint and primer then they'll be installed and the cables attached and adjusted.
Last of the hydraulic delivery and return lines are done and mounting brackets to carry hydraulic lines for the crane and transmission cooler are in the works.

Last big job at this point is finishing up the wiring harnesses and getting them run. I've gone with the all black mil. spec. wiring and metal number tags that follow the correct M-series circuit numbers; even to the correct pin position in any quick disconnects I use. Water-proof rubber connectors and cannon (amphenol) plugs will keep everything simple and straight-forward-- and easy to work on.

Once the truck is on the road, it can be moved to whatever specialty shop it needs to visit for attention; i.e. getting the crane fully functional, a paint job, etc.
 
That is one cool wippersnapper of a HEMTT.
Hmmm...
So now I might have an idea with what to do with the Detroit 8V92TA I'm trying to sell on ebay. Somebody offered me $4500 for it last week, and now I'm kind of glad to turn them down. I just wonder about the steering and that 4100# V8 getting in the way of that.
 

Jones

Well-known member
2,237
83
48
Location
Sacramento, California
I have to admit that building the baby HEMTT isn't a project for the faint-of-heart-- or someone in full control of their faculties.
There are times I've wondered just where my head was at when I started this job.

Lots and lots of design and engineering to get stuff stuffed into a shorter length, smaller vehicle.
Deuce frame vs. HEMTT gives you a vehicle that's close to half the original length, and a crash course in compression and conservation of space.

And just once, I'd like to heft a part that weighs less than I do.

Ahhh, the joys of retirement and having spare time on one's hands.
 

Jones

Well-known member
2,237
83
48
Location
Sacramento, California
Yeah Sean,

It definately keeps me off the streets at night... or when I do hit the streets, I'm too tired to get into any trouble.
And when it's done, I'll have something to show for my time and money instead of a hangover and a bunch of valet parking receipts from the local lap dance emporium.
 

Jones

Well-known member
2,237
83
48
Location
Sacramento, California
Well, the baby HEMTT and I hit a little milestone.
Got the correct rotation, correct orientation, correct valving for the pass. side steering assist ram, steering box mounted.
I was able to reuse one mounting bracket, had to make up a new reinforcing bracket to get the box plastered to the side of the frame. Played mix-and-match with the down shaft and got the steering wheel connected to the box.
Now I'm building drag links to get everything connected to the steerning arm on the axle.
Here are a few pictures of the box, mounted and connected. More to come when I get the drag links built and installed.
 

Attachments

Jones

Well-known member
2,237
83
48
Location
Sacramento, California
Steering is in and complete with the exception of dust boots for the ends of the drag links.
Check one more task off the list.

The box is a custom unit that has reverse orientation (shaft comes in at front); and the shaft turns the opposite direction (a conventional box, if flipped over, would steer right when the steering wheel was turned to the left. The box is 6 turns lock to lock so steering shouldn't be so sensitive that it's all over the road.
It wasn't cheap, but it's one of those one-time purchases. If it ever needs rebuilding, repair parts are all off-the-shelf items.

To get everything to work; steering drag link goes to a secondary Pitman arm because of the box's location almost directly over the axle.
That Pitman arm mounts on a flanged shaft that rides in two big pillow blocks.
The lower drag link goes from the secondary to the steering arm on the front axle.
 

Attachments

Top
AdBlock Detected

We get it, advertisements are annoying!

Sure, ad-blocking software does a great job at blocking ads, but it also blocks useful features of our website like our supporting vendors. Their ads help keep Steel Soldiers going. Please consider disabling your ad blockers for the site. Thanks!

I've Disabled AdBlock
No Thanks