• Steel Soldiers now has a few new forums, read more about it at: New Munitions Forums!

  • Microsoft MSN, Live, Hotmail, Outlook email users may not be receiving emails. We are working to resolve this issue. Please add support@steelsoldiers.com to your trusted contacts.

Working on the M1078 LMTV

Oxyacetylene

Active member
Steel Soldiers Supporter
518
179
43
Location
Stoneville, NC
Both the early and late bows (1st and 2nd generation) simply slide into holes on the top of the bed sides. You have to decide if you want 1G or 2G bows. The 1G are not economical to ship even motor freight, the bows are huge (8'x6'). In Texas, Red River Parts (New Boston) has those in stock so you can go there and get some in person. The 2G bows break completely down and are UPSable. See ebay etc. I am starting to think the 2G bow kits for the 5 ton M1083 MTV can be modified for the LMTV. Just cut down the stringers.
My truck has this "2nd gen" frame setup. Unfortunately a couple of the horizontal poles are very rusted in a few spots. The straps that secure the cover to the frame at the top will also hold moisture, and couple that with movement rubbing the paint, and now you have rusty spots. A few of the rectangular steel pieces that the straps thread through to secure are also rusted on mine. One day I plan to replace at least some of the horizontal poles with aluminum or stainless steel. At least my cargo cover doesn't have any holes :) My cargo cover does however collect water and sag. For now I have alleviated that by using strips of thin plywood that span from side to side, and go over the center rib. It hold the cover up so water drains. I'm not sure the 2nd gen frame kits came with the flat metal strips to help with this, or if they did then mine were missing.
 

coachgeo

Well-known member
5,063
3,392
113
Location
North of Cincy OH
Just an FYI... There is an alternative to the standard cover. It's a pop up hard shell box (not intended for people to be inside) that lowers to cab height? and raisable for taller cargo. It fits one of the Trailers that goes with the FMTV too. There is specific Tie down kit as well. That's all I know about them. No idea if their any good, will last forever (or not) ... just know the exist.
Screenshot from 2016-06-03 13:08:42.jpgCargoCoverDataPlate.jpg
 

mkcoen

Well-known member
Steel Soldiers Supporter
5,637
381
83
Location
Spring Branch, TX
Just an FYI... There is an alternative to the standard cover. It's a pop up hard shell box (not intended for people to be inside) that lowers to cab height? and raisable for taller cargo. It fits one of the Trailers that goes with the FMTV too. There is specific Tie down kit as well. That's all I know about them. No idea if their any good, will last forever (or not) ... just know the exist.
Yeh I'm thinking a standard cargo cover will be a lot cheaper and weigh a lot less.
 

mkcoen

Well-known member
Steel Soldiers Supporter
5,637
381
83
Location
Spring Branch, TX
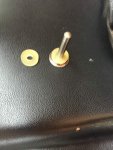
The trade term for this is a "button clip" and they are commonly available if you need replacements.
Thanks I did not know that. However, doing a google search I found similar ones available at Home Depot called "spring clips" so I'll probably go see how they measure up in size. I'd hate to order something on line and be the wrong size.
 

Oxyacetylene

Active member
Steel Soldiers Supporter
518
179
43
Location
Stoneville, NC
Just an FYI... There is an alternative to the standard cover. It's a pop up hard shell box (not intended for people to be inside) that lowers to cab height? and raisable for taller cargo. It fits one of the Trailers that goes with the FMTV too. There is specific Tie down kit as well. That's all I know about them. No idea if their any good, will last forever (or not) ... just know the exist.
View attachment 626403View attachment 626404
That looks interesting. Maybe it could be transformed in a Hi-Lo type camper, LOL.
 

mkcoen

Well-known member
Steel Soldiers Supporter
5,637
381
83
Location
Spring Branch, TX
Finally got the pump piston bumpers in today. Annoying to have to wait so long for something so insignificant but want to do things right. Now, unfortunately, I need someone with the hand strength and muscle coordination to be able to compress the spring enough that I can put it back together. I was hoping to use my vise but the throat isn't deep enough (okay I can hear the "that's what...said" jokes from here). I'm trying to catch Keith_J in one of his rare moments when he can lend a hand. Might not be for a couple of days though.

IMG_4241.jpgIMG_4243.jpg
 

Another Ahab

Well-known member
17,849
4,211
113
Location
Alexandria, VA
Finally got the pump piston bumpers in today. Annoying to have to wait so long for something so insignificant but want to do things right. Now, unfortunately, I need someone with the hand strength and muscle coordination to be able to compress the spring enough that I can put it back together. I was hoping to use my vise but the throat isn't deep enough (okay I can hear the "that's what...said" jokes from here). I'm trying to catch Keith_J in one of his rare moments when he can lend a hand. Might not be for a couple of days though.
There is such a thing as a "spring compression" tool, and I don't think they're too costly.

I don't know that it'd help your situation, but if I can find one I'll post it up here. Going to do a little checking right now...
 

mkcoen

Well-known member
Steel Soldiers Supporter
5,637
381
83
Location
Spring Branch, TX
There is such a thing as a "spring compression" tool, and I don't think they're too costly.

I don't know that it'd help your situation, but if I can find one I'll post it up here. Going to do a little checking right now...
The spring is actually inside the pump canister and while technically you're compressing the spring you're actually pressing the canister down to it's mating section and then bolting it in place. I believe an actual "spring compression tool" hooks to the spring itself to tighten it down. That won't work as it needs to be inside the canister while being compressed.
 

Another Ahab

Well-known member
17,849
4,211
113
Location
Alexandria, VA
The spring is actually inside the pump canister and while technically you're compressing the spring you're actually pressing the canister down to it's mating section and then bolting it in place. I believe an actual "spring compression tool" hooks to the spring itself to tighten it down. That won't work as it needs to be inside the canister while being compressed.
Yes, it does.

I figured you'd already have figured it out, so knew there had to be more to it than I thought.
 

agazza2

Active member
483
31
28
Location
Ahwatukee, AZ
Or even a c-clamp and if you need to push it beyond the outside, just use a small socket in between the c-clamp and the piston outer surface. Wish I was closer to give you a hand :)
 

mkcoen

Well-known member
Steel Soldiers Supporter
5,637
381
83
Location
Spring Branch, TX
Or even a c-clamp and if you need to push it beyond the outside, just use a small socket in between the c-clamp and the piston outer surface. Wish I was closer to give you a hand :)
Thanks for the suggestion but it's about a 10" spring and about 6" of canister and 2 ends so I don't have a c-clamp that big. The vise that I was hoping to use is a full size bench vise and it's not big enough. I think it's a 2 person job with 1 pushing down on the assembly (while holding all the pieces together) to compress it and the other getting the bolts started. I'm sure others on here have done it individually but with the weakness in my hands I'm lucky to be able to push down on the spring let alone keep 3 moving sections of the assembly together without the spring taking flight.
 

mkcoen

Well-known member
Steel Soldiers Supporter
5,637
381
83
Location
Spring Branch, TX
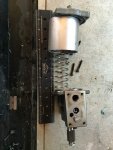
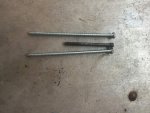
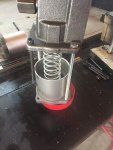
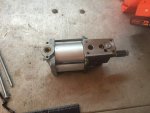
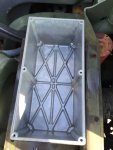
Okay I may not be the sharpest knife in the drawer but I can still cut butter. I finally figured out how to get the pump back together without a 20 mule team (sorry for those of you not old enough to know what Borax is). The first pic below shows how large the assembly is while it's still in pieces - about 14" and part of the spring is already in the canister. Since all 4 pieces tried to go in different directions while I tried compressing it I had to come up with a way to do it slowly enough to keep everything in place. Fortunately the bolts that hold the unit together are just 1/4"x20 bolts, easily obtained at Home Depot. I just got some that were a little longer (6" vs 3") and was able to get them started while the spring was only lightly compressed. Everything stayed in one spot and I slowly tightened the bolts down, alternating a few turns on each one, until everything was close enough to get 2 of the regular bolts started. I then continued tightening all 4 until it was fully compressed and simply took the 2 long bolts out and replaced them with the pump bolts. Of course I haven't got it back in the truck yet so we still need to see if it works now that it's back together. The last shot is of the reservoir. It had some water that had settled to the bottom and was pretty nasty but I got it cleaned up before things went back in.

IMG_4250.jpgIMG_4251.jpgIMG_4252.jpgIMG_4253.jpgIMG_4244.jpg
 

mkcoen

Well-known member
Steel Soldiers Supporter
5,637
381
83
Location
Spring Branch, TX
That brings back memories (even the 20 mile team). Make sure you orient the seal correctly - if it goes in easily it's the wrong way. Once you installed it it might work for two minutes and then stop. Don't panic it could be an air bubble. Or you installed the seal the wrong way or the little weep hole wasn't on top. Time for a tea .
We had replaced the u-cup 2 weeks ago and I was just waiting for the replacement bumper so I could put it back together. I followed all the directions in NDTs pump thread including marking the hoses so I knew which was which and getting the u-cup in was not easy so figured it's in right (and seated in the grove). Unfortunately we have failure to lift off. The manual pump is working fine and the cab latch button is retracting (it wasn't before the pump rebuild) but I'm getting nothing when trying the hydraulic controls. If I try lifting the cab manually I can hear escaping air but I have no Soldier B at the moment (she's at work so I can buy my toys). Once she's home I can watch the pump why she operates the manual and maybe see where the air is coming from.
 

Another Ahab

Well-known member
17,849
4,211
113
Location
Alexandria, VA
Fortunately the bolts that hold the unit together are just 1/4"x20 bolts, easily obtained at Home Depot. I just got some that were a little longer (6" vs 3") and was able to get them started while the spring was only lightly compressed. Everything stayed in one spot and I slowly tightened the bolts down, alternating a few turns on each one, until everything was close enough to get 2 of the regular bolts started.

brilliant-guinness-meme.jpg
 

mkcoen

Well-known member
Steel Soldiers Supporter
5,637
381
83
Location
Spring Branch, TX
I didn't have problems with the unit launching off. I pushed down on the cover compressing it and with my left hand threaded one of the bolts in far enough to hold it all together. Then I threaded one in on the opposite side
I don't have a lot of hand strength due to the MS so need to use alternate means for accomplishing some things.
 
Top