• Steel Soldiers now has a few new forums, read more about it at: New Munitions Forums!

  • Microsoft MSN, Live, Hotmail, Outlook email users may not be receiving emails. We are working to resolve this issue. Please add support@steelsoldiers.com to your trusted contacts.


WSUCougarx's M561 Gama Goat Acquisition and Build Thread

wsucougarx

Well-known member
6,951
64
48
Location
Washington State
Radio Check 5 x 5

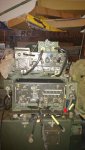
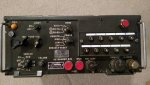
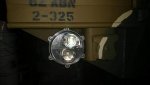
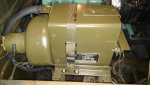
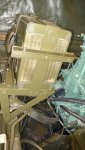
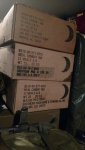
Finally got a chance to venture out into the garage to put the radio in their new home. It was a bit of a chore however. My Goat sits in the garage. Now there are positives and setbacks to this. As you all know, the garage is a great place to put all the extras and things that just no longer belong in the home. Well, out garage is just about filled to it's capacity. As a result, the Goat's carrier is now a storage unit of sorts. I spent a good part of the morning removing boxes of Christmas lights/decorations, bins of our kid's outgrown clothes, and the extra Costco purchases. Once cleared out, I was able to muscle that RT246 into place. Seems as the years go by, those VRC12 components gain weight;-).
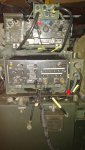
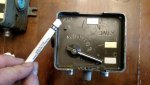
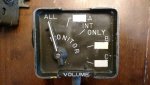
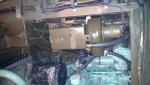
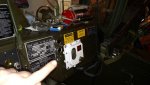
Once everything was hooked up I was able to use the PRC-77 to do a radio check on the RT-246...everything was good to go!
 

Attachments

Last edited:

wsucougarx

Well-known member
6,951
64
48
Location
Washington State
Lights at my 6

I live on a street with very minimal lighting. I typically take the Goat out on a dusk run. By the time I get home, it's dark. I've had a few close calls with my 2nd hobby (Volkswagens). So, after my 5th close call, I decided it was time to get some lighting on my six. I thought about placing the clear lens armored lights in the rear but didn't like how they mounted. Then I made a run upto JBLM's commissary. I was stopped at stoplight behind an MRAP when I noticed the lens on their back up lights. It was identical to the Goat's brake light lens configuration. Though not era correct, safety and future headaches took priority over my PURIST views.
I located the NOS MRAP reverse lights off a popular auction website for $25 each shipped out of Callifornia. I ordered a couple. After receiving the lights, my intention was to just place one light at the rear. My license plate bracket was in the way so I figured one light would be good enough. Well, my OCD kicked in. I had to have two lights:sad:. So I had to relocate the license plate mount more towards the centerline and lowered it a tad.
I'm going to put these lights on a toggle switch rather than a tranny switch. I like the ability to illuminate my rear on demand.
Project Cost:
1) Two NOS MRAP Reverse Lights $50 shipped for the pair
 

Attachments

Last edited:

wsucougarx

Well-known member
6,951
64
48
Location
Washington State
C-2298/VRC Lettering

This Goat is still a work in progress. The VIC-1 system has been up and going for about a year. One thing that has bothered me were the VIC-1 Intercommunication Control Boxes, is they were the CARC'd C-10456/VRC boxes. They also had mid-80's dating which was not consistent with the rest of the truck for my theme. I know I know just bear with me;-). So I was perusing a popular website and found these C-2298 boxes listed. I only needed four but figured since they were untested I might as well order six. I'm glad I did as two boxes were inop. I noticed that several boxes were either missing some of the white lettering compound or they were really faded or darkened. I went into my kids school supply room and grabbed a white crayon. Then I headed to the junk drawer and found an old Costco cash card to act as my scraper.
 

Attachments

Last edited:
150
12
18
Location
BNE, Oz
I located the NOS MRAP reverse lights off a popular auction website for $25 each shipped out of Callifornia. I ordered a couple. After receiving the lights, my intention was to just place one light at the rear. My license plate bracket was in the way so I figured one light would be good enough. Well, my OCD kicked in. I had to have two lights:sad:. So I had to relocate the license plate mount more towards the centerline and lowered it a tad.
Looks the goods, have been looking at the MRAP LED replacements from Truck-lite, not correct, but sorta possible as a motor pool fix.... And I think I'm going to be hit up for amber turn indicators and clear reverse to get my road plates.
 

wsucougarx

Well-known member
6,951
64
48
Location
Washington State
Hunter HW-20-2 Heater

After nearly a year after purchasing the HW-20-2 heater, she was finally given her new home. I spent the last couple days fabricating, painting, and finally mounting the main unit. It was a bit of a challenge to cut this bracket to shape. I used a military 2 stroke Husqvarna Handheld Power Cutter to shape this thing. Although crude, it did the job. Last night I finished up the bracket to get the correct angles. This morning I shot some paint to get her looking somewhat right. Got the heater unit mounted. Tested to make sure it was indeed grounded...check!
Next order of business is running some wire, mounting a switch, and trying to figure out a duct system that will minimize the amount of holes/cutting.
 

Attachments

Last edited:

wsucougarx

Well-known member
6,951
64
48
Location
Washington State
Asked and now answered.

It's one of those commonly asked questions..who made these trucks? Well here's your answer!
I was originally going to mount it inside the truck (why it's black and silver). However, I had a different idea at the last minute. When the weather cooperates, I may shoot it with Forest Green to match the rest of the MERDC theme.
 

Attachments

Last edited:

wsucougarx

Well-known member
6,951
64
48
Location
Washington State
Personal Heater...check!

Today I got a chance to route my heater duct. The install was pretty straight forward. Initially, I planned on making a divider right off the heater unit into two 2" ducts. I was going to route a duct to the driver and passenger side. Then I revelation. Why not use the existing Gama Goat vent plumbing under the dash that you installed a year ago:shrugs:
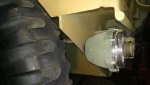
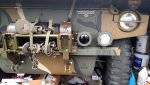
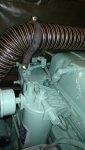
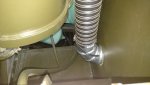
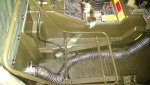
. Rather than drilling two 2" holes into the fire wall, I only had to drill one 3 1/4" hole on the passenger side. I fashioned a duct clamp out of two clamps to help clear the engine. I didn't want the duct to lay across the top of the motor. The duct enters the cab via 90 degree duct elbow I bought at Home Depot. I looked all over my garage for a military solution for the elbow but didn't locate anything. The duct runs under the passenger seat on upto a 3" to 4" silicone adapter. The adapter is a civilian turbo intercooler adapter.
The switch is an M151A2 heater switch minus the Lo setting. So the switch is wired Hi-Off-Hi. I may or may not add the capacitor in the future for the Lo setting but highly doubt it. As all you Goat owners know, the cab isn't exactly air tight and has a couple gaps open to the outside air. So if you need heat, then you're going to need heat.
15556
 

Attachments

Last edited:

SgtMajHarper

Well-known member
297
574
93
Location
Falcon, CO
Again I have spent a lot of time going over yours and other posts to help me thru the head scratching ides I have for getting my Goat "cherried out". I'm one of those guys where a picture usually does more for me that a thousand words. Your last picture showing the switch location is another example of this. My interest is in the two chrome plated push / pull knobs located just above the on / off switch. My M38 heater also came with two push / pulls....one is long and one is short. I am planning on using one of them to operate the issue heater / defroster diverter box that mounts under the dash, but that is a single push / pull for either heat or defrost. So my question is.....what does the second one do? Or should I read more instead of just look at nice pictures?
 

SgtMajHarper

Well-known member
297
574
93
Location
Falcon, CO
One last comment for now......is your Leprechaun octopus that you have to use to work down low under the dash and in the very roomy drivers compartment available for outside work? Obviously a full sized grown man cannot contort himself inside out while standing on his head and one foot wrapped around his neck to reach everything and see and use tools without some kind of magic involved.
 

wsucougarx

Well-known member
6,951
64
48
Location
Washington State
Again I have spent a lot of time going over yours and other posts to help me thru the head scratching ides I have for getting my Goat "cherried out". I'm one of those guys where a picture usually does more for me that a thousand words. Your last picture showing the switch location is another example of this. My interest is in the two chrome plated push / pull knobs located just above the on / off switch. My M38 heater also came with two push / pulls....one is long and one is short. I am planning on using one of them to operate the issue heater / defroster diverter box that mounts under the dash, but that is a single push / pull for either heat or defrost. So my question is.....what does the second one do? Or should I read more instead of just look at nice pictures?
The other push/pull knob is for the air intake scoop at the front of the Goat. When I was in the dash, I added the knob to plan ahead. I was going to add a hinged cover on the intake scoop for those really cold days. That idea is still in the books.
 

wsucougarx

Well-known member
6,951
64
48
Location
Washington State
One last comment for now......is your Leprechaun octopus that you have to use to work down low under the dash and in the very roomy drivers compartment available for outside work? Obviously a full sized grown man cannot contort himself inside out while standing on his head and one foot wrapped around his neck to reach everything and see and use tools without some kind of magic involved.
Oh I hear you about contorting. What's really frustrating is getting into those position only to have a major leg cramp set in....haha. Short of removing the cumbersome doghouse, most everything under the dash is by feel. Takes about 10x longer but eventually the job gets done;-).
 

wsucougarx

Well-known member
6,951
64
48
Location
Washington State
Been awhile

Yikes, has it been since APR18 since I posted. Well, here to better late than never. Here are some pics from the July 4th Summerfest event in Centralia, WA. Early morning we gathered in Borst Park for the public to check out our MV's. Later on the afternoon, we joined up with the big parade through Centralia.
Everything went well except my Goat developed a weird shimmy followed by clunking after she made the the 60 miles drive to Centralia and again at home upon backing into my driveway. It was isolated to the middle axle and was prevalent while driving on the pavement. As soon as I drove off the pavement into the grass it went away. However, she didn't clunk or shimmy during the entire parade. I still haven't had time to troubleshoot it. Here's what I know, the issue only exists after she's warmed up and not while she's cold. Some ideas that have come up are she's going into 6x6 while warm, the posi-traction plates are grabbing (needs an additive to the pumpkin), bearings, or U-joint. Anyone else have had this issue? Sorry no audio or video of the issue.
**Pics inbound, having internet issues**
 

Attachments

Last edited:

wsucougarx

Well-known member
6,951
64
48
Location
Washington State
C-Rats...finally!!

Just when I think I have enough stuff on the Goat, I finally secured something I have been looking for two years now. This was one of those out of sight out of mind items. I would see it and want it, but as soon as I got home...forgotten. Now with my mind clearing from the busy daily grind, I was finally able to secure these three cases off ebay. Due to weight and leaking cans, I secured two empty boxes in good shape and one full box for static display. Not sure where I'm going to secure these boxes but for now, they're on the engine cover. I paid $16 for the empty boxes and $50 for the full case.
 

Attachments

wsucougarx

Well-known member
6,951
64
48
Location
Washington State
Finally...carrier cushion!

One small victory at a time. That's what it seems when you find that one little part you've been waiting and waiting and waiting...well you get the point. Here is yet another small part I've been looking for. Finally found it on Ebay! It's the cushion for the carrier. I couldn't click on the BUY IT NOW fast enough when I saw her. She set me back $14.95:p
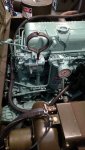
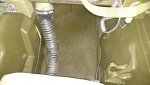
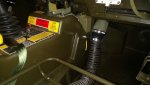
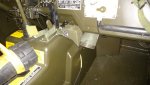
. I also found a nice little 66mm tube that went nicely on the middle console.
19,131
 

Attachments

Last edited:

CombatJack

Member
89
10
8
Location
Texas
got a photo of how that jump seat back mounts????
I actually have a jump seat in my goat ,just no cushion. Is it supposed ot have a cushion? Probably not!
 
Top
AdBlock Detected

We get it, advertisements are annoying!

Sure, ad-blocking software does a great job at blocking ads, but it also blocks useful features of our website like our supporting vendors. Their ads help keep Steel Soldiers going. Please consider disabling your ad blockers for the site. Thanks!

I've Disabled AdBlock
No Thanks