• Steel Soldiers now has a few new forums, read more about it at: New Munitions Forums!

  • Microsoft MSN, Live, Hotmail, Outlook email users may not be receiving emails. We are working to resolve this issue. Please add support@steelsoldiers.com to your trusted contacts.

What did you do to your deuce this week?

fpchief

Well-known member
Replaced the manifold coolant hoses, and the rubber hose connectors going to the oil cooler.

The manifold hoses turned out to be much more of a chore than I expected... Mainly because I didn't realize I would have to disconnect the coolant manifolds and make all new gaskets. Blah.View attachment 747153

Sent from my Moto Z (2) using Tapatalk
I admire your work...no doubt. But not a good spot to use RTV?
 

Fatalid

Member
Steel Soldiers Supporter
I admire your work...no doubt. But not a good spot to use RTV?
I wouldn't know... I don't use the stuff. If I can't buy a gasket, I make one.

Funny story though -- I had a friend in high school that had an old Ford courier pickup, and I think every part on that truck was sealed with red RTV silicone. It was leaking out of every possible joint, seam, and mating surface

Sent from my Moto Z (2) using Tapatalk
 

fpchief

Well-known member
I wouldn't know... I don't use the stuff. If I can't buy a gasket, I make one.

Funny story though -- I had a friend in high school that had an old Ford courier pickup, and I think every part on that truck was sealed with red RTV silicone. It was leaking out of every possible joint, seam, and mating surface

Sent from my Moto Z (2) using Tapatalk
He should have used the Grey Gasket maker!!!! JK.....
 

archmark

Member
Replaced the windshields & seals with NOS parts on my M185A5 and I'm thinking about replacing my vacuum wipers with a set of electrics.

After that is the side glass. I have NOS glass and frames for the sides but need all the other stuff, i.e. channels, felts, seals, etc. Does anybody know of a supplier that sells the entire kit so I don't have to piecemeal all the parts?

Finally, anybody know a supplier that sells a complete battery cable, starter, etc. set? I'd be an easy winter project to make my own, but I'm lazy!!!

Thanks...

Mark
 

cattlerepairman

Well-known member
Steel Soldiers Supporter
After soldering the wires into my trailer receptacle I now discovered I no longer have a right turn signal.....AAARRGGHH. I guess I need to bring her back around and take that darn trailer receptacle apart again. Nothing is more fun than doing things over outside in the cold. Probably a short somewhere in there...

...and turned out to be an easy fix. Shrink tubing and re-soldering a wire. Unfortunately, the short killed my brand new turn indicator switch.
 
Last edited:

fpchief

Well-known member
After soldering the wires into my trailer receptacle I now discovered I no longer have a right turn signal.....AAARRGGHH. I guess I need to bring her back around and take that darn trailer receptacle apart again. Nothing is more fun than doing things over outside in the cold. Probably a short somewhere in there...
It's 81 here.

Sent from my SM-G955U using Tapatalk
 

Menaces Nemesis

"Little Black Truck" Conservator
Steel Soldiers Supporter
Did the brake light switch upgrade that's been talked about again/recently on SS (removing the hydraulic switch from the front of the airpack, and installing an air-actuated switch to the left/air side of the airpack). I know there are already many threads about this, but the "Upgrade Kits" that have been used seem to be getting hard to come by, so I'm posting with the parts listed out for those who'd like to make their own kit (list of parts below). The outside diameter of the air line on the airpack needs to be measured before ordering parts, as the line OD determines which brass elbow needs to be purchased. Also, a person may be tempted to use a brass plug to replace the hydraulic switch... DON'T! Brass plugs tend to be hollow, and aren't capable of handling near the pressure of steel plugs (especially if one is milled a little thin on the end). So, use a STEEL plug. As far as the wiring goes, some folks would just cut the existing plug off the truck's harness, and crimp on a couple of ring terminals to slip over the air switch posts, but I like things to be more insulated and protected. The wiring parts shown are just a suggestion, and are what I used because they're what I had in the shop. The blue sleeves over the switch posts are 14-16 ga. insulated female bullet connectors, loaded with dielectric grease, and pressed onto the posts (they're not coming off without a fight). Then I just made up 2 jumper wires with insulated plugs to crimp and shrink-tube onto the bullet connectors.
Air Switch 3.jpgAir Switch 1.jpgAir Switch 2.jpg
Removed the Hydraulic switch from the front of the airpack, and replaced it with a 1/8-27 NPT Socket Head Plug. Before and after;
IMG_20181105_114419440.jpgIMG_20181105_114649135.jpg
Cut off the old electrical plug, and replaced it with connectors to match what I put on the new switch;
IMG_20181105_121050764.jpg
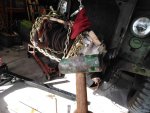
Removed the air line and fitting from the left side of the airpack, installed the new fittings, installed the new switch, and plugged it in. Before and after;
IMG_20181105_114722376.jpgIMG_20181105_121535906.jpgIMG_20181105_121755841.jpg
Reinstall the skid plate, bleed the airpack, and check for leaks at the new air fittings, and the plug on the airpack front, and it's done.
Parts list;
-If you have a 3/8 airpack line, you'll need a 3/8 Male NPT x 3/8 compression elbow
-If you have a 1/2 airpack line, you'll need a 3/8 male NPT x 1/2 compression elbow
-Haldex BE13250 Switch
-3/8 Male NPT x 3/8 Female NPT x 3/8 Female NPT "Street Tee" or "Run Tee"
-3/8 Male NPT x 1/4 Female NPT Bushing
-1/8-27 NPT Steel Plug
-Your choice of electrical hardware to connect the two wires to the
posts on the new switch
 
Last edited:

Jbulach

Well-known member
Steel Soldiers Supporter
Use caution when buying your air fittings, the elbows in those links don’t appear to be DOT fittings.
 

77 AMG

Active member
Replaced the manifold coolant hoses, and the rubber hose connectors going to the oil cooler.

The manifold hoses turned out to be much more of a chore than I expected... Mainly because I didn't realize I would have to disconnect the coolant manifolds and make all new gaskets. Blah.View attachment 747153

Sent from my Moto Z (2) using Tapatalk
What diameter are the large holes, Fatalid? I've got a rather extensive collection of shell casings in different calibers that I use for hole punches, including a few 20m/m and .50 cal. You get perfectly round holes everytime. No muss, no fuss.
 

77 AMG

Active member
I received my tow bar feet in the mail a few days ago (Shout out to Castle Bravo), and spent the last couple of days working on "re-sizing" the shackles to the proper "space" between the ears so that the keeper pins will fit through them. WOW. It's been entertaining trying to "persuade" those shackles to squish, using a 3lb hammer!
 

Jbulach

Well-known member
Steel Soldiers Supporter
Can you get longer pins? Typical shackles are made from forged, and tempered alloy’s that are meant to resist deforming. Once they are tweaked they are considered junk...
 

rustystud

Well-known member
Can you get longer pins? Typical shackles are made from forged, and tempered alloy’s that are meant to resist deforming. Once they are tweaked they are considered junk...
Just like Jbulach said, your shackles should never be forced into shape. It creates "stress fractures" in the metal which can later under stress, break. Not good.
 

whatadeuce

Active member
Steel Soldiers Supporter
Well today I chained my winch in between the two extended frame peices, oiled the sufaces and with a block of wood hammered theninto place. Dont seem to have the bolts that match the winch body , so I shall pull one from anotyher truck to serve as an example
 

Attachments

gimpyrobb

dumpsterlandingfromorbit!
The 6(12, 6 on eaach side) bolts that go through the frame ext into the winch ends are special shouldered bolts. Make sure you find the right ones. White owl had them last time I needed a set.
 

Valence

Well-known member
Steel Soldiers Supporter
Fixed my leaking speedo cable/transfer case seal, with the help of Gringeltaube's post here; https://www.steelsoldiers.com/showt...-cable-leaking&p=354570&viewfull=1#post354570

Found the needed seal (2 ea. for $8 w/free shipping) here; https://www.ebay.com/itm/2-Pack-Gen...e=STRK:MEBIDX:IT&_trksid=p2057872.m2749.l2649

First pic shows the speedo adapter and wet cable. 2nd pic shows that the bad seal allowed gear oil to leak into the adapter drive. 3rd pic shows the sleeve where the speedo adapter was mounted, and where the seal is housed on the transfer case (the little black ring on the end of the sleeve was the old seal, it was loose in the sleeve and about to fall out. New seal was tight, and had to be pressed in). 4th pic shows how HUGE the seal is (old seal on left, new seal on right),
View attachment 747129View attachment 747130View attachment 747131View attachment 747132

And I replaced my old injection pump oil lines. The one from the block to the pump was starting to leak a bit.

Tubes n' Hoses of Loveland CO. made me a new set of IP oil hoses for $19.58 total. Old vs. new hoses, and a view from underneath, of the new hoses installed;
View attachment 747127View attachment 747128
It’d be best if you could post the names and part numbers for the speedometer adapter oil seal instead of the eBay link as that eBay link will not last “forever”.

Also, I want to replace my injection pump oil lines too, but how in the world did you get wrenches on them without removing the pump from the engine block? It must be that the winch PTO shaft on my truck is the primary “problem” (aka in the way).

Nice fixes though!
 

whatadeuce

Active member
Steel Soldiers Supporter
Thank you Chris, I was begining to think I was crazy...( we both know the answer to that ! ) So its another call to George today. I love how I have used my snap on tools on this project, I torqued all the frame extention fasteners to about 200 foot pounds !
 

Attachments

AngryOregonian

New member
I'm just starting out with my M35A2 but I'm proud to say I got the stuck Parking Brake in working order by simply removing and properly lubricating all of the moving components and the cable. I have also very quickly learned that 3/8 Drive tools will not be sufficient for much longer. I LOVE IT!:-D
 

77 AMG

Active member
Just like Jbulach said, your shackles should never be forced into shape. It creates "stress fractures" in the metal which can later under stress, break. Not good.
I'm going to try and find some different shackles, actually. I got a job offer of part time work at the Surplus Store where my Deuce is actually in Lay-A-Way. I will *happily* accept that job offer! SCORE!!!!!!!!!!!
 
Top