• Steel Soldiers now has a few new forums, read more about it at: New Munitions Forums!

  • Microsoft MSN, Live, Hotmail, Outlook email users may not be receiving emails. We are working to resolve this issue. Please add support@steelsoldiers.com to your trusted contacts.


Was looking for a shop in or near Milwaukee to work on M1008; then did it all myself!

retro_life

Well-known member
243
629
93
Location
Los Angeles, California
Also, the damn alternator still squeaks after putting ~300 miles on it.

I wish the guy wouldā€™ve just addressed it when I said something when picking it upā€¦ anyway I called him and told him and he said to bring it back. Other than the noise they seem to be good though. When I start the truck the generator lights donā€™t even come on for a second. Before I got them done sometimes the generator lights would stay on until I revved the motor a little.
 

cucvrus

Well-known member
11,289
9,658
113
Location
Jonestown Pennsylvania
The Generator lights are supposed to stay on till you rev the engine a little. And as far as the rattle goes the skid plate is probably bent and making contact with the frame. Take it off carefully and straighten the little L brackets at the frame. Reassemble it with new bolts flat washers and nylock nuts. They are 5/16" bolts and it is mounted as designed it will not make contact with anything to vibrate against. I myself would never hear that slight alternator squeak. It's a CUCV. It is going to make noise. I agree you pointed it out from the beginning. Give the man a chance to fix it. Things go wrong many times. Good Luck.
 

retro_life

Well-known member
243
629
93
Location
Los Angeles, California
The Generator lights are supposed to stay on till you rev the engine a little. And as far as the rattle goes the skid plate is probably bent and making contact with the frame. Take it off carefully and straighten the little L brackets at the frame. Reassemble it with new bolts flat washers and nylock nuts. They are 5/16" bolts and it is mounted as designed it will not make contact with anything to vibrate against. I myself would never hear that slight alternator squeak. It's a CUCV. It is going to make noise. I agree you pointed it out from the beginning. Give the man a chance to fix it. Things go wrong many times. Good Luck.
Not sure what they did to the alternators but the lights are off as soon as the motor starts now. Donā€™t know if that will always happen but thatā€™s how itā€™s been since I reinstalled them.
I know the squeak isnā€™t a huge deal but Iā€™m just worried that maybe they either installed a bad bearing or didnā€™t change the bearing, and I paid good money for the work. Maybe the bearings in these alternators are an oddball size like the pulleys are? I just hope they didnā€™t reuse a bunch of the old parts and then call it ā€œoverhauledā€ because they didnā€™t have replacements or something. Also you know by now Iā€™m a little nuts when it comes to little stuff like that. Even though the cucv is loud I feel like I can hear it making noise especially since I know itā€™s there.

Thanks for the tip on the skid plate I will get under the truck later and give it a good look.
 
Last edited:

ezgn

Well-known member
Steel Soldiers Supporter
650
1,039
93
Location
Lake Elsinore Ca.
I have some left over heater hose I could try. I will mess with it and see what happens. Maybe the forklift bent it when they were in the process of destroying my driveline šŸ˜‚
I would try pushing, pulling, prying, on different areas underneath the truck and see if it changes the vibration. If that does not help then I would bust into the skid plate fix.
 

retro_life

Well-known member
243
629
93
Location
Los Angeles, California
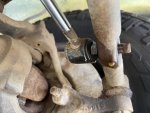
Quick question. Iā€™m about to install my new steering stabilizer and im removing the old one. I removed the castle nut but I was wondering if this bolt is also threaded through this rod, or do I just bang it out? I did try to stick a wrench on the backside of it and loosen it out but itā€™s really frozen in there. I put some PB on it, but I figured Iā€™d ask before I mess something up. Thanks
54A8EC91-8ECE-4D6C-866E-5B885D792E0B.jpeg
 
Last edited:

retro_life

Well-known member
243
629
93
Location
Los Angeles, California
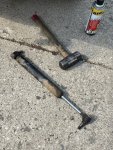
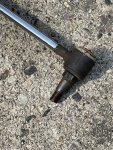
Yeah itā€™s definitely the original. Thing was frozen in there so bad that it seemed like it was permanently attached. From looking at the new hardware and realizing that itā€™s a tapered bolt I figured that it was just jammed and needed a little help from the sledge.
Thing is definitely shot, it pulls open with absolutely no resistance, but compressing it closed has some resistance.
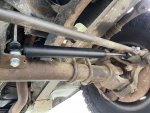
The new one has a lot of resistance going in either direction. Iā€™m sure itā€™s gonna feel night and day once I take it out on the road.


BA638CC4-ED4D-4022-AEEF-CBAB567BEFB0.jpeg
 

Mullaney

Well-known member
Steel Soldiers Supporter
Supporting Vendor
7,376
19,089
113
Location
Charlotte NC
Yeah itā€™s definitely the original. Thing was frozen in there so bad that it seemed like it was permanently attached. From looking at the new hardware and realizing that itā€™s a tapered bolt I figured that it was just jammed and needed a little help from the sledge.
Thing is definitely shot, it pulls open with absolutely no resistance, but compressing it closed has some resistance.
The new one has a lot of resistance going in either direction. Iā€™m sure itā€™s gonna feel night and day once I take it out on the road.


View attachment 840647
.
Yep. You don't need the info now, but the same tapered bolt in one end just like a tie-rod end. A swift smack on the "rounded" part where the new shiny piece goes through the tie-rod would have made it pop out too.

You will definitely feel a difference driving!
 

ezgn

Well-known member
Steel Soldiers Supporter
650
1,039
93
Location
Lake Elsinore Ca.
Yeah itā€™s definitely the original. Thing was frozen in there so bad that it seemed like it was permanently attached. From looking at the new hardware and realizing that itā€™s a tapered bolt I figured that it was just jammed and needed a little help from the sledge.
Thing is definitely shot, it pulls open with absolutely no resistance, but compressing it closed has some resistance.
The new one has a lot of resistance going in either direction. Iā€™m sure itā€™s gonna feel night and day once I take it out on the road.


View attachment 840647
Sweet!
 

retro_life

Well-known member
243
629
93
Location
Los Angeles, California
By the looks of those zirk fittings a lube job may be an easy task. Just saying!!
Found a grease gun in my brothers tools! Will go through the front end and lube everything up real good.
A4A7DEF7-C2FA-4FDA-875E-4CC19FA21755.jpeg
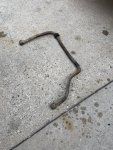
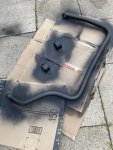
Had to use a propane torch to melt some of the rubber and get the bushings out of the sway bar. Now Iā€™m giving it a fresh coat of paint before I put it back on the truck.
53CCFF68-9744-4546-8287-48BB26BA966B.jpeg
 

cucvrus

Well-known member
11,289
9,658
113
Location
Jonestown Pennsylvania
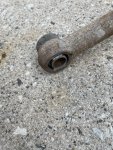
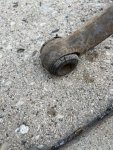
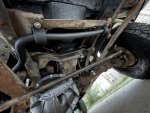
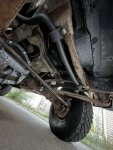
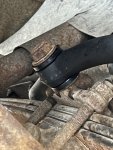
I figured since Iā€™m down there I might as well take on the sway bar bushings. I just got the bar off the truck and now Iā€™m attempting to remove the old bushings out of it.
Thanks for all the help guys.
View attachment 840650View attachment 840651View attachment 840652
I used the sawzall and cut the inner steel bushing. I also used a cutting torch a few times. that makes a huge mess but it works and I always paint everything I have apart. Looks' good.
 

retro_life

Well-known member
243
629
93
Location
Los Angeles, California
I used the sawzall and cut the inner steel bushing. I also used a cutting torch a few times. that makes a huge mess but it works and I always paint everything I have apart. Looks' good.
When my brother got home he showed me this air hammer tool heā€™s got. He said next time I could probably use it to punch the bushing right out. But this time I just did the torch method and they pulled out fairly easily. I know you mentioned you always paint the stuff you work on before, thatā€™s kinda why I started doing it too. Stole a page outta your book šŸ˜‚. I got the sway bar back on.

DF77120B-539F-4D1C-BD0E-0512DCBCAC4D.jpegF56AD6BA-9C8B-4104-9764-63DDD69A14D2.jpeg43FD3015-1CD4-479F-8531-8BD67F8FBB7D.jpeg
I got a little carried away with the grease gun and was going around town lubinā€™ everyone up when I accidentally broke a nipple off one of the zerks on the top of the axle hub.
B91E5A0D-0A6D-4643-8F47-1D92D629A80D.jpeg
Itā€™s actually the one on the other side that broke but itā€™s that same location. The nipple is stuck in the grease gun fitting too and I wasnā€™t able to pop it out. I tried Vice grips and everything. Looks like Iā€™ll need to replace the fitting on the grease gun and also replace that zerk on the axle. Do you know what type of zerk Iā€™ll need for it? Luckily it broke off after I already pumped it full of grease.
 

GunnyM1009

Well-known member
354
529
93
Location
Roanoke/Alabama
Found a grease gun in my brothers tools! Will go through the front end and lube everything up real good.
View attachment 840661
Had to use a propane torch to melt some of the rubber and get the bushings out of the sway bar. Now Iā€™m giving it a fresh coat of paint before I put it back on the truck.
View attachment 840662
The previous owner of my 09 torched the flipping sway bar off of it. I didn't even realize it till about 10,000 miles after I had it. I still have not replaced it not really sure how much of a difference it would make for me. That thing is starting to look pretty cherry.
 

ezgn

Well-known member
Steel Soldiers Supporter
650
1,039
93
Location
Lake Elsinore Ca.
When my brother got home he showed me this air hammer tool heā€™s got. He said next time I could probably use it to punch the bushing right out. But this time I just did the torch method and they pulled out fairly easily. I know you mentioned you always paint the stuff you work on before, thatā€™s kinda why I started doing it too. Stole a page outta your book šŸ˜‚. I got the sway bar back on.

View attachment 840691View attachment 840692View attachment 840693
I got a little carried away with the grease gun and was going around town lubinā€™ everyone up when I accidentally broke a nipple off one of the zerks on the top of the axle hub.
View attachment 840694
Itā€™s actually the one on the other side that broke but itā€™s that same location. The nipple is stuck in the grease gun fitting too and I wasnā€™t able to pop it out. I tried Vice grips and everything. Looks like Iā€™ll need to replace the fitting on the grease gun and also replace that zerk on the axle. Do you know what type of zerk Iā€™ll need for it? Luckily it broke off after I already pumped it full of grease.
[/Q
When my brother got home he showed me this air hammer tool heā€™s got. He said next time I could probably use it to punch the bushing right out. But this time I just did the torch method and they pulled out fairly easily. I know you mentioned you always paint the stuff you work on before, thatā€™s kinda why I started doing it too. Stole a page outta your book šŸ˜‚. I got the sway bar back on.

View attachment 840691View attachment 840692View attachment 840693
I got a little carried away with the grease gun and was going around town lubinā€™ everyone up when I accidentally broke a nipple off one of the zerks on the top of the axle hub.
View attachment 840694
Itā€™s actually the one on the other side that broke but itā€™s that same location. The nipple is stuck in the grease gun fitting too and I wasnā€™t able to pop it out. I tried Vice grips and everything. Looks like Iā€™ll need to replace the fitting on the grease gun and also replace that zerk on the axle. Do you know what type of zerk Iā€™ll need for it? Luckily it broke off after I already pumped it full of grease.
Did the bushings come with assembly lube?
 

ezgn

Well-known member
Steel Soldiers Supporter
650
1,039
93
Location
Lake Elsinore Ca.
Take about a 1/4'' drill bit and drill out as much of the rubber around the bushing as you can and then use your air hammer when you do your spring eyelets. Buy some extra assembly lube. Keep going! Now that you got the easy part done you can start on the not as easy parts. Good job, enjoying the journey. waiting for more. Like CUCVRUS said a sawzall with a metal blade will almost certainly be needed to get the metal ring out, eze peze !!
 
Last edited:
Top
AdBlock Detected

We get it, advertisements are annoying!

Sure, ad-blocking software does a great job at blocking ads, but it also blocks useful features of our website like our supporting vendors. Their ads help keep Steel Soldiers going. Please consider disabling your ad blockers for the site. Thanks!

I've Disabled AdBlock
No Thanks