• Steel Soldiers now has a few new forums, read more about it at: New Munitions Forums!

  • Microsoft MSN, Live, Hotmail, Outlook email users may not be receiving emails. We are working to resolve this issue. Please add support@steelsoldiers.com to your trusted contacts.

HELP!! installing the rebuilt IP - MEP-002A Refurb Update

LuckyDog

Member
394
11
18
Location
Freedom, NH
There are two glow plugs, I don't know if they are both used and if one is a spare that you can just switch the wire to the other one, I'm not sure.
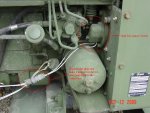
There are actually four glow plugs on the MEP-002A (Six on an 003A). All are used. The two in the head are wired in parallel and are 24 volt units. The two in the intake are wired in series and are 12 volt civilian types.

The dribble you hear returnig into the fuel tank is normal, and if it sounds like a dribble like (mine does) your good.
That information is kind of discouraging to me.:cry: I am hoping for a clogged return line.

In regard to your stuck nuts soaking in PB, you can tell if you are getting high press fuel to the injectors by loosening the, I think 7/8, nut on the top of each injector or if you can take out the allen threaded plug in the top of the same nut I just mentioned.

Once you get either of these free put them back on but not wrench tight and turn over the engine. If you can be at two places at once, see if you get fuel at this point. It will tell you if your IP is putting out.
I thought the nut and allen were the adjustments for the pop-pressure of the injector?
That is why I am trying to get the return line fitting off, so I can see if the injector has fuel coming out that orifice.
... If you take appart the injectors you must count the threads on the allen holed cap which puts the right spring tension on the injector needle. ...
So, with the above sentence, I assume IF i loosen the cap with the allen, I had better be counting threads?

I don't think I want to mess with that setting.
... but I guess the question is why it stops getting fuel? ...
That is my (and I think Joe's) problem.aua From other threads I have read here at SS, I am thinking my IP is dirty or bad. I am HOPING it is something else.
 

joesco

Member
442
1
18
Location
Hampstead, NH
Real dumb question and it would be funny if this were the case, but I just email the shop that I purchased the rebuilt IP from and they said my issue could be "[FONT=&quot]Our only suggestion is to make sure you have the fuel lines hooked up correctly. The symptom that you have is consistent with having the fuel inlet and return lines switched. The return line is restricted and will not properly feed the pump."

I can't find a diagram or pic in the TM for the proper connection of these two lines. Could some me send me a pic or a description of the connections to the IP from the inlet and return lines? Boy if this is case, I will feel like a real dummy!!!!!!!!!!!! Thanks!
[/FONT]
 

LuckyDog

Member
394
11
18
Location
Freedom, NH
[FONT=&quot]I can't find a diagram or pic in the TM for the proper connection of these two lines. Could some me send me a pic or a description of the connections to the IP from the inlet and return lines? Boy if this is case, I will feel like a real dummy!!!!!!!!!!!! Thanks![/FONT]
First, I hope you feel like a real dummy :grin:. (at least yours would be fixed and running that way)

Second, Look at the Figure 7-1 on page 7-2 of the -34 manual. (TM 5-6115-584-34) Item 1 is the IP (obviously). The return line connects to the fitting on top. The picture ain't great. Item 5 connects to the top of the fitting on top of the IP and the return line to the tank fits on the side of that fitting. (At least on mine that is how it is.)
The fitting on the left side of the IP is where the line from the fuel filters goes.

Also See page 4 item 18 of the Ambac service parts

Someone, once mentioned that the check valve that is in-line between the last fuel filter and IP can also get clogged / stuck. I have already checked mine by seeing a strong steady stream come out the hose when disconnected from the IP.
 

Speddmon

Blind squirrel rehabiltator
Super Moderator
Steel Soldiers Supporter
4,640
28
38
Location
Cambridge, Ohio
Everything is worth checking out at this point. Like LuckyDog pointed out, the line from your last filter (the feed line) should go into the side of the pump, and the line back to the tank should come out of the top.

I know it is a huge pain in the butt....but if you got that take-off IP from the fellow who sold you the generator....why not throw it on and see if it will fire off and stay running any longer. Since you know how to change the timing buttons and calculate the right size...you should have 3 to choose from (The original from your IP, the one you bought for the rebuilt IP and the one on the take-off IP) Determine which one you need for the take-off IP and choose the closest one from the 3 you have just to see if it will start and run. Then you can eliminate the rebuilt IP as a possible cause of your troubles.

I've said it for years with electrical components "Just cause it's new doesn't mean it's any good" I've gotten countless parts brand new out of the box that didn't work. Just because they rebuilt the pump, doesn't mean something couldn't have gone wrong inside of it. Most rebuild shops don't have an engine laying around to test run an IP after they rebuild it.
 

LuckyDog

Member
394
11
18
Location
Freedom, NH
Here is a good pic by Speddmon.

The hoses, going up from the oil fill tube, are:
Bottom: Oil pressure gauge line
Middle: Fuel Supply
Top: Fuel Return to tank.
 

Attachments

joesco

Member
442
1
18
Location
Hampstead, NH
You guys are such a great resource, many thanks!

Will check it out this weekend.
Thanks!
Joe S.
First, I hope you feel like a real dummy :grin:. (at least yours would be fixed and running that way)

Second, Look at the Figure 7-1 on page 7-2 of the -34 manual. (TM 5-6115-584-34) Item 1 is the IP (obviously). The return line connects to the fitting on top. The picture ain't great. Item 5 connects to the top of the fitting on top of the IP and the return line to the tank fits on the side of that fitting. (At least on mine that is how it is.)
The fitting on the left side of the IP is where the line from the fuel filters goes.

Also See page 4 item 18 of the Ambac service parts

Someone, once mentioned that the check valve that is in-line between the last fuel filter and IP can also get clogged / stuck. I have already checked mine by seeing a strong steady stream come out the hose when disconnected from the IP.
 

joesco

Member
442
1
18
Location
Hampstead, NH
Thanks Tom!

Have not received the take-off pump and fuel lines yet. At this point, I may never get the parts promised, but I am holding out hope as he is an SS member who is currently advertising additional 002A's trailered units in the classified section!

Everything is worth checking out at this point. Like LuckyDog pointed out, the line from your last filter (the feed line) should go into the side of the pump, and the line back to the tank should come out of the top.

I know it is a huge pain in the butt....but if you got that take-off IP from the fellow who sold you the generator....why not throw it on and see if it will fire off and stay running any longer. Since you know how to change the timing buttons and calculate the right size...you should have 3 to choose from (The original from your IP, the one you bought for the rebuilt IP and the one on the take-off IP) Determine which one you need for the take-off IP and choose the closest one from the 3 you have just to see if it will start and run. Then you can eliminate the rebuilt IP as a possible cause of your troubles.

I've said it for years with electrical components "Just cause it's new doesn't mean it's any good" I've gotten countless parts brand new out of the box that didn't work. Just because they rebuilt the pump, doesn't mean something couldn't have gone wrong inside of it. Most rebuild shops don't have an engine laying around to test run an IP after they rebuild it.
 

joesco

Member
442
1
18
Location
Hampstead, NH
WOW, now I am even more intrigued or should I say confused!!!!!!!!! Here is another email from the shop that I purchase the rebuilt IP from... "[FONT=&quot]The key is to make sure that the fuel inlet does not have a “restrictor” valve on it and that the fuel return does have this valve. The pump needs to have a supply of fuel built inside of it to operate correctly. Also, you cannot have check valves on the inlet and the return."[/FONT]
 

treeguy

New member
605
3
0
Location
Fort One Bay - Cape Cod, MA
Luckydog, what you said about the glow plugs wired in series I got, but you are throwing me for a loop with the other two, now I'll have to go look.
On the injectors - all asembled when you look at it now you see the big nuts on top. That allen hole is just a pipe plug and the big nuts are just caps. Under what I just said is another allen hole, THIS is the spring tension adjuster that you should count the thread turns. Fuel collects under the exterior cap so you should get some there to find out if the IP is pushing fuel out.
Regarding the IP's they are a very simple design. I can't see how they would go BAD, but they will sieze up and not spin corectly like what happened to me, I could see some gelled fuel junk clogging distribution ports though. If you don't get fuel at the injector under the big nuts than it is Definitly the IP dirty, clogged, or shattered drive washer or NO BUTTON installed. Thats what happened when I installed a NEW IP, they don't come with buttons. So I disassembled my old one, cleaned, freed up the piston/plunger, and welded the drive washer back together. This is where you should be invistigating if you are sure everything behind the IP (fuel delievery system to this point) is good. Did you take off the fuel supply line to the IP and crank the engine to verify fuel flowing thru the check valve. If you have fuel there than the IP is STUCK.
They are not hard to take appart and clean or even check their operation. Pretty cool then you can visualize how it works. I explained in detail in one of the threads I listed how to do it in detail. The pic in the TM of the drive pistion and a couple of other things are not the same as what you will find inside.
 
Last edited:

Speddmon

Blind squirrel rehabiltator
Super Moderator
Steel Soldiers Supporter
4,640
28
38
Location
Cambridge, Ohio
Treeguy and Lucky,

This really isn't the thread for it, but you guys are mistaken on the glow plug issue. The MEP-002a only has 2 glow plugs (one located in each cylinder head). The other two that Lucky is refering to, that are wired in series, are the intake manifold heaters. They are not a glow plug per-say, rather just a heating element meant to warm up the air in the intake..
 

joesco

Member
442
1
18
Location
Hampstead, NH
Guys, this is an email from the shop that sold me the rebuilt pump. Does this make sense? Now there is a "check" valve which is after the last fuel filter on the way to the inlet side of the IP. From what I am reading below, he is saying remove that valve????

"[FONT=&quot]The key is to make sure that the fuel inlet does not have a “restrictor” valve on it and that the fuel return does have this valve. The pump needs to have a supply of fuel built inside of it to operate correctly. Also, you cannot have check valves on the inlet and the return."


Thanks!
[/FONT]
 

rickf

Well-known member
Steel Soldiers Supporter
3,072
1,456
113
Location
Pemberton, N.J.
You guys are such a great resource, many thanks!

Will check it out this weekend.
Thanks!
Joe S.
Joe, I think this thing has become personal to all of us, Once you get it going this thread will become invaluable for diagnosing and repairing a 002. Once it is all said and done I am going to print out the entire thread and out it my generator papers.

Rick
 

rickf

Well-known member
Steel Soldiers Supporter
3,072
1,456
113
Location
Pemberton, N.J.
Luckydog, what you said about the glow plugs wired in series I got, but you are throwing me for a loop with the other two, now I'll have to go look.
On the injectors - all asembled when you look at it now you see the big nuts on top. That allen hole is just a pipe plug and the big nuts are just caps. Under what I just said is another allen hole, THIS is the spring tension adjuster that you should count the thread turns. Fuel collects under the exterior cap so you should get some there to find out if the IP is pushing fuel out.
Regarding the IP's they are a very simple design. I can't see how they would go BAD, but they will sieze up and not spin corectly like what happened to me, I could see some gelled fuel junk clogging distribution ports though. If you don't get fuel at the injector under the big nuts than it is Definitly the IP dirty, clogged, or shattered drive washer or NO BUTTON installed. Thats what happened when I installed a NEW IP, they don't come with buttons. So I disassembled my old one, cleaned, freed up the piston/plunger, and welded the drive washer back together. This is where you should be invistigating if you are sure everything behind the IP (fuel delievery system to this point) is good. Did you take off the fuel supply line to the IP and crank the engine to verify fuel flowing thru the check valve. If you have fuel there than the IP is STUCK.
They are not hard to take appart and clean or even check their operation. Pretty cool then you can visualize how it works. I explained in detail in one of the threads I listed how to do it in detail. The pic in the TM of the drive pistion and a couple of other things are not the same as what you will find inside.
Treeguy, Do you by any chance remember where the thread is that you were referring to about taking the pump apart?

Rick
 

treeguy

New member
605
3
0
Location
Fort One Bay - Cape Cod, MA
Rickf, I talked about the disassembly and components of the IP in the 16th post in the thread "MEP002a not starting". You do need to keep the check valve that is in the fuel supply line from the last filter that goes into the IP. I am not aware of any restrictor any where else. You can take out the check valve and clean it to free it up, but I'd put it back in. Like I said before, clean all the fuel components pre IP, remove the fuel line (supply) AT the IP and crank the engine and see if you get fuel out of the line. That reasures you have fuel to the IP. The TM pic of the internal shaft shows a little tit/arm that is driven by the face gear to spin the shaft to aline the proper fuel port for the right injector needed (in relation to the firing timing). As the shaft spins to aline the ports it also pumps in and out to presurize a chamber to give you high pressure to go thru the port to the injector. So the shaft (about 1/4" diameter) spins and pumps like a piston all at the same time. All the pumps that I have seen differ from the TM in that they are a solid shaft with no arm. They are perfectly round except for the end that goes into the face gear which has a flat ground along the length. The flat creates what I call a dog house shape, this flat is used to engage the "drive washer" (see post #21 in thread MEP002a not starting for a pic.) As the face gear spins by the cam shaft, there is a machined out recess under the face gear that the "drive washer" lives, so the "drive washer" is spun, in turn spinning the internal fuel delievery shaft alining the ports. The flat ground area also allows this shaft to piston in and out by you cam lobes while still spinning, it slides thru the "drive washer". The shaft in my IP was gummed up and couldn't spin, so as the face gear spun and the shaft didn't, the weakest link was the "drive gear" which shattered into two pieces. The shaft continued to piston in and out pumping and presurizing fuel but no ports alined so I was not getting any fuel to the injectors.

I hope all this helps, let us know, Ben
 
Last edited:

rickf

Well-known member
Steel Soldiers Supporter
3,072
1,456
113
Location
Pemberton, N.J.
Thanks Ben, I had a post titled "Rough running" that I think I will abandon because this thread is covering all of the bases.

Rick
 

joesco

Member
442
1
18
Location
Hampstead, NH
Thanks very much Ben, I have fuel entering the IP and exiting the IP and also fuel up to the injectors. This week, if I am up to it, I am going to pull the newly rebuilt pump and re-time it to the engine as I think it must be a timing issue because everything else has failed thus far. After reading and re-reading the TM, I am going to use timing Method 1 as I just can't make sense out of Method II. Barely made it through my math courses in high school back in the 70's!
 

treeguy

New member
605
3
0
Location
Fort One Bay - Cape Cod, MA
Don't worry about the math hogwash, are you sure its the timing and not stuck injectors? Your unit fires but won't stay running right, so its not the glow plugs. Dumb question now, but you prime the engine with the switch and hear clicking that stays steady around 10 clicks in 5 seconds. Then turn the switch to preheat for a FULL minute, then try to start? And you do have some sort of timing button installed right? In the center of the face gear is a floating flat disk with a pin hole in the middle held in by a snap ring. NOT a shiny rounded nub recessed below the face gear surface which is just the center IP shaft. Just asking.

Timing the IP is wicked easy, just remove the screw on the side of it's housing near the fuel inlet, stick in a piece of coat hanger, toothpick or anything else that diameter, rotate the face gear until said wire jumps into the slot in the face gear's side, you'll feel it, then hold the unit in that position and don't turn the gear any more. Then take the appropriate size socket and stick it thu the cooling fan grill and rotate the engine. Looking from the front it will be clock wise, or if standing in front of the IP, pull the rachet handle up. Look at the flywheel type housing for the PC pointer and rotate the engine until the pointer points to the "PC" line scribed on the flywheel.

Here is the hardest part which is simple to over look. At this point, you have a 50/50 shot that the fly wheel is in the right spot. Carl from NH and Speddmon mention that the crank shaft turns twice for every turn of the cam shaft. The PC mark will line up on the compression stroke (TDC - top dead center of #1 piston (closest to the fan)) AND line up with the TDC of the exhaust stroke.
You could be lucky and get it or you would have to remove the valve cover and make sure that both the intake and exhaust valves are closed while the PC mark shows. Both valves closed would indicate a compression cycle. This is the PC mark/cycle that you want the IP timed to.

*********Check to make sure you have the shims if there were any in place on the mounting surface (there may or may have not been any, if so, no matter what IP installed, you always keep these same shims with this block). Now, without rotating the face gear, slide the unit in place over the mounting studs and the face gear should mate into the cam gears. Remover the coat hanger, install the mounting nuts and replace the screw where the coathanger was. Easier than trying to follow the TM gibberish.

If you have fuel out of the IP and you know it is pressurized (shoots out at high velocity while cranking from any of the ports the guys here mentioned to check) than the IP is fine (maybe the timing is off) I would suspect the injectors are stuck. Mine were crappy, like we have said, if these units sit, the diesel turns to glue. You can dissassemble the injectors to free them up and clean them. Be careful, go back and read my tid bit on the injectors back in this thread about counting threads to get spring pressure. Also about removing the aluminum spacer with the fins.

Keep trying your almost there!:wink:
 
Last edited:

Speddmon

Blind squirrel rehabiltator
Super Moderator
Steel Soldiers Supporter
4,640
28
38
Location
Cambridge, Ohio
Joe,

I think Ben may be onto something here...you already installed and timed the pump using method 1, and have the proper button. If you want to verify the timing, I'll try to condense the TM version and clear it up some for you....you can check and verify the timing without pulling the IP off.

First, leave everything hooked up the way it should be...fuel lines and return lines

Then remove the center nut from the IP and carefully remove the delivery valve holder. Make sure you have a 12 point socket or wrench to do this. Then, remove the delivery valve spring...ONLY THE SPRING!, and reassemble the delivery valve holder and nut.

Valve.JPG

Now, take a piece of wire, and wire up the fuel solenoid so the stopper rod is up and the IP would always have full fuel flow.

Take your ratchet and turn the engine over slowly clockwise from the blower wheel until your "PC" mark is lined up on the compression stroke...you'll need to carefully pull the valve cover off again to verify this (Both valves closed...free play in the rockers). The "PC" mark on an 002a will only ever line up on #1 cylinder, but could be on either the compression or exhaust stroke. Then go back counter-clockwise about an inch, so the flywheel PC mark is below the pointer a bit.

Remove the fuel injector line from the #1 cylinder (closest to the blower) and the IP and fish it out of the engine, re-connect it to the IP but hanging down some so you can place a container below it.

Now, turn your master switch to the "Prime/Run" position, but DO NOT start or rotate the engine. This will get fuel pressure to the IP.

Now, SLOWLY rotate the engine clockwise toward the "PC" mark, you should get a steady free flow of fuel from the injector line. Keep SLOWLY rotating the engine, and stop as soon as the fuel flow stops (The TM says about 1 to 2 drops in 5 to 10 seconds is considered stopped flowing).

Now look at the "PC" mark. If you are timed properly and have the correct button installed, you should be right on the "PC" mark, or very darn close to it.

If you are still below the "PC" mark, you will need a thinner button. If you are above the "PC" mark, you will need a thicker button. Count the number of marks you are above or below the "PC" mark and let us know and we can tell you what size of button you need to install. But you should be right on the money.


If you are going to verify the timing and button thickness, this is a way more accurate way to do it. And since you know what size button you have installed, it's easy to calculate a new one if needed.
 
Last edited:
Top