• Steel Soldiers now has a few new forums, read more about it at: New Munitions Forums!

  • Microsoft MSN, Live, Hotmail, Outlook email users may not be receiving emails. We are working to resolve this issue. Please add support@steelsoldiers.com to your trusted contacts.


From fire truck to MTV

ramdough

Well-known member
1,554
1,727
113
Location
Austin, Texas
Cut some isolaters for the box to frame interface from HDPE. Hopefully box to be mounted this week.
Removed the air over oil pump and about 8 hydraulic lines I won't need (suspension cylinders, feed and return from aoo pump). Did have some issues with the spare tire cylinder locking up but Ronmar has some great info on how to fix trapped air. I would like to just eliminate the cylinder safety feature though. Moved the ABS controller to the old pump location since I'm planning a cab pass though on the left behind the driver seat View attachment 910413
I did the same thing, but reused the ABS mount (cut it down and treeless it) to hold the access port connector. Picture in next post.

Looks good so far.

What manual pump are you using?


Sent from my iPhone using Tapatalk
 
Last edited:

aw113sgte

Well-known member
Steel Soldiers Supporter
464
677
93
Location
La Crosse, WI
I did the same thing, but reused the ABS mount (cut it down and treeless it) to hold the access port connector. Picture in next post.

Looks good so far.

What manual pump are you using?


Sent from my iPhone using Tapatalk
Using the stock pump, waiting on a vented pump cap to arrive.
Nice solution on the mount. I'm going to see if I can add the plate that went over the air/oil pump back on. Would give lots of protection and I like using it as a step :)
 

aw113sgte

Well-known member
Steel Soldiers Supporter
464
677
93
Location
La Crosse, WI
Trying to sort out my hydraulic system. Took out the air/oil pump and removed all the lines.
Still have issues with hand pump overflowing, have a NOS one coming and I'll try rebuilding the one I have too.
Here is the vented cap that's needed if you delete the air/oil system
 

Attachments

aw113sgte

Well-known member
Steel Soldiers Supporter
464
677
93
Location
La Crosse, WI
Replaced the four 75/86 (reserve capacity 70 each)batteries with 2 6TLs(reserve capacity 230each)
Wasn't a fan of the floppy way they fit in the battery box plus now I have more room for activities.
I see a lot of people saying the price on the 6TLs is terrible but these were $240 each from O'Reilly's. Certainly doesn't seem out of line for how much material there is. Had them at the store next day, full charged.
20231116_100830.jpg
 
Last edited:

aw113sgte

Well-known member
Steel Soldiers Supporter
464
677
93
Location
La Crosse, WI
Thinking through some different ideas for framing out the shipping container/box. I'm not very experienced with house building methods so I'm kind of just winging it. Figure you guys may have some different ideas.
I already have 2" closed cell insulation in the container. I do live in WI and this thing will be used in sub zero temps. Thermal efficiency is quite important so I want to minimize thermal bridging but there is a balance, I do want it strong. I will be attaching cabinets and the like to the walls.
A couple methods I've been kicking around:
1. Internal framing, with no ties through the insulation to the shipping container except at the top corners. Walls 1/2 plywood with a nicer wood layer over top for looks. Internal framing unistrut or similar.
2. No internal framing. Bolts though the shipping container walls, with stainless standoffs for lower thermal conductivity (plastic stand off are temping but obviously lack strength). These would bolt to the same plywood and have a wood layer over top as well.

Thoughts? Other ideas?20231015_152205.jpg20231015_154205.jpg20231015_152126.jpg20231015_152825.jpg
 
Last edited:

aw113sgte

Well-known member
Steel Soldiers Supporter
464
677
93
Location
La Crosse, WI
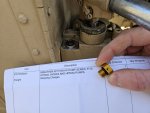
Here is what my brother found:
"Those are standard radio tags. Typically used when rail shipping unit equipment. This truck most likely went to JRTC (Joint Readiness Testing Center) for pre-deployment training. While it's not 100% conclusive, the serial number didn't show up under the W90KNQ customs code, so it likely hasn't left the country or seen combat. Further history (See paragraph 3) supports that, as it was wearing a garrison paint scheme as late as 2006, and TPE (Theater Property Equipment) has been in place since about 2006 or so. It was deemed inefficient for units to continuously ship their vehicles back and forth, so there is just equipment already there to fall in on.

You are correct in that the truck was designated as a Patriot Air Defense Guided Missile System. From the unit identification code (UIC) information, the truck belonged to the 108th Air Defense Artillery Brigade, Fort Bragg. The bumper number (HHB 76) indicates it was assigned to Headquarters and Headquarters Battery. This is essentially the command and staff/support and administrative battalion. Your truck was also an SRPT (Small Repair Parts Transporter) which meant it was equipped as a support unit, not a missle launcher. It would have had a shop container mounted on the back for the transport of small repair parts. It was part of the maintenance support for a fire unit. I've attached the field manual that provides some clarity on how Patriot units are set up. It's a little out of date as it doesn't include the MTV, but all the principles are the same. Essentially, with that container you've purchased, your truck will be set up very similarly to how it was in active service.

Your truck has an odd bit of history attached to it. It was included in a paint survey of Patriot systems in Fort Bliss TX in 2006 (Attached), passing with no defects apparently. At the time it was listed as being painted camo green, and had likely not had an overhaul or refit at that point. Soon after it would have relocated to Fort Bragg when the 108th moved there (2007). At some point it would have had a repaint in which it got its CARC tan paint. Most likely would have had a refit/overhaul as well, which would be indicated by a metal plate on the body/engine.

Hope this helps!"
 

aw113sgte

Well-known member
Steel Soldiers Supporter
464
677
93
Location
La Crosse, WI
Successful thanksgiving, box is on the frame.
Height is 12'7" at rear, 12'8" at front of box (driveway is not perfectly level)
7" to bump stop, 8.5" from tire to box.
It was surprising how little the suspension moved when I put the weight on it.
Cribbing and jacking was nerve racking as it was a little wiggly. Just held on with chains and clamps for now.20231123_111154.jpg
20231123_121425.jpg20231123_121439.jpg20231123_142825.jpg20231123_142833.jpg20231123_142851.jpg
 
Last edited:

aw113sgte

Well-known member
Steel Soldiers Supporter
464
677
93
Location
La Crosse, WI
Working on drilling all the mounting holes for the box. Tough work drilling though 1/2" thick steel with 1/2" diameter bit. Clearances are really small too makes things more difficult. Did "make" a device to help with some holes...a bucket with cribbing provides force to the drill and I just have to work on alignment.20231129_135910.jpg
 
Last edited:

aw113sgte

Well-known member
Steel Soldiers Supporter
464
677
93
Location
La Crosse, WI
Finished drilling most of the holes (middle 5 out of 20 on each side I don't have the clearance for due to huck bolts) and took it on it's first drive with the box mounted. Didn't notice much drivibg difference except I no longer have the harmonic bouncing going down the road. Hopefully that stays away. Didn't notice a change in CG although I'm sure there is one. Surprised the boys picking them up from school with it, they wanted to ride in the back but were not allowed.
My driveway requires significant articulation and fasteners all looked good afterwards. Will do some detailed inspection after some real articulation tests.
 

aw113sgte

Well-known member
Steel Soldiers Supporter
464
677
93
Location
La Crosse, WI
Chasing down ABS issues still. My board had some signs of water inside...the newer replacement looked better on the outside but inside was a mess. So basically no progress.

20231206_132549.jpg20231206_125550.jpg
 

aw113sgte

Well-known member
Steel Soldiers Supporter
464
677
93
Location
La Crosse, WI
Wasn't a big fan of the split collar that came with the ECO hubs, mine is the one with an M5 screw. Considering if that clamp failed, the entire wheel would detach I started looking at another solution. This got kicked into high gear when I checked for wheel bearing tightness and I had play in both the left mid and rear wheels. All wheel bearings were tightened when ECO hubs were installed and verified "tight".

Here is my solution, an aluminum spacer that just slides in place and holds the stock inner gear in location. No way for the nut to back off now. The three holes are for gear oil to be able to flow freely from inside/outside.

1701992046241.png

20231207_130142.jpg20231207_123218.jpg20231207_123209.jpg20231207_123202.jpg
 
Last edited:

Xengineguy

Well-known member
Supporting Vendor
211
737
93
Location
USA Indiana
I like it! Two thumbs up. We have upgraded the split collars to 1/2” thick with a 1/4”x20 Allen bolt. All new sets will ship with the updated split collar. I do like your idea, I’m going to see what it Might cost to incorporate it down the road. Thanks for posting.
Might be able to do them out of plastic?? Lots of crazy tough plastics out there.
 

aw113sgte

Well-known member
Steel Soldiers Supporter
464
677
93
Location
La Crosse, WI
I like it! Two thumbs up. We have upgraded the split collars to 1/2” thick with a 1/4”x20 Allen bolt. All new sets will ship with the updated split collar. I do like your idea, I’m going to see what it Might cost to incorporate it down the road. Thanks for posting.
Might be able to do them out of plastic?? Lots of crazy tough plastics out there.
From an engineering perspective, many plastics would work well for this. Teflon(PTFE) is a go to for temp resistance and chemical resistance. Have to verify chemical resistance and max temp of whatever plastic used. Delrin may be a good option. I didn't want to do that much research as plastics fail over time as well and the research is somewhat difficult to find. I went with aluminum because it's very easy to machine, and know it will not change or creep with time. Since it's aluminum and it's CTE is far higher than steel, I did make adequate clearances for that growth.
From a cost perspective this is way cheaper than a split clamp as well as easier to install. Only negative is you can't sell your original gear set and have to do the clocking thing with the splines.
 
Last edited:
Top
AdBlock Detected

We get it, advertisements are annoying!

Sure, ad-blocking software does a great job at blocking ads, but it also blocks useful features of our website like our supporting vendors. Their ads help keep Steel Soldiers going. Please consider disabling your ad blockers for the site. Thanks!

I've Disabled AdBlock
No Thanks