• Steel Soldiers now has a few new forums, read more about it at: New Munitions Forums!

  • Microsoft MSN, Live, Hotmail, Outlook email users may not be receiving emails. We are working to resolve this issue. Please add support@steelsoldiers.com to your trusted contacts.

Diablo Build Update (pics)

devilman96

New member
2,056
16
0
Location
Boca Raton, FL
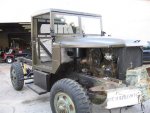
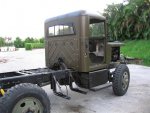
A little bit of an update...

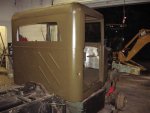
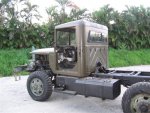
Since I am waiting on sheet metal to paint and everything to proceed that I am trying to stay busy but not get to far ahead of myself.

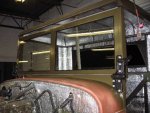
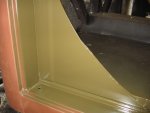
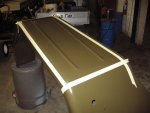
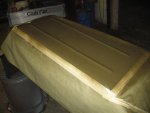
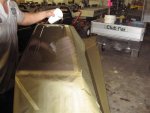
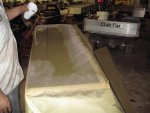
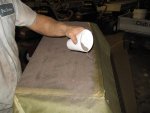
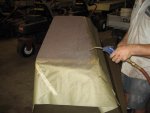
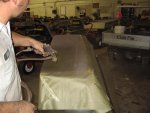
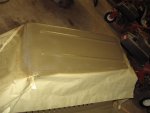
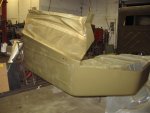
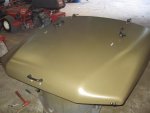
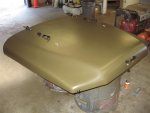
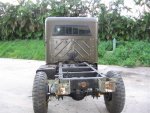
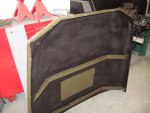
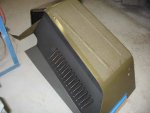
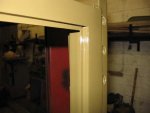
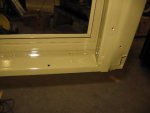
I have started on some of the paint, mostly the inside stuff or I have just accepted having to paint some things twice but I am getting the hard parts out of the way with seam sealing and aluminum oxide on the walk ways of the fenders, etc. The hood is painted and undercoated on the bottom so I will spare masking later. I could not decide on the "warning, don't leave the hood flopping around to all on your head" thingo... My hood had it on both top and bottom so I masked it to go back on the bottom side??? Correct or not at least I will get the lettering back on...

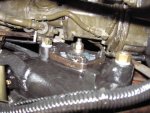
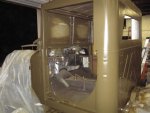
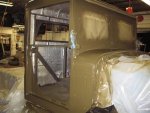
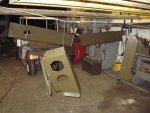
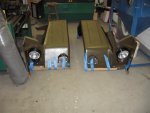
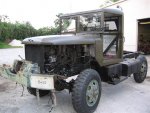
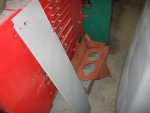
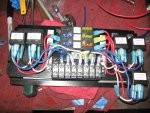
Lots of wiring stuff... I made a panel for under the dash which will run all of my 12/24V functions as seamlessly as possible. In short I am using 12 and 24 volt relays to control all of my accessories based on the ignition switch's position as you would expect a "normal" truck to work... IE "run" turns everything on (radios, window motors, seats, etc) start allows nothing to be on, and the accessory position to allow just the radios to function. I am working on redundancy with this and though it looks complicated and will be a "busy" with wires I can yank the whole panel and the truck still starts, runs and drives as it should with its 24V system so if anything fails or craps out for any reason I still have a functional vehicle. It is also designed to be fixed roadside, all labeled correctly and all common parts so a few spare fuses and a 24 and 12 volt relay would allow you to repair anything on the fly. It is also modular... If I need to completely redesign it later or make changes all I have to do is disconnect 7 wires and its out of the truck....

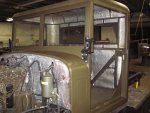
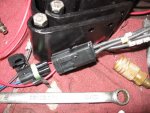
I am also updating the plug ends on the whole truck to the newer "weather tight" fittings found on most cars and equipment... It might not be military but I think in the long haul these will be much easier to deal with when pulling parts or trouble shooting / testing the system while still retaining water tight plugs.

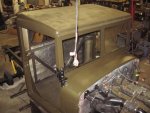
I am also getting the time to pick up some odds and ends that will make the truck more drivable... I am going with electric window wipers from a CJ jeep (easy /cheap kit to find and work with)... electric windshield washer unit, remote brake reservoir for the firewall and a over flow reservoir for the radiator... If I can figure out where in the hell to mount all of this stuff... and HOPEFULLY its Orlando this weekend and paint next week...
 

Attachments

Boelt63A

Member
77
1
8
Location
Jacksonville Florida
Mike all looks great. I am having trouble believing this is the same truck I looked at only a few months ago. I tried to call you a few times but your phone is never with you and it's not accepting messages. I can't wait to see how this turns out.
 

devilman96

New member
2,056
16
0
Location
Boca Raton, FL
Well the truck gods were being nice this weekend and Orlando finally happened!!! Its nice to have friends that are so willing to give up a Saturday afternoon for my weird hobbies!! So... I have a very modified but very stock looking windshield frame... I tried to get some detail in the pics below to show what was done. I had considered going as large as possible on the openings but opted to keep it within 3/4 of an inch to stock glass size... It should... once the glass and trim is installed look like stock fold out glass at a glance.... But dry and quiet!!! I will let the paint dry over night and get it out to the glass shop tomorrow!

Some other pics... the last fender (and last body part) is almost done... RD I will photograph and give details on the walk way in the next night or two...

Some machine work... I err... well... was going to hold off on this but Its kinda interesting and cool so it is hard to keep to myself... There are two bases like this that I am modifying to accept full flow 5 micron glass element filters which will be remote mounted... The only "full flow" oil filter bases made are produced by the high dollar specialty companies and I refuse to pay 3 - 400$ per filter set up so I am modifying bypass housings to be full flow and accept a over the road filter which is capable of handling the LD's oil system requirements... In researching these filters I found out a lot about LD oil systems and was given a few very convincing reasons to replace the canisters that I will put in a write up in the next few weeks... Interestingly enough it revolves around engine life, 20-30 micron filtration, soot, dry starts, spin on adapters, the commercial LD and the militaries insistence at having canisters against the manufactures recommendations.

Lastly in the mix is a pic of what I think will be the beginning of the upper window frames... Right now it is just a pile of bent channel but give it a few weeks...
 

Attachments

devilman96

New member
2,056
16
0
Location
Boca Raton, FL
Ugh its been hell week so far...

Got the windshield ready to go, called the glass shop Tues AM whom doubled the price... They got a prompt and very direct F.U.!

Hunted down another shop, $150... Should be done Friday... Maybe Monday... Im feeling pessimistic so I am saying Monday...

I called about the hydraulic pump (Vickers VTM42) on day 9... Forgot to ship it (eBay seller rpalesh)... So it actually just showed up yesterday... *gurrr*

Installed it last night about 8PM and nothing,... wrong rotation and sucking rather than blowing... pulled it off... tore it down... reversed the sleeve and rotor (vein pumps can be flip flopped, not a biggie)... Vala! pressure.. kinda...

I failed to note the manifold's inlet was SPT and I had a NPT fitting so when I screwed it in I cracked the manifold... so it was sucking air... Which of course I had already unknowingly cracked the old pumps manifold too... genius aint I?

Spent 2 hours machining and installing a retaining ring to go over the outside of the manifold... ground the crack down... brazed the crack and retaining ring in place... Went home annoyed to death with myself...

Today I swapped the manifolds... cranked it up... ah pressure... turned the steering gear... gear went one way... wheels go the opposite way... *sigh*... this has got to be the only gear I have never seen where the large line is pressure and the small line return... lesson learned! (harder than I could know)

Pulled the hoses... made new ones... installed them... ha! pressure!!!... wheels go in the right direction... woo hoo... and drip drip drip... *sigh*

Got underneath to see what was going on (I rebuilt this box before installing it to avoid this)... When I hooked the lines up backwards and turned the gear the hydraulic piston went one way and the gear another which pulled the worm shaft and ripped the adjustster threads out of the side of the body... *sigh*

Pulled the drag link... pitman arm... gear's side cover... adjuster and gear... for all of my intelligence... sometimes I am a IDIOT! *sigh*

Looks like tomorrow eve will be machining the side cover for a re-thread... Or I might just get a 1/2-20 helicoil set (another $100) and do it the easy way...

Im a little Deuced out at the moment... I guess you have to expect some weeks to go to hell now and then... So many delays in the past month and so much is hinging on just another day or two of waiting... Its hard not to be discouraged and over zealous at the same time (IE pissed off and frustrated)!!! I just have to keep reminding myself that I am trying to cram a 2 year project into 2 months... So what if it takes three???

If a frog had wings... ya know?... Hummmm I wonder if my insurance covers arson??? lol

Better luck tomorrow... at least I know its all working now...

I will divulge all of the filter info as I get to installing it... I have researched the snot out of the subject making sure of the flow requirements and such but I want to go though the install vs. giving out a whole game plan and then changing it all (ya know how these things go). The basics are 2 bypass filter bases machined out to be full flow and rethreaded to accept Wix XD filters (you could add a 3rd as a bypass if you wanted but its over kill), I was going to build manifolds and everything to port off of the motor but I think lopping off the filter canisters and shortening them to nothing in height, adding fittings to each and then fittings through the bolt holes will be easier to do and easier to copy if anyone wished. I really should be painting rather than messing with this but with the delays in the past month with being able to paint ones mind tends to wander!

Oh... and the compressor took a dump today so I have no air at the shop... 860$ for the motor... Glad I dont own that one!
 

doghead

4 Star General /Moderator
Staff member
Super Moderator
Steel Soldiers Supporter
26,247
1,168
113
Location
NY
I usually enjoy reading your updates, not this one! I know how it is, just accept that errors happen and move on (as you have)! Keep moving on !
 

devilman96

New member
2,056
16
0
Location
Boca Raton, FL
Sorry... I know its a bit depressing....

I have some talented moments but still fall fault on my face over the dumbest of things... and of my own doing!!! I've been showing off a lot of really cool "working" things and a lot of things that have gone so according to plan its almost scary. Figured its only fair to toss in some of the defeat too...

Working on a project this big and mostly by myself in such a tight time frame these things are bound to happen... So many details... So many variables... Something has to blow up, leak, fall apart or simply refuse to work as planned...

Yesterday it won... Today I will break my foot off in its arse! :)
 

devilman96

New member
2,056
16
0
Location
Boca Raton, FL
Ah some good news... Truck 0 Mike 1.... My gear box spoof is fixed...

In the pic below you can see the adjuster nut (1/2-20) in the center of the side plate (4 bolt cover plate)... With the line criss crossed yesterday it pulled the threads out of this plate so the jam nut was worthless... This is what adjust the "slack" in the gear so its rather important and was leaking from around the threads.

I tried a helicoil but the threads were only a 1/2 inch... It might have worked but I didn't want to do this a second time so I chucked the cover plate up in the lathe, drilled the hole out to 3/4" and threaded it, then made a threaded bushing 3/4 to 1/2-20. Being that it is steel rather than case iron its stronger and should survive my idiocy. Sorry for not taking more pics while doing the job... Its been one of those weeks and I seem to have a short attention span!!! lol

So I FINALLY got to turn the wheels with power... I don't have my column installed but its a good thing when you can grab the steering shaft by hand and turn right and left. The linkages appear to be about perfect, the travel is great and the resistance is minimal... Between the pump and gear I was able to get matching relief valves (1500PSI) and matching flows (6 GPM) I don't think there will be any issues in the future and I don't have to worry about popping seals from bottoming anything out! Only thing I don't like is the gear noise coming from the pump drive... Anyone know if these require shimming??? I think it would help to take the "chatter" out of it...???!!!??? Suggestions???

As for the column... I am not at all pleased with the stock column... Especially with the amount of work I am doing to the truck... Not to mention the steering wheel thing is a pain due to having to fabricate an adapter, etc, etc... I had started looking at tilt columns a few weeks ago and finally found one from a camaro for a reasonable price ($65). Its from a 1994 which means I will have the turn, wipers and high beams at my finger tips... I will have a functional horn in the column (you loose the stock wiring when you add power steering) and I will have a keyed ignition switch all in one nice neat package with tons of options for after market steering wheels.

Also the glass shop called... my windshield is done... looks like I can FINALLY paint Saturday... If I can get the compressor fixed tomorrow... I will pick it up tomorrow afternoon and get some pics up...
 

Attachments

Recovry4x4

LLM/Member 785
Super Moderator
Steel Soldiers Supporter
34,014
1,814
113
Location
GA Mountains
'Bout damn time Son! Little Man and I will probably be down on Saturday to watch you fill your lungs. Need me to bring anything?
 

Boelt63A

Member
77
1
8
Location
Jacksonville Florida
If you need some help this weekend, just give me a call today and I can come down tonight or in the morning to help with the paint/assembly. I can only offer a set of hands and a warm body to help out. Mechanically this is way out of my league and you know it!!
 

devilman96

New member
2,056
16
0
Location
Boca Raton, FL
Thanks Chuckels but I think I have 2 bodies comming, if Ken shows I might put him to work too :)

As for help in your tallent range... I think a week of Thorazine at 1000ml every 24 might be in order... Just prop me up in a lawn chair on a waste island with a fishing pole... Or set me in the corner and "tell" me thats where I am every few hours... LOL
 

devilman96

New member
2,056
16
0
Location
Boca Raton, FL
Well the windshield is in (enough to paint)... Took pics from a few angles to get an idea of how it looks. I am a little frustrated with the shop because I had asked for gray glass v/s clear... They offered to re do it but I wanted to get this damn thing painted!!! Its easy enough to tint it when I do the rest.

I don't know how well the detail will be in the pic but I sprayed my door jambs working out the ratios on the flattening agent. The finish is mat and resembles a US color but more of a European finish at about 20% gloss. All of the parts that have been painted in the past few weeks will be re shot tomorrow (which was planned) with the undercoating etc, masked off.

I am using 24087 the last OD used 57 to present before camo... Its supposed to be "semi gloss" but I actually had someone ask me if I clear coated some jerry cans I was test spraying... Tooooooo bright and with or with out hardener its identical. After playing its worked out to a 2:1 ratio and using 10 oz of accelerator per gallon (a LOT) to "kick it" and make it dry faster, which also helps the flattening agent along. On the flattening agent, it is a Sherman Williams product whom (BTW) is about the only company producing a flattening agent for synthetic enamels anymore. PPG and DuPont have discontinued them....

I am Annoyed with Gillespie over all of this... At $100 a gallon for a flatten agent and 5 phone calls placed to them I have not received a single call back when told every time they would check their batch samples and get back to me ASAP... If I EVER paint another OD truck I will NOT use a "Mil Spec" paint... I will have it color matched in a PPG urethane and flatten it myself, its just easier and will in the end, be a better paint....

Yes... I know I am picky LOL...

So tomorrow will be "d day"... I will be SO DAMN HAPPY to have this behind me!!!

RD I have not forgotten the aluminum oxide deal... I just have not had time to do the base coats on the last fender.... Tomorrow I will have some pics for you!!!

Kenny... Lots of juice packs!!! :)
 

Attachments

houdel

Active member
1,563
9
36
Location
Chase, MI
Devilman96 - PLEASE keep us updated on the oil filter conversion - I'd do most anything to get rid of that "dry engine start" condition!
 

devilman96

New member
2,056
16
0
Location
Boca Raton, FL
Here is how I am doing the walkways on the truck... I learned this as a kid doing wing walkways on aircraft, the method works well, is fairly fool proof, and will hold up for a number of years... I will add text to the images but here are a few things to know...

I use aluminum oxide... I don't know where to tell you to find / buy small quantity, I rob a cup out of my bead blaster when I need it. I do know it is far superior to any "non skid" additive you will find in home depot because it does not "crush" or grind down.

You don't have to add hardener but I highly recommend doing so... Your dry time will be days v/s hours and it will not cure as well... Accelerator is a added bonus to the mix if you have / can mange to spend the cash on the mix.

Paper the WHOLE part of... If you get over spray and get the oxide on a part you didn't want it on... Getting it off is like cutting a diamond with a hand file.
 

Attachments

devilman96

New member
2,056
16
0
Location
Boca Raton, FL
LONG weekend but a lot of stuff done... paint paint paint... I can not tell you how happy I am with the end results! It took a lot of test spraying to get the mix right but I some how managed to nail the gloss level I was looking for perfectly. I paint, but I do not paint "often" so getting it right was pure luck... I must have had the paint gods approval for shooting this weekend or something... The bugs were well behaved for a change and I managed everything with out a single run, miss, or dry spot...

Nice to see some color back on the parts... Its given a lot of very needed inspiration!
 

Attachments

devilman96

New member
2,056
16
0
Location
Boca Raton, FL
OK... third posting in a row but it catches me up to today...

Painted was started at about 9PM last night and finished at 1am... I had a lot to do and did the last walkway posted above so it took some time.

Running on 3 hours of sleep I started assembly this morning.. its going quick but I think I am spending as much time searching for parts as I am bolting things together!!! Boxes, bins, corners, shelves... I have had truck parts hidden all over the place for months!! I am going back with all stainless steel on the fasteners and all of the "non serviceable" parts like grab handles and such are getting sealed with polymer to keep water from between them... Details details details!!!

Nice to see what it is shaping up to... I think I am going to drop dead from exhaustion but hey... Some one will inherit a nice ride!
 

Attachments

Top