• Steel Soldiers now has a few new forums, read more about it at: New Munitions Forums!

  • Microsoft MSN, Live, Hotmail, Outlook email users may not be receiving emails. We are working to resolve this issue. Please add support@steelsoldiers.com to your trusted contacts.

FLU419 SEE HMMH HME Owners group

glcaines

Well-known member
3,925
2,650
113
Location
Hiawassee, Georgia
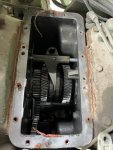
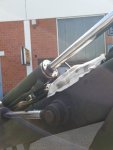
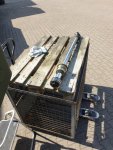
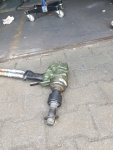
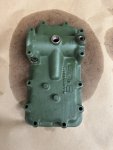
I've now discovered the problem with my Intermediate Speed Control. The piston in the actuator is completely seized up. I removed the actuator and the cover on one end of the actuator, along with the pin that moves the gears, but I haven't been able to get the M48X1.5 hex plug on the other end to budge. I was using a tool on the plug that I made, but I was bending it. I believe the hex wrench size is 22 mm and I ordered one which is due to arrive tomorrow so when it arrives I'll be able to put a lot more torque on it. I may even try an impact wrench. I had a very difficult time removing the top plate with the actuator. It was really stuck. I ended up using a long crowbar and had to put all of my weight on the end to get it to pop loose. I only used the crowbar after I found out the Expedition Imports had a new one in stock, albeit very expensive.
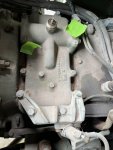
Intermediate Speed Control Transmission Top.jpgUnderside of Transmission Top.jpgTop of Trans.jpg
 

glcaines

Well-known member
3,925
2,650
113
Location
Hiawassee, Georgia
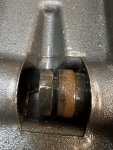
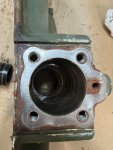
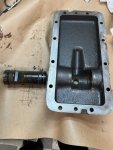
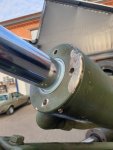
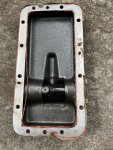
I'm now back on the FLU419 Intermediate Speed Control problem. I couldn't get the end plug out of the top cover until I found a 24 mm hex plug socket. I ordered one from Home Depot with 3 days delivery and it has never arrived after weeks of waiting. I ordered another from another vendor and it finally came. I still had major issues getting that plug out. My 1/2 inch impact wrench wouldn't do it. My 3/4 inch impact wrench also wouldn't do it using my shop air compressor, which is a big one. I finally hooked the 3/4 inch impact wrench up to my M35A3's gladhand and the plug came loose. As soon as it was out, the problem was obvious - corrosion. With the plug out I should have been able to simply slide the piston out. No way. I had to beat the piston with a large hammer and a wooden shaft, beating it back and forth in both directions and I finally drove it out of the bore. It took about an hour to beat that piston out. The piston is in good condition as well as the two O-rings, but I've ordered new O-rings. However, the bore is corroded as well as the inlet air-port. I'm going to try to clean it all up. EI has a new top cover, but the cost is way more than I want to pay. If I can't clean up the bore on the old one, I'll have no choice.


Corrosion On Piston.jpgCorrosion In Air Inlet.jpgTransmission Top Dismantled.jpg
 
Last edited:

Mullaney

Well-known member
Steel Soldiers Supporter
Supporting Vendor
7,839
20,039
113
Location
Charlotte NC
I'm now back on the FLU419 Intermediate Speed Control problem. I couldn't get the end plug out of the top cover until I found a 24 mm hex plug socket. I ordered one from Home Depot with 3 days delivery and it has never arrived after weeks of waiting. I ordered another from another vendor and it finally came. I still had major issues getting that plug out. My 1/2 inch impact wrench wouldn't do it. My 3/4 inch impact wrench also wouldn't do it using my shop air compressor, which is a big one. I finally hooked the 3/4 inch impact wrench up to my M35A3's gladhand and the plug came loose. As soon as it was out, the problem was obvious - corrosion. With the plug out I should have been able to simply slide the piston out. No way. I had to beat the piston with a large hammer and a wooden shaft, beating it back and forth in both directions and I finally drove it out of the bore. It took about an hour to beat that piston out. The piston is in good condition as well as the two O-rings, but I've ordered new O-rings. However, the bore is corroded as well as the inlet air-port. I'm going to try to clean it all up. EI has a new top cover, but the cost is way more than I want to pay. If I can't clean up the bore on the old one, I'll have no choice.


View attachment 897318View attachment 897320View attachment 897321
.
You shouldn't hesitate to get yourself a bore hone like you would use on an engine block. They come in assorted sizes. The knurled nut on top will add more spring tension. Add some grit to the hone stones if the rust is really bad. Use liquid (penetrating oil will work) to keep from killing your stones. Drive it with your drill (slower is better) and you might need and extension to get the hone all the way down the bore.

1684267298365.png

There are metal brushes with "balls" on the end of the wire. My opinion (everyone has one - right?) is to stay away from those because they are more aggressive and could cut grooves in the cylinder bore.
 

glcaines

Well-known member
3,925
2,650
113
Location
Hiawassee, Georgia
I actually already have a bore hone for wheel cylinders that I got years ago, which should work. Since there are two separate and opposite bores to hone, I can reach each from different sides of the top cover. I'm optimistic that I can save the part. I'm going to start the process tomorrow afternoon. That thing was in such bad shape, I can't believe it ever worked, but it did. It froze up suddenly while I was driving.
 

yinzer970

New member
1
3
3
Location
Rocky Mountains
FNG reporting for duty! I took delivery of my sand FLU419 yesterday. Got it from Ritchie Bros auction with the OD showing just over 1k miles. It was missing a hood, had a broken wheel, and only starts by bridging the starter solenoid. I'm happy to report that I was able to operate all the hydraulics and drive it right off the trailer! The push-button ignition isn't working, and I have two small hydraulic cylinder leaks to reseal. Some pealing paint, but mostly just some surface rust. Brake fluid reservoir is dry, so I'm also expecting to find some leaks. Interior is in surprisingly good shape. All the pnumatic tools were included. Engine sounds great. All in all, very minor stuff considering I got it for under $10k!

I had a fiberglasss hood replacement arrive before the truck -- what's the go-to for securing it? I was thinking side latches would make more sense than a lifting hood.

Any suggestions on where to source cylinder seal kits? Fox Machine carries a bunch marketed for the machine, but it looks like it'll run north of $500 go reseal the whole machine. Seems a bit steep!

I got the chainsaw, but the bar is missing. Does that typically get stashed somehwere that I might have overlooked? If not, anyone know the specs for a replacement?

Thanks all!
 

Mullaney

Well-known member
Steel Soldiers Supporter
Supporting Vendor
7,839
20,039
113
Location
Charlotte NC
FNG reporting for duty! I took delivery of my sand FLU419 yesterday. Got it from Ritchie Bros auction with the OD showing just over 1k miles. It was missing a hood, had a broken wheel, and only starts by bridging the starter solenoid. I'm happy to report that I was able to operate all the hydraulics and drive it right off the trailer! The push-button ignition isn't working, and I have two small hydraulic cylinder leaks to reseal. Some pealing paint, but mostly just some surface rust. Brake fluid reservoir is dry, so I'm also expecting to find some leaks. Interior is in surprisingly good shape. All the pnumatic tools were included. Engine sounds great. All in all, very minor stuff considering I got it for under $10k!

I had a fiberglasss hood replacement arrive before the truck -- what's the go-to for securing it? I was thinking side latches would make more sense than a lifting hood.

Any suggestions on where to source cylinder seal kits? Fox Machine carries a bunch marketed for the machine, but it looks like it'll run north of $500 go reseal the whole machine. Seems a bit steep!

I got the chainsaw, but the bar is missing. Does that typically get stashed somehwere that I might have overlooked? If not, anyone know the specs for a replacement?

Thanks all!
.
Wow! Sounds like a pretty decent deal - and ESPECIALLY with the hydraulics functional straight off the trailer. Most of your problems sound like they will be easily fixed.

Congratulations!
 

The FLU farm

Well-known member
Steel Soldiers Supporter
3,357
1,361
113
Location
The actual midwest, NM.
I had a fiberglasss hood replacement arrive before the truck -- what's the go-to for securing it? I was thinking side latches would make more sense than a lifting hood.
Welcome!

If your 'glass hood is like mine you'll need to cut two holes in it to make it lay down all the way. I used PVC caps to cover the holes, siliconed in place.
Put early Jeep "hood latches" on the sides. They're actually meant to hold the windshield when folded down and has a 90 in the end.

Being much lighter, that hood is fairly easy to sneak out from behind the loader, and obviously the external latches are far quicker to work than the OE center setup.
 

Migginsbros

Well-known member
2,272
7,001
113
Location
Berlin-Germany
We got all the seals from fox. Today we rebuild our first hyd. Cylinder ever. We take the dipper cyl..Carefully we get out the rod , supporting the cyl.,leaving the lines connected.The hardest thing was to unscrew the Piston bolt. We had to heat the bolt with the welding torch very hot to brake up loctite. Good to have the hydr. Impact wrench on Board. :cool: The seals fitted, and it looks like it works.20230518_155910.jpg
20230518_161021.jpg
20230518_165717.jpg

20230518_165723.jpg
20230518_192738.jpg
 

Mullaney

Well-known member
Steel Soldiers Supporter
Supporting Vendor
7,839
20,039
113
Location
Charlotte NC
We got all the seals from fox. Today we rebuild our first hyd. Cylinder ever. We take the dipper cyl..Carefully we get out the rod , supporting the cyl.,leaving the lines connected.The hardest thing was to unscrew the Piston bolt. We had to heat the bolt with the welding torch very hot to brake up loctite. Good to have the hydr. Impact wrench on Board. :cool: The seals fitted, and it looks like it works.View attachment 897463
View attachment 897464
View attachment 897465

View attachment 897466
View attachment 897467
.
I definitely wish the Hydraulic Table that we had when I rebuilt cylinders every day was here in my building... Much faster and easier than struggling to do it by hand. Of course I wasn't in that business at the time. Just a technician back then.

Hydraulic Rebuild Repair Table CampbellandKellarTeam.jpg
 

Knobby57

Member
33
64
18
Location
Pa
FNG reporting for duty! I took delivery of my sand FLU419 yesterday. Got it from Ritchie Bros auction with the OD showing just over 1k miles. It was missing a hood, had a broken wheel, and only starts by bridging the starter solenoid. I'm happy to report that I was able to operate all the hydraulics and drive it right off the trailer! The push-button ignition isn't working, and I have two small hydraulic cylinder leaks to reseal. Some pealing paint, but mostly just some surface rust. Brake fluid reservoir is dry, so I'm also expecting to find some leaks. Interior is in surprisingly good shape. All the pnumatic tools were included. Engine sounds great. All in all, very minor stuff considering I got it for under $10k!

I had a fiberglasss hood replacement arrive before the truck -- what's the go-to for securing it? I was thinking side latches would make more sense than a lifting hood.

Any suggestions on where to source cylinder seal kits? Fox Machine carries a bunch marketed for the machine, but it looks like it'll run north of $500 go reseal the whole machine. Seems a bit steep!

I got the chainsaw, but the bar is missing. Does that typically get stashed somehwere that I might have overlooked? If not, anyone know the specs for a replacement?

Thanks all!
I got every seal kit for flu 419 in a kit off eBay for around 450
 

Knobby57

Member
33
64
18
Location
Pa
I actually already have a bore hone for wheel cylinders that I got years ago, which should work. Since there are two separate and opposite bores to hone, I can reach each from different sides of the top cover. I'm optimistic that I can save the part. I'm going to start the process tomorrow afternoon. That thing was in such bad shape, I can't believe it ever worked, but it did. It froze up suddenly while I was driving.
Would you believe I have one of these parts you need sitting in a file cabinet
 

glcaines

Well-known member
3,925
2,650
113
Location
Hiawassee, Georgia
Would you believe I have one of these parts you need sitting in a file cabinet
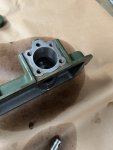
Right now, all I need is the O-rings. I honed the two bores with a wheel cylinder hone and they now look perfect. Fortunately, the piston was in perfect condition and didn't need any help. I ordered new O-rings from EI, but they couldn't find them, although they had them, so they have ordered some new ones from Merecedes in Germany and should be here in a few days. I cleaned up the top and re-painted it with 383.
Painted.jpgHoned Bore.jpg
 

BELinNC

Member
72
91
18
Location
White Oak, NC
Thought I would say Hi to the forum. Back in 2013 I bought a SEE from govtliq. and it was a near perfect example of the breed and it never needed anything other than fluids and filters changed. I worked it pretty hard and had a lot of fun with it too. In 2018 I sold it for a lot more than I paid for it so it was great overall experience except it left me without a unimog. I went on to restore a nice military G wagon so I still had a nice diesel mb to entertain myself with, but it was all play and no work! Recently my wife and I bought a 53 acre ranch with airstrip here in NC-to support my aviation hobby. I found myself thinking how many projects I could achieve if I still had the SEE! As the fates would have it I received an email from someone I was acquainted with back when I was more active on forums with my first SEE. Due to health reasons he was selling his SEE and another Unimog 1300 DOKA crane truck. His SEE had been stranded out in the open at a work site with the backhoe deployed for close to two years when the owner was stricken with some serious ailments. I worked out a deal and am the proud owner of a new to me SEE. The rescue involved several trips across the state to get it started and in position that I could get it on a trailer, but it worked out.
It is a bit of a sad sack compared to my first one (2003 rebuild with 5100 miles and 923 hours), but I enjoy working on such things and will get it sorted out. So far I have put a real nice set of 14.5 Continental MPT81s on it, changed the hi -low shifter bushings, sorted out an air leak in the fuel system, fixed some dents and dings, new oils all throughout, some new hydraulic hoses and had rebuilt one of the front end loader cylinders with one of the backhoe stabilizers badly in need!
Yesterday I was using it do demo an old barn and I lost my clutch while moving a bucket load of wood to my burn pile. Had to start it in gear to get it moved back to the garage. So far I have neglected the brake and clutch system so I just paid for that! The reservoirs for both are empty. I had planned to remove the front end loader soon and get access for some more maintenance, but I guess the SEE beat me to it. I hope it just got air in the system due to no/low fluid. Will use the good info on the forum to make up a pressure bleeder and hopefully get back in operation.
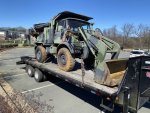
Here is a pic from the trip home after buying it.
 

Attachments

BELinNC

Member
72
91
18
Location
White Oak, NC
I also meant to mention that I took the FOPS roof off of mine because I like the look better and saving some weight and maybe lower center of gravity. If anyone wants one they are welcome to come pick it up.
 

BELinNC

Member
72
91
18
Location
White Oak, NC
I mentioned above I lost the clutch on my SEE as I was trying to stop before dropping a load of wood in my fire pit. Well I confirmed the slave cylinder is kaput and leaking profusely. I understand the slave cylinder can be changed out without tipping the cab, but I have decided to tip the cab since I need to assess and hopefully repair the 4wd actuator as well as the slave - and take a look around at anything else. When I picked up my SEE it was in 4wd and no amount of air ( plenty of pressure) or turning the selector would change its mind . I eventually moved the lever on the transmission back to 2wd via a crow bar.
I ordered the cab tilting brackets from EI, anyone have any hints or tricks on the whole cab tilt process?

By the way I took the loader and backhoe off my SEE -surprisingly no stuck pins or other issues! -so I can study it closer and have good access to everything for maintenance and repair. I discovered the main flexible hose from the pump to the backhoe was chafed through it's outer protective cover and through the outer rubber layer of the hose itself on the top and bottom where it was pinched somewhat where it goes through the rear chassis to the backhoe. Seems like it could not have lasted much longer. Just something to look out for. I think I will have the replacement made a little longer to help route it better.
 

Mullaney

Well-known member
Steel Soldiers Supporter
Supporting Vendor
7,839
20,039
113
Location
Charlotte NC
I mentioned above I lost the clutch on my SEE as I was trying to stop before dropping a load of wood in my fire pit. Well I confirmed the slave cylinder is kaput and leaking profusely. I understand the slave cylinder can be changed out without tipping the cab, but I have decided to tip the cab since I need to assess and hopefully repair the 4wd actuator as well as the slave - and take a look around at anything else. When I picked up my SEE it was in 4wd and no amount of air ( plenty of pressure) or turning the selector would change its mind . I eventually moved the lever on the transmission back to 2wd via a crow bar.
I ordered the cab tilting brackets from EI, anyone have any hints or tricks on the whole cab tilt process?

By the way I took the loader and backhoe off my SEE -surprisingly no stuck pins or other issues! -so I can study it closer and have good access to everything for maintenance and repair. I discovered the main flexible hose from the pump to the backhoe was chafed through it's outer protective cover and through the outer rubber layer of the hose itself on the top and bottom where it was pinched somewhat where it goes through the rear chassis to the backhoe. Seems like it could not have lasted much longer. Just something to look out for. I think I will have the replacement made a little longer to help route it better.
.
I would imagine that there is a section of the TM's that explains the cab tilt process. The thing to do - book or not - is to be sure that you manually block the cab in the raised position. We had one of our members get caught with his head between the cab and the motor. Almost lost him... Safety needs to be considered before you crawl up into the area under the cab.
 

peakbagger

Well-known member
734
360
63
Location
northern nh
I have not lifted my cab yet. I do have list to things that is slowly growing if I do lift the cab.

Check every air component of the air system by removing the air inlet side and cleaning out any debris that have been carried forward through the system. A definitely flaw with the SEE is lack of an air filter on the air system. There was screen in the air pressure regulator on some versions of the regulator but it looks like most of them do not have the screen.

Grease and check the speedometer gearbox that attaches to the transmission and the speedometer cable. Mine appears to be toast (or I have a frozen cable). The gearboxes were somewhat universal for different models and had a spare speedometer cable connection on it. That connection was sealed with a rubber "condom" but on both my SEE and 1300 both "condoms" have rotted away. On the 1300 it definitely let water in and corroded the internals and froze it up additionally damaging the input shaft from the gearbox to the gearbox. I think its easier to get to when the cab is up, I think I would need to pull the fuel tank to get at it without a cab lift

If you have ever messed with the various ball joints in the throttle rods or think someone has, check to the see if the small wire retaining clips are all in place. The linkage works without them most of the time but in extreme use the rod will pop off. Its almost impossible to get those clips back on without the cab and out of the way. EI has or had the clips and I have bag of them waiting. I would take a good look at the accelerator pedal bushing and the arm its attached to, the bushings wear out as they are in the bottom of the footwell and the arm bends impacting the relationship of the wheel that rolls on the curved pad

Definitely order up new plastic bushings for the transmission levers, yes they can be done with the cab down but expect far easier with the cab up.

Unless you are going for a restoration, consider removing the STE/ICE wiring and plumbing. It was added on after the fact to the factory harness and is useless unless you have access to the very rare diagnostic unit. The student handout contains a wiring diagram for this system.

The official MB cab lifting kit has a prop rod designed to mount on existing bolts on the frame and the cab to prevent it from falling down. I expect someone with a welder could make one up pretty quick.

BTW a shout out to one of the Steel Soldier members for reproducing the cab tilt brackets and supplying them to EI.
 
Top
AdBlock Detected

We get it, advertisements are annoying!

Sure, ad-blocking software does a great job at blocking ads, but it also blocks useful features of our website like our supporting vendors. Their ads help keep Steel Soldiers going. Please consider disabling your ad blockers for the site. Thanks!

I've Disabled AdBlock
No Thanks