• Steel Soldiers now has a few new forums, read more about it at: New Munitions Forums!

  • Microsoft MSN, Live, Hotmail, Outlook email users may not be receiving emails. We are working to resolve this issue. Please add support@steelsoldiers.com to your trusted contacts.


goldneagle's M923 recovery and modification thread

goldneagle

Well-known member
4,433
867
113
Location
Slidell, LA
great idea to use up that wasted space....i may borrow this one
Now I need to find a good Military case or box that will fit the open area. I need some thing about 30" to 32" long, about 20" to 24" wide and no more than 10" tall. If anyone has any for sale let me know. Otherwise I may have to fabricate one to fit.
 

goldneagle

Well-known member
4,433
867
113
Location
Slidell, LA
OK today was another nice warm day out so I decided it was a good day for an oil change. It was also a chance to upgrade to the spin-on filter mod. I had already purchased the adapter and filters for the M931 truck, but I am not keeping the truck. So I used it to update the M923 truck. All went well and everything fit as it should. Decided to change the transmission filter as well. Still waiting for the thermal sensor to arrive.

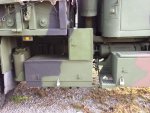
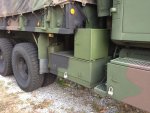
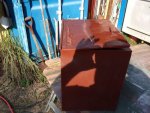
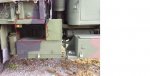
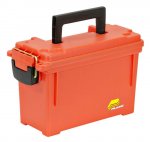
Since I moved the Jerry Can holder to the side of the tool box I have been thinking of what kind of tool box or boxes to put on top of the existing tool box. One part of the space in under the truck bed, but the rest has more height clearance available. I measured the tool box on the 5 ton tractor. If I shorten the length of the box it will fit in the area in front of the muffler. It would allow me to store taller items in that tool box. In the remaining space under the truck bed I have 2 options. 1-Fabricate a custom metal tool box. 2-Use a waterproof shipping case that can be removed from that location. (I would fabricate some type of locking mechanism) I will probably start on the project in the morning.
 

Danger Ranger

New member
2,253
23
0
Location
Roland, IA
I would look at ammo cases for your space. I don't know the measurements, but you may be able to find one and put it on its side or something. You could bolt it down and with sealing, you would not have to worry about water. Plus the ammo cans are lockable. Just a thought.
Good job on everything so far!
 

commandojeff

New member
241
1
0
Location
St. Louis, Missouri
My dad used two .50 cal ammo cans to make a toolbox for the step of his WC51. It looks very nice. Basically he took one can and took the lid off. Got the second can, cut the floor out of it. Then he welded the one with no floor onto the top of the one with no lid. He bolted it to the step and bingo. It looks from the outside like there is two ammo cans stacked on top of each other sitting on the step. When you open the lid on the top one you can see that it is basically a deep ammo can. He went with this to keep the truck looking original for our reenactments.

Maybe you can get 4-6 cans and set them side by side to fill your space. I'm not sure how the lid would work. You would have to get creative. It would look pretty sweet. Like a bunch of ammo cans sitting on top of your toolbox. Just throwing the idea out there...

I will try to get some pics for you or anyone else interested in the idea.
 

goldneagle

Well-known member
4,433
867
113
Location
Slidell, LA
New day new project! I went over to my friend Allen's place and removed the 2nd M818 tool box from my M931 truck. After measuring I started cutting the tool box shorter. The new dimensions are 12" wide 16" deep and 16" high. I cut some angle from the passenger seat back frame to make up the front face of the tool box. Then I cut the original door with the hinge from the tool box leftover. Once I straightened it out and weld repaired the hinge I welded it to the new tool box. This time the hinge will be on the right side of the box.

I had to cut the door and add a strip of sheet-metal in the middle to make it wider. I wanted a wider opening to the tool box than the original box had. It was a lot of work to weld the pieces of sheet-metal to widen the door. Had to deal with warping and twisting of the door. I got it close to what I wanted but I will need to do some additional work on the door and reinforce it over the welds. I had to stop since it was getting dark out. Since I have to do the work outdoors. Will probably need a little BONDO to make the door look smooth. I took some pictures of the progress. First picture is of the leftover piece of the box after cutting:

Cut-Off_1.jpg

Here are progress pictures:

Tool_box_1.jpgTool_box_1a.jpgTool_box_1b.jpgTool_box_1c.jpgTool_box_1d.jpg
 

goldneagle

Well-known member
4,433
867
113
Location
Slidell, LA
Today mission accomplished! I got the box done and installed. First thing this morning I went to Advance Auto and got a small can of BONDO Filler and applicator. Then I went to Home Depot and got some Acid Etching Primer and red primer.

Once I got home I set up the welder and other equipment and went to work on the box. I cut some narrow C-channel to reinforce the door. Once I cut and welded the reinforcement to the door i cleaned up the welds. I cut the padlock receiver from the leftover box piece. Had to remove the sheet-metal that was welded to it. I lined it up with the grove that is cut in the lid and welded it tot he edge of the tool box. I cleaned up the welds and started to prime the tool box.

My friend Billy came over to help apply the BONDO to the door. After applying the BONDO and letting it dry I started to sand it smooth. I have a really good DA sander that i used to smooth out the BONDO. Once i got the BONDO sanding done I finished priming the box. Once dry I applied 2 coats of Gillespie paint.

While the paint was drying i cut some pieces of scrap Horse Stall mats to use as spacers between the 2 boxes. Without the spacer you cannot open the door on the top box. I marked and drilled 2 holes in each of the rubber strips for the bolts to pass through. I applied some RTV Silicone to the bottom of the 2 strips and installed them over the holes drilled into the bottom box. I made sure the holes lined up.

Once the paint dried i installed the box on top of the rubber spacers with four 3/8" bolts. I sprayed some touch up paint to blend the box into the truck paint scheme.
 

Attachments

238
0
16
Location
Las cruces nm
Tomarrow I plan to start my work with putting the condensor and drier in. If all goes well I will take the old heater unit out and try to install the heater a/c box. I will need someone to help me with the compressor being mounted since I stink at metal work so that will probably be one of the last things I do.

The unit looks great, i finally looked at everything and all looks good!
 

goldneagle

Well-known member
4,433
867
113
Location
Slidell, LA
That looks great! So what are you gonna put here?
I have a tool box on my M109 that is almost the perfect size for it. It will need to be slightly cut shorter and I may put a different door on it

M820A2_Modified_1k.jpg

I don't like the lid on the box because it leaks all the time. I may fabricate 2 facing doors instead.
 
Last edited:

commandojeff

New member
241
1
0
Location
St. Louis, Missouri
That looks great! So what are you gonna put here?
I'd be careful mounting anything under there. Wouldn't want it to be right up against the bottom of the bed anyway. When your bed flexes off road it could smash whatever box you have under there. I was looking at the way GE has it setup right now. Looks like the tie down pocket for the bed might get the edge of his box... There is a reason they left room there, otherwise they would have made the large toolbox high enough to touch the bottom of the bed.
 

goldneagle

Well-known member
4,433
867
113
Location
Slidell, LA
I'd be careful mounting anything under there. Wouldn't want it to be right up against the bottom of the bed anyway. When your bed flexes off road it could smash whatever box you have under there. I was looking at the way GE has it setup right now. Looks like the tie down pocket for the bed might get the edge of his box... There is a reason they left room there, otherwise they would have made the large toolbox high enough to touch the bottom of the bed.
Those main box supports are pretty flexible. You can actually feel the box go down if you push on it. It the bed pressed against the box it would flex down on the support brackets. Think about how close the top of the fuel tanks are to the truck beds. I think the space was left above the tool box so you can get the bows stored under there. You need room to strap them in.

I am not planning on taking the truck off-road on the trials at GA Rally. It will see mostly highway use. I rather have the extra storage space than flexibility in severe off-road use.

I will keep you comment in mind before I make a final decision on what to install under the truck bed. Maybe I will just put a removable water-proof tool case.

I appreciate you bringing it to my attention.
 
Last edited:

commandojeff

New member
241
1
0
Location
St. Louis, Missouri
That is true GE. Even if it did go down, it wouldn't be very much travel to worry about. I forgot that the struts the boxes are attached to are pretty forgiving. I was throwing the idea out there to keep in mind. I don't think any kind of "realistic" off roading we would do with the truck could cause it to flex that much.

I would like to mount some kind of large box in the front part of the bed. Would be nice to be able to lock up large items when at events.
 

goldneagle

Well-known member
4,433
867
113
Location
Slidell, LA
That is true GE. Even if it did go down, it wouldn't be very much travel to worry about. I forgot that the struts the boxes are attached to are pretty forgiving. I was throwing the idea out there to keep in mind. I don't think any kind of "realistic" off roading we would do with the truck could cause it to flex that much.

I would like to mount some kind of large box in the front part of the bed. Would be nice to be able to lock up large items when at events.
Get a gang box. Used in the construction trade to store tools on the job site. They come in many sizes. I have a small one in the back of the Deuce. I may move it over to the M923.
 

goldneagle

Well-known member
4,433
867
113
Location
Slidell, LA
Great work! If you ever get bored and want to come to Arkansas and work on my truck, come on up.
Thank you for the compliment. Would love to make some extra cash on some of the mods. If you want to bring the truck down we might be able to do some work.
 

goldneagle

Well-known member
4,433
867
113
Location
Slidell, LA
It was kinda wet out today so I couldn't do a lot on the truck. I was curious what kind of tool cases i could put inside the new tool box. Storing bottles of fluid in there would be a waste of cubic feet of space. I tried some containers I already had in stock. Noting I had fit without a lot of wasted space. I went on Ebay to look at ammo boxes. They were way to pricy! I looked up ammo boxes on Google and ran into a Plano ammo box. Measurements 11.625 x 5.125 x 7.125 inch. Since the box dimensions are 12" wide by 16" long by 16" deep I should be able to fit 4 of them stacked 2 high. I found them for a good price but were out of stock. Finally found them cheap on Amazon. The were available in green and safety orange. Well the safety orange ones were about half the price. So I bought all 5 they had in stock for $7.13 each with free shipping. Plano 1312 Dry Storage Emergency Marine Box, Orange They will be inside the tool box so color is not important. Also they will be easier to spot -so I don't run them over.
 

Attachments

goldneagle

Well-known member
4,433
867
113
Location
Slidell, LA
Had an oil leak from the new oil filter adapter I just installed last week. Saw it the following morning, but could not look into it due to rain every day since. Finally had a chance to work on it Thursday. I put an oil pan under the truck to catch the oil from the filter. Unscrewed the filter. Unbolted the filter adapter. Found gasket twisted out of place but undamaged. I was looking at the adapter and the gasket trying to figure out why it was not sitting correctly. Well some dummy (me) forgot to remove the original gasket that sealed the canister to the filter housing! It blended in so well I almost missed it again! Once I removed the old gasket I installed the undamaged new one and rebolted the adapter into place. 25 to 35 foot pounds on the torque wrench is recommended. I decided to install a new oil filter since the other one was all oily from removal. I put if face down in the bucket to drain. I will clean it off later for reuse. Has no miles on it.

I did a quick test by running the engine and saw no leak. I added 3 quarts of oil until the dipstick showed it was full.

Next I decided to replace the temperature sensor on the engine since it was defective. Applied Teflon tape to the new sensor. unplugged the wire from the old unit and removed it with a box end wrench. I used my thump to keep the coolant from pouring out. Only lost about a cup full. Then i inserted the new sensor (lost another cup full) and tightened it in. Reconnected the wire. I topped off the coolant reservoir. Then i ran t he engine looking at the gauge to see if the unit functioned properly. I also checked for any oil leak. After running about 1/2 hour the temp was 150 degrees approximately.

Drove to Walmart and bought some engine de-greaser. Used 2 cans to clean up the oily mess from the leak. Washed off as instructed. Looked a lot better! Will take the truck for a test drive Friday.
 
Top
AdBlock Detected

We get it, advertisements are annoying!

Sure, ad-blocking software does a great job at blocking ads, but it also blocks useful features of our website like our supporting vendors. Their ads help keep Steel Soldiers going. Please consider disabling your ad blockers for the site. Thanks!

I've Disabled AdBlock
No Thanks