• Steel Soldiers now has a few new forums, read more about it at: New Munitions Forums!

  • Microsoft MSN, Live, Hotmail, Outlook email users may not be receiving emails. We are working to resolve this issue. Please add support@steelsoldiers.com to your trusted contacts.


HanksDeuce: 8" Lift, Bobbed, External Cage, A/C and more Project!

HanksDeuce

Well-known member
1,080
238
63
Location
Prairieville, LA
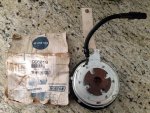
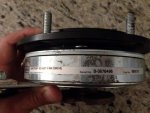
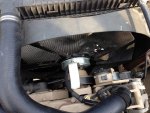
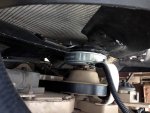
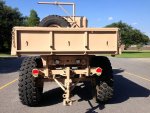
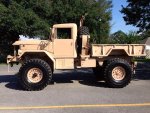
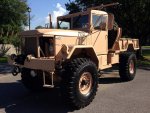
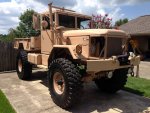
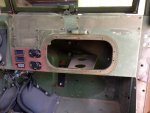
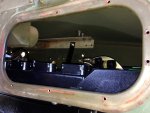
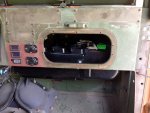
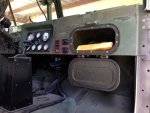
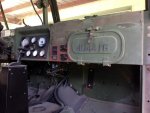
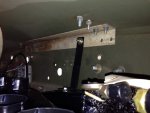
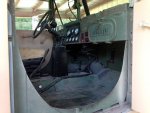
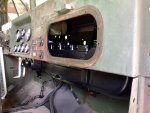
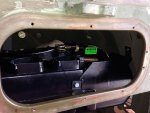
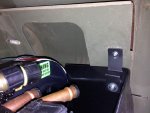
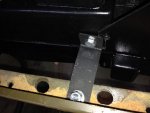
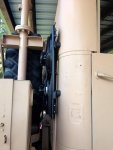
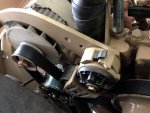
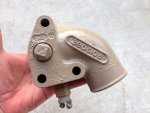
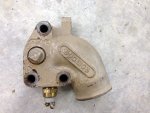
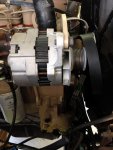
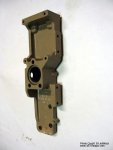
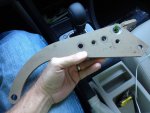
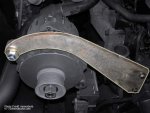
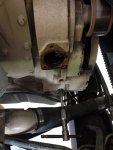
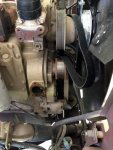
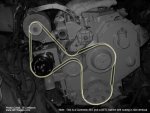
Today I finally fixed my air system pressure issue. After several calls to Cummins, Haldex, and a few others followed by disconnecting this and re-testing that I decided to throw some money at the problem. I drove down to the local Truck Pro and bought a replacement governor for my Holset QE296B gear driven air compressor. I plugged the necessary ports and installed the governor. After I reconnected the sensing line from the factory deuce air tanks I fired the deuce up. A few minutes later I'm up to 125psi (cut out pressure). The air system had been giving me fits since the engine was swapped by only pumping up to 75psi. I always figured it was something to do with the governor because I ditched the air dryer setup from the donor Bus that I took the engine/tranny out of.

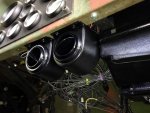
Now where did I put that train horn...
 

HanksDeuce

Well-known member
1,080
238
63
Location
Prairieville, LA
So just after passing 47,000 miles on the Cummins 6BT the factory Horton 12 volt electric fan clutch rear bearing decided to start coming apart. A pre-trip inspection caught the little bugger. I was standing on top of the valve covers and when I grabbed the fan and gave it a spin I noticed the "extra" play in the clutch housing.

I called several Horton distributors and the fan clutch price varied from $600 to $800. Yowza! On a stroke of luck I found a NOS clutch on Ebay for $80 shipped. After a few days of sweating I opened the box thinking it would be dirty magazines from Mexico or a box rocks, but low and behold a NOS Horton EC450 12 volt fan clutch was in there! A few hours later and we are back in business.
 

Attachments

HanksDeuce

Well-known member
1,080
238
63
Location
Prairieville, LA
Well I've been hitting a few local car shows here and there. Attached are a few shots of my handy work after cleaning the tire sidewalls with Bleche-Wite and then Armor All Extreme gel. It took an hour for 4 tires (no I didn't do the spare). My spare tire is now flat so I reached out to Erik's surplus for a new 20" o-ring and valve stem grommet (should be in this week).

I have been overwhelmed with the excitement that this truck generates at a car show. You would think that there would be one nut job to come up and preach about the environment or baby seals, but nobody has hit me with that yet. I guess the car shows I go to typically have 440 Cudas and other untuned muscle cars that get 3-4 mpg. The shear amount of veterans that I have had the opportunity to meet and shake hands with makes this hobby worthwhile. I make sure and thank each of them for their service. I've met veterans from Vietnam, Korea, Iraq, and Afghanistan. The oldest person I met was 83 years old and he was part of the Confederate (Commemorative?) Air Force. He mentioned a story about getting together with a group of vets and purchasing a Grumman F8F Bearcat and then later selling his share of the plane for $1,750. I think the plane now is worth millions. Amazing stories follow this truck around to each show. I can't wait for the next story!

New mods:
- Grote 24v Trilliant Cube LED Work Lamp 63F51 (back-up lights)
- Cummins badge for each engine side cover
 

Attachments

Another Ahab

Well-known member
17,825
4,157
113
Location
Alexandria, VA
Well I've been hitting a few local car shows here and there. Attached are a few shots of my handy work after cleaning the tire sidewalls with Bleche-Wite and then Armor All Extreme gel. It took an hour for 4 tires (no I didn't do the spare). My spare tire is now flat so I reached out to Erik's surplus for a new 20" o-ring and valve stem grommet (should be in this week).
Your rig looks super sharp, HanksDeuce; nice work. :beer:


rig.jpg
 
Last edited:

HanksDeuce

Well-known member
1,080
238
63
Location
Prairieville, LA
Ordered 90% of my air conditioning system today. Vintage Auto Air Conditioning had the best deals of any Vintage Air dealer on the internet. Gary was very knowledgeable and helped me choose the right components for putting a/c, heat, and defrost in my bobbed deuce. I ran out of time to order the compressor and alternator brackets for the Cummins 6BT engine since some companies close before 5pm. :roll: Most of the parts should be in next weekend to start the install. Once the A/C system is mocked up in the cab I will take it out and coat the interior of the cab with Lizard Skin (both sound deadening and thermal insulation).

The A/C system consists of the following components:

- Vintage Air Gen II Super system with a/c, heat, and defrost [61005-VUZ-A]
- Gen II 4 knob underdash control pod [49200-RHA]
- (4) Underdash round black louvers (vents) [49354-VUL]
- 26" x 27" Parallel Flow Condenser [TBI custom]
- (2) 14" SPAL puller fans (1623cfm each) [32141-SHF]
- (2) 180 degree duct adapter for center vents [605004-VUA]
- Custom hose kit with hoses to mount condenser behind Deuce cab [A1WOTS-XL]
- Binary switch with harness [SS0602]
- Dryer [included with hose kit]

I purchased the compressor directly from Sanden because Vintage Auto A/C didn't sell that particular model.
- Sanden 4474 compressor

The following Cummins parts need to be purchased next week for mounting the compressor on the 6BT engine:
- 3930888 Water Inlet Housing / Compressor Mount
- 3906697 Square cut water inlet gasket
- 3930820 Lower Alternator Mount
- 3920862 Upper Alternator Mount
- 3903103 Lower Water Inlet [Edited 09/09/15 to correct this part number for my final setup.]
- 080720 Serpentine Belt
 

Attachments

Last edited:

Another Ahab

Well-known member
17,825
4,157
113
Location
Alexandria, VA
Ordered 90% of my air conditioning system today.
That is one excellent post, and almost completely all-inclusive for an A/C set-up.

I'm not sure if it's easily searched (being post #408 of your thread), but I hope it is.

Because there appears to be a WHOLE lot of useful in it for anybody who might want to go this route for A/C.

You Da Man, HanksDeuce. :driver:
 

HanksDeuce

Well-known member
1,080
238
63
Location
Prairieville, LA
Holy Cow! I can't believe how well the Vintage Air Gen II Super system fits under the deuce dash. It's like it was made for it. I was able to slightly modify the 3 factory brackets for the Evaporator box, and I only needed one piece of scrap aluminum angle as an attachment point. No new holes were drilled in my cowl. I think my deuce may be different than others, however, because the hole in the middle of the cowl that caught the left side of the aluminum brace was for my windshield washer nozzle. I removed the windshield spray system, but I kept the nozzle in the cowl.

Notes:
- Remove Glovebox
- Remove Glovebox brace
- Install aluminum brace from windshield washer nozzle to right side hood hinge bracket
 

Attachments

HanksDeuce

Well-known member
1,080
238
63
Location
Prairieville, LA
More A/C install notes:

- Cut longest factory Vintage Air Evaporator bracket into 2 pieces that are 2-3/4" long. These are used for the front dash brackets.
- Use 3rd factory Vintage Air bracket on right side of Evaporator removable piece by fan to hold up heavier end of Evaporator
- Installed 2 of the 4 underdash louvers so far. No room for in-dash louvers.
- Waiting on A/C compressor brackets, A/C hoses, and Condenser...

Note: The factory deuce glove box will be shortened to only a few inches deep. This will be enough for insurance/registration and a few firearms.
 

Attachments

DHennon

Member
Steel Soldiers Supporter
364
16
18
Location
Orlando, Fl
Hank,

Great job! Wait till you get it working. You won't ever get out of the truck! I can't set mine on high or it will freeze you out! Can't be without A/C in Florida!

Dave
 

HanksDeuce

Well-known member
1,080
238
63
Location
Prairieville, LA
More A/C install updates...

- Mounted the Condenser on the back of the cab with McMaster-Carr rubber isolators
- Mounted the 2 SPAL 14" puller fans (40A, 12 volt, 1623 cfm each)
- Wired the fans and tested them. Wow!
 

Attachments

HanksDeuce

Well-known member
1,080
238
63
Location
Prairieville, LA
More A/C install updates...

- Mounted the Cummins High Mount A/C bracket to my engine
- Installed the same alternator I've been using on my Cummins engine
- Installed the Sanden 4474 compressor inside the high mount A/C bracket
- Modified the upper alternator bracket to become the tensioner bracket
- Installed longer Cummins OEM belt
- Started running hoses!
 

Attachments

Another Ahab

Well-known member
17,825
4,157
113
Location
Alexandria, VA
More A/C install updates...

- Mounted the Condenser on the back of the cab with McMaster-Carr rubber isolators
- Mounted the 2 SPAL 14" puller fans (40A, 12 volt, 1623 cfm each)
- Wired the fans and tested them. Wow!
No kidding, HanksDeuce, that is VERY slick. That's a nice installation you got going there. A+
 

HanksDeuce

Well-known member
1,080
238
63
Location
Prairieville, LA
Gutted the interior today. Man what a lot of work removing the air system and both 12v/24v electrical fuse panels, relays and breakers. Lizard skin sound control followed by insulation coating go in next weekend.

I found a 24v on delay relay that I will use to delay the start-up of the 12v auxiliary fuse panel for 5 seconds by connecting it to the coil side of the Ametek relay that powers that 12v fuse panel. This will protect the batteries until the engine is started and the 24v alternator is spinning and putting out power. The Vanner equalizer will then do its job of balancing the 12v load of the SPAL fans and A/C blower.

I got all of the A/C lines cut to length and the fittings were clocked and marked with a sharpie. I brought them down to a local A/C shop and he crimped them all.

Once the lizard skin coatings cure I will reinstall the A/C evaporator, connect the hoses, pull a vacuum, fill the system with freon and get blasted with cold air!
 

Another Ahab

Well-known member
17,825
4,157
113
Location
Alexandria, VA
I found a 24v on delay relay that I will use to delay the start-up of the 12v auxiliary fuse panel for 5 seconds by connecting it to the coil side of the Ametek relay that powers that 12v fuse panel. This will protect the batteries until the engine is started and the 24v alternator is spinning and putting out power. The Vanner equalizer will then do its job of balancing the 12v load of the SPAL fans and A/C blower.
It sounds like you "know your stuff" HanksDeuce. Are you maybe an electrical engineer, or something?
 
Top
AdBlock Detected

We get it, advertisements are annoying!

Sure, ad-blocking software does a great job at blocking ads, but it also blocks useful features of our website like our supporting vendors. Their ads help keep Steel Soldiers going. Please consider disabling your ad blockers for the site. Thanks!

I've Disabled AdBlock
No Thanks